
In February 2020, there will be an online community event promoting well managed Azure tenants.
Check out – https://www.azurespringclean.com for all the details!
#AzureSpringClean

In February 2020, there will be an online community event promoting well managed Azure tenants.
Check out – https://www.azurespringclean.com for all the details!
#AzureSpringClean
At Ignite 2019, Microsoft announced a new service; Azure Arc. It allows you to extend the capabilities of Azure to your on-prem environment, multi-cloud and edge. At launch, it’s only Azure Arc for Servers, but there will also be an option for data services at a later date. Everything is in public preview for now, so careful with those production environments!

The basic concept is that with Azure Arc you can manage machines which are outside of Azure. Once connected, a non-Azure VM becomes a Connected Machine resource in Azure. Connected Machines have a Resource ID, and are manageable using the normally supported components such as Policy and Tags.
To register a Connected Machine, an agent needs to be installed on each local VM. The currently supported OS’ are 2012R2 or newer and Ubuntu 16.04 and 18.04. As Connected Machines are an Azure resource, normal resource limits apply (800 resources per RG etc).
The agent has some network requirements, documented here. For onboarding the agent is combined with a script. This process can be done via the Portal or Powershell. Recommendation here would be to follow the option to create a Service Principal if you need to onboard machines at scale.
You will also need to enable a couple of new resource providers in your Azure subcription:
Once you have a VM present in Azure as a Connected Machine, you can start managing it, but only using the following services at this time of the preview:
So for now, the service is quite limited. But you can assume that many more features are on the roadmap. The end goal of Azure Arc is to give you a single tool set to manage all your servers and data services regardless of where they are provisioned. So whether you’re a small company with a hybrid footprint, or an MSP, Azure Arc could make your life a lot easier. One to keep an eye on for GA in 2020!
If you’ve read any of my blog posts regarding networking in Azure, you might have guessed it’s one of my favourite topics. For ITops, it’s one of the shifts in thinking required to make a change to cloud. As software-defined-networking is one of the core concepts required for a successful cloud implementation, it’s no surprise that the security of that networking is a close second.
Looking at it as simply as possible, good network security means allowing only required traffic and preventing everything else while logging what is useful for auditing. Azure offers several integrated services that can help achieve this.
With that in mind, there are three major scenarios to deal with when it comes to Azure networking:
I will reference each as we cover the different best practises available.
Good network access control requires layering. In Azure, the most common networking concept is a vnet. A vnet does not, by default, get access to another vnet. However, within a vnet, every subnet, by default, has access to each other. So, the subnet layer is most likely where you will need to address access control. In Azure this can be done in two, free, simple ways. Custom Route Tables and/or Network Security Groups.
Custom Route Tables are exactly as they sound. They modify the system route table using routes you specify. If your route matches a system route, it will take preference, user defined routes always do. Similarly the lowest prefix match will always win. More on route tables here. CRTs are applied at subnet level and can quickly manipulate network traffic for your entire vnet. For example, preventing internet access by dropping traffic to 0.0.0.0/0.
Network Security Groups are a little bit more complex in application, but their concept is straight forward. They are an ACL for your network. They can be applied at subnet or network interface level. While NSGs allow you to create complex and granular rules quite simply, managing them at scale can be a challenge. More on them here.
While the above allows for control of the network from a routing and access perspective, you may also need to control traffic by inspection and filtering. Within Azure, there are two main options for this; Azure Firewall or a 3rd party NVA.
Azure Firewall was released last year and is a stateful, firewall-as-a-service resource. It offers HA and scalability, however, it’s still a young product and therefore light on traditional network security options. More on it here.
Thankfully, Azure and network appliance vendors have been working better together recently. Most solutions you would expect are available in the Marketplace. The common gripe is that documentation can be light if not bad. However, if you need continuity with your local site, or a specific feature well then they are your best choice. My advice is to reach out to the Azure community if you are having issues, generally someone will have had the same issue and can help!
It’s best to start with some basic architecture decisions relative to your Azure perimeter.
Once the above are answered, you have a couple of well documented implementation options. They all operate on the same premise of layering. This allows for segregation of traffic most commonly with a firewall aspect. This combined with UDR can lead to a well designed and secure environment allowing only the network access required. Therefore layering everything that has been discussed already.
In Azure, there are two major tools to help you with this:
Network Watcher is one of my favourite tools in Azure. Within a couple of minutes, you can gain granular insights into your complex network issues with minimal effort. You can also integrate the output to other Azure services like Monitor and Functions to react to alerts and capture traffic automatically (*notes to self* must blog that).
Security Center, as it does for other infrastructure, offers insights into your network topology and can provide actionable recommendations at scale. Meaning you have a single pane to sanity check your network, regardless of how complex it may be.
If you take the time to understand and implement the above, you’re well on your way to having a secure networking environment. However, every single environment and workload should be treated as unique. The best network security is constantly auditing and reassessing itself. Be proactive to avoid having to be reactive!
As always, get in touch with any questions or to chat about your go-to network security steps.
In my opinion, one of the most interesting services to be launched this year by Microsoft was Windows Virtual Desktop (WVD). If you aren’t sure what WVD is exactly, I wrote some initial thoughts on the service here and here earlier this year. Right at the end of September, the service went GA so here is a guide on how to successfully deploy your first WVD.
So first, the things you need to start:
Next, you need to understand the components of WVD that you will deploy:
Now it’s time to start configuration and deployment. First, you need to grant WVD access to your Azure AD, you should read the full instructions on doing this and be sure you understand the required permissions and that they are OK within your Governance strategy. You accept two sets of permissions, a server app and a client app.
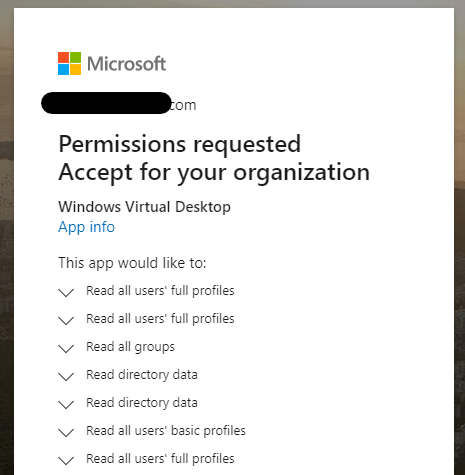
Once the permissions are accepted, you will see two new enterprise applications created in your tenant.

This is the step I have seen most people stumble on, you need to assign the TenantCreator role to a user within the Windows Virtual Desktop app. It must be a user from that AAD instance. It cannot be a group or a service principal. If you’re using AADDS, my advice is to assign the role to a user who also is a member of AAD DC Administrators. You can then use the same account for your whole deployment.
Now we move onto some Powershell configuration for your WVD tenant. You’ll need to install the module first. Then a couple of commands later has a tenant created for you. Note the tenant name must be globally unique. Also the Add-RdsAccount cmdlet requires login, ensure you use the account that was assigned the TenantCreator role in the previous step.

Now you need to create a Service Principal for use with WVD. This is made simpler with the detailed instructions at the link. Pay special attention to the fact you cannot retrieve the password at a later time, make note of it securely! Complete all of the steps in a single powershell session to avoid any headaches. When the role is assigned, and you’ve signed in as the Service Principal, simply run the following cmdlet to confirm access:
Get-RdsTenantNow we move onto deploying resources. You can deploy your first host pool via the Marketplace. When running through the basics, if you’re using AADDS, ensure you choose the same location for deployment or domain join will fail. Fill in your requirements, I went quite light for mine, single server, shared pool, just one user with access.
When that completes, you will have access to a desktop from the default group. I’m going to change things up a bit and give access to an app group and some basic apps. Full commands required are here and easy to follow. Just remember a user can’t be part of both an app group and desktop group for the same pool.
Once deployed, you can access your resources via browser or the client. I like to test via the browser as it’s quick and simple. But I’ve found it’s an odd URL to find so here it is – https://rdweb.wvd.microsoft.com/webclient – and we can see I have access to my resources!

Next, I want to add my final piece of customisation for this post. FSLogix profiles via Azure Files. There is a straight forward guide to setting up a share on a server here and it works great but who wants to manage a server?
There is a nice comparison table for pros/cons here
| Features | Azure Files | Azure NetApp Files | Storage Spaces Direct |
|---|---|---|---|
| Platform service | Yes, Azure-native solution | Yes, Azure-native solution | No, self-managed |
| Regional availability | All regions | Select regions | All regions |
| Redundancy | Locally redundant/zone-redundant/geo-redundant | Locally redundant | Locally redundant/zone-redundant/geo-redundant |
| Tiers and performance | Standard Premium Up to max 100k IOPS per share with 5 GBps per share at about 3 ms latency | Standard Premium Ultra Up to 320k (16K) IOPS with 4.5 GBps per volume at about 1 ms latency | Standard HDD: up to 500 IOPS per-disk limits Standard SSD: up to 4k IOPS per-disk limits Premium SSD: up to 20k IOPS per-disk limits We recommend Premium disks for Storage Spaces Direct |
| Capacity | 100 TiB per share | 100 TiB per volume, up to 12.5 PiB per subscription | Maximum 32 TiB per disk |
| Required infrastructure | Minimum share size 1 GiB | Minimum capacity pool 4 TiB, min volume size 100 GiB | Two VMs on Azure IaaS (+ Cloud Witness) or at least three VMs without and costs for disks |
| Protocols | SMB 2.1/3. and REST | NFSv3, NFSv4.1 (preview), SMB 3.x/2.x | NFSv3, NFSv4.1, SMB 3.1 |
Now the official doc site doesn’t include a tutorial and there are quite a few steps to configure initially, but thankfully the different sections have been put into a single post by Stefan Georgiev over on the tech community site. I’ve ran through the entire thing and it works exactly as expected.

There is so much more to explore with WVD. I’m going to use this post as a starting point and build from here with more complex configuration as I go. If there is anything you’d like to see, please get in touch!
If you’ve worked with Azure for a while, you would know that one of the most efficient methods of deployment is ARM templates and one of the most powerful services is Azure Policy. What you might not know, is that you can combine the two for efficient, iterative and defined deployments.
A great point I saw recently on Twitter was that a lot of technical posts highlight features and how to use them but rarely go into why you should use them. Conscious of that, here are a couple of points on why I think you should make use of Policy via Template (PvT):
So if the “why” makes sense to you, let’s move onto the “how”. If it doesn’t, let me know! I’d love to hear your horror stories/use cases…
Templates can be deployed in several ways, for the sake of simplicity, I’m going to use two tools here. Visual Studio Code and Powershell. Currently you can only deploy subscription scope resources via Powershell or CLI.
There are some other differences to note. The schema for the template must be:
https://schema.management.azure.com/schemas/2018-05-01/subscriptionDeploymentTemplate.json#
When deploying the template, it must be deployed to a location and given a name (the name of the template will be used if none is specified), that combination is then immutable for that location. So if you need to change location, you need to use a new name etc.
Now, let’s create our template. For this post, I am going to use an existing Template Definition and scope it to my Subscription. While you can pass the Template Parameters via Powershell Variable, for this post I am going to define them as a Template Variable. This is tricky piece of logic as they must be defined as a nested, object array. I also define the policyID via Variable. For existing definitions, you can get this via the Portal, or Powershell command
Get-AzPolicyDefinition | select PolicyDefinitionId -ExpandProperty properties | where displayName -Match "allowed locations"{
"$schema": "https://schema.management.azure.com/schemas/2018-05-01/subscriptionDeploymentTemplate.json#",
"contentVersion": "1.0.0.0",
"parameters": {},
"variables": {
"policyName":"Allowed Locations",
"policyDefinitionID":"/providers/Microsoft.Authorization/policyDefinitions/e56962a6-4747-49cd-b67b-bf8b01975c4c",
"policyParameters":{
"listOfAllowedLocations":{
"value":["NorthEurope","WestEurope"]}}
},
"resources": [
{
"type": "Microsoft.Authorization/policyAssignments",
"name": "[variables('policyName')]",
"apiVersion": "2018-03-01",
"properties": {
"scope": "[subscription().id]",
"policyDefinitionId": "[variables('policyDefinitionID')]",
"parameters": "[variables('policyParameters')]"
}
}
]
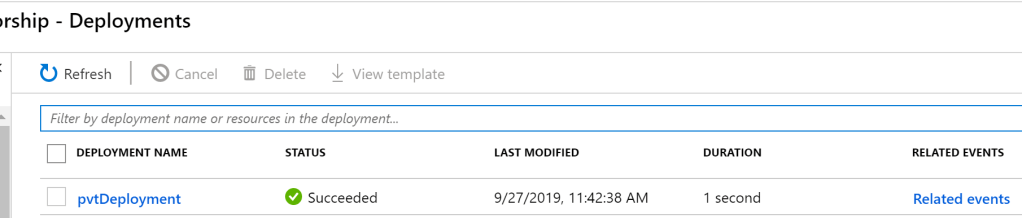
}Now are Policy deployment is defined and ready for use, we deploy using Powershell:
New-AzDeployment -Name "pvtDeployment" -Location northeurope -TemplateFile 'C:\Users\username\Documents\WDA\PvT.json'You should receive a succeeded message within your shell and you can verify via the Portal. As it was a subscription level deployment, head to your Subscription blade and check the Deployments tab. You should see the Template listed as the same name as you ran for the deployment.
You can then confirm your settings via heading to Azure Policy and the Assignments blade. You will see your Policy Definition assigned at the scope you set, using the Parameters you set.
Just to go back to an early point on why you’d use this option. Look at the duration of the deployment in the above screengrab – 1 second. You simply cannot beat that!
This can obviously be used for much more complex deployments, for example, defining your own policy inline and deploying via template. The possibilities are endless with one current exception; Subscription is highest scope you can currently use, hopefully Management Groups are on the roadmap and therefore the scaling capability is excellent.
As always, if there are any questions or suggestions, please get in touch!
