Introduction
It’s great to be back for another year of the Festive Tech Calendar. Always an excellent event across the month of December, and looking through the schedule, it is an amazing year of content. Kudos to the team for all the work they put in, and thanks for having me again!
This year, I’m continuing my AI adoption theme, but expanding it slightly beyond the scope of Azure, and taking a bit of a ‘business via tech’ approach. This is for a couple of reasons; first, I think AI has changed in the last 12 months, and second, I think the way everyone approaches it also has. This might seem simple, but in reality, or in practice for an IT decision maker – it really isn’t. So, I thought I would share some learnings from where I have seen things work well and work not so well!
AI Opinion
This of course all starts with AI. If you don’t know what that is, I would be slightly worried as to how you found yourself reading this… but AI isn’t just one thing anymore, and to be honest, it never was to begin with.
The GPT models have become the Google of search engine colloquialism for common users – ‘just ask ChatGPT’ etc. This is great for awareness, but also no doubt frustrating for the teams creating Copilot, Gemini etc. Even more frustrating for the teams responsible for the original Azure AI Services (Cognitive Services – remember that!?). That brings me onto my next point, and one of the key challenges with AI adoption I have seen – AI isn’t just generative and the perception gap that opens up.
AI ‘Types’ I Think are Relevant
For most users, working with an AI assistant of some sort, is the majority of AI interaction they will have. So general and/or company based knowledge helping users find or create content that assists with work. I genuinely haven’t seen any work setting where stupid images etc are being created, so don’t believe the hype or prevalence of that based on social media.
Next, a subset of your user base may use more tuned AI assistance. Think Github Copilot as the example here. Chat based, powerful and specific AI based assistance. This is often seen as a more impactful ‘upgrade’ to a user/teams skillset, but much less clearer in terms of adoption requirements.
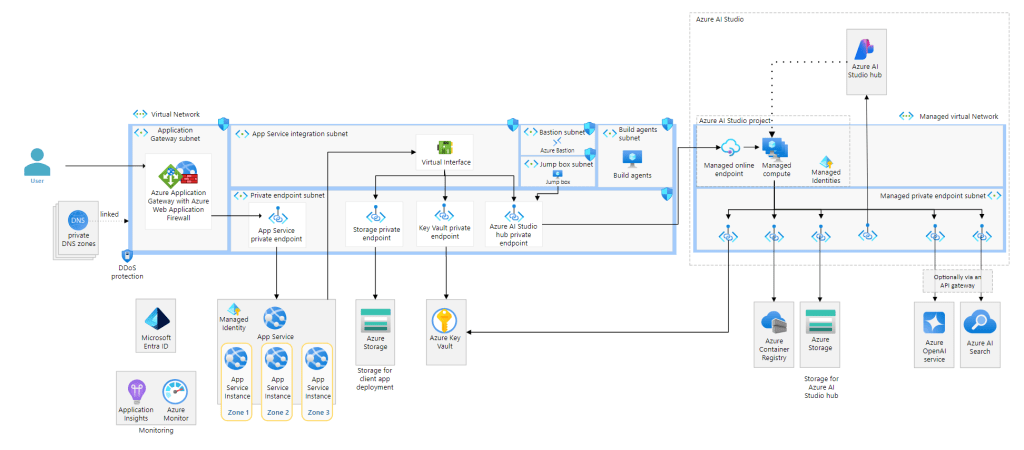
Then we move into the one-to-many AI – agents. A huge range of options here and with the capabilities in Azure AI Foundry, a near endless set of use cases. From experience, I’ve seen these used to take on one information source, or one task. These work well, roll out rapidly and require little to no real guidance. I have also seen attempts at multi-agent frameworks/workflows with less success, and finally very few agents that take action without explicit supervision. Take an over simplistic example – “Write a reminder email for the upcoming meeting and send to all attendees, cc my boss” you need serious confidence in that agent to handle information as you need it to.
Finally, there has been large scale adoption of AI within systems or existing applications. However, don’t mistake large scale adoption with actual success of AI. This is easily the example where I have seen the most ‘AI washing’ – reinventing some existing feature by calling it AI. This part really bugs me, as I believe it is driving up costs of already expensive systems, while also interrupting roadmaps of upgrades, fixes, new features that could have more impact.
Ok – let’s get into some points around adoption in practice. Ultimately I’ve seen it boil down to a balance of use case vs blockers. If you can outdo the list of blockers, and the use case is valid – success. Now I have drastically simplified that, but let’s start with blockers, so we can start to see the meat of the issue.
Blockers
When C-level look for AI adoption, they think of productivity return-on-investment, people management, time to market, and competition. This is no different than any other type of adoption, but I think AI carries a much tougher perception problem. In a presentation back in the Summer, and in every AI discussion since, I have discussed and named this as the ‘surely gap’.
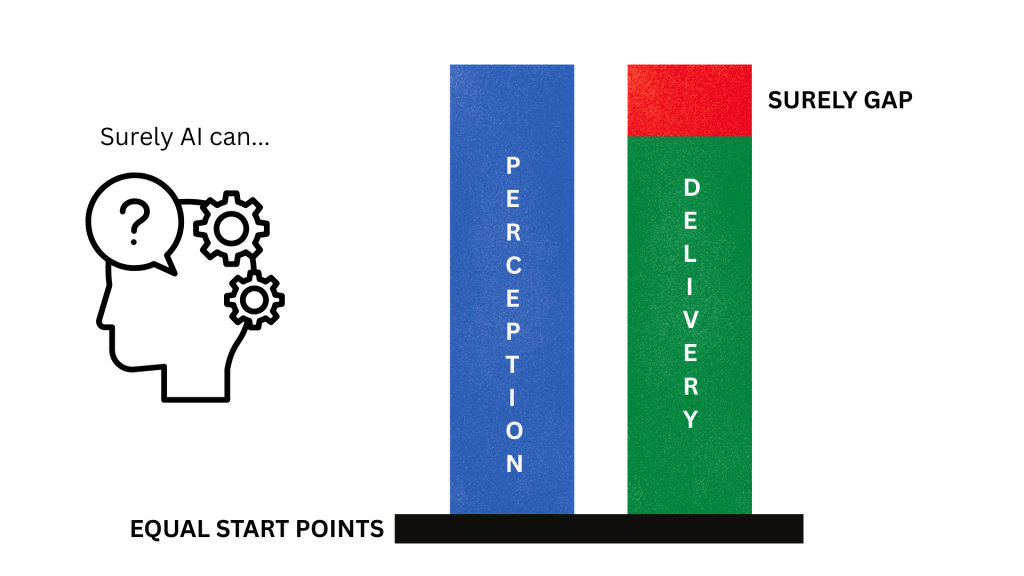
Without exception this is the number one issue derailing AI adoption. If you cannot address the perception issue early, you are doomed to have a project that will be viewed as not meeting expectations, disappointing, or even a failure. Even though AI might be delivering 50-80% increases in productivity, output, or accuracy etc. The second you hear “Surely AI can solve this, surely AI can create that, surely AI can remove that team – you are surely, in trouble.
Flip the approach to the ops team, or IT people. I see two equal priority issues:
- Bad data projects – “I’d love to use AI, but our data isn’t ready” – this is either a security issue, or a compliance issue, or both. Often it can be as simple as permissions and structure of data, commonly an issue in any SharePoint online environment that has been around a while. Plenty of simple work can address this, but the fear of sensitive data being exposed will put the brakes on any AI work. Now a positive swing here is perhaps you can now get that data project budget based on AI, but it’s still a significant challenge.
- Sprawling use cases – this is causing more of a compliance and regulatory issue, with no real resolution I have seen, only mitigation via policy. Take a system that can do five things, but your users only need two of them. So you risk assess and secure those two. However, if you can’t disable the other three features, users can simply use them if they wish. And it might not be as simple as features, it becomes more complex with generative AI. I expect changes in monitoring, analytics and feature decoupling to come as the EU AI act takes hold.
Lessons Learned
The first challenge with any blocker is knowing about it. Once you know about a problem, you can start to formulate a plan to solve it. And with the blockers I’ve outlined, you can probably already guess some solutions.
First and most important in my experience is dealing with the perception issue. I view AI as the least IT project a company can take on at present. Something like Copilot has little to no real IT or Ops work to configure it. License the user – milestone complete. But if an Ops team is given this as a project it can miss the real beginning an end of the project – perception and adoption.
Address the perception up front – why do we need AI, what will it do, what does good look like? Work backwards, and pick use cases that have simple, measurable outcomes.
Plan the adoption the second you have defined use cases – targeted users, timeframe, and a cadence of revisit. Most AI usage requires habit forming of some sort, adoption plans need to promote and push that.
In terms of Ops challenges, the most important lesson I have learned is get the team onboard, and get them out of the way. AI has the worst risk of shadow IT and data leakage I have ever seen. Users will want to try and use it. Give them something early, give them something decent and give them guidance. Then and only then – block everything else you can.
My Wishlist
This is tricky, but maybe not too complex. Instead of a list, I think I would push for one change and one change only – greater awareness or understanding of how to align a use case and capability. Nobody thinks email is the entire answer to their comms requirement, and they aren’t disappointed when it can’t do instant messaging or video calling. I know that isn’t necessarily a fair comparison, but if we can get AI understanding closer to that, I think it will greatly improve not only the adoption rates, but the success of AI projects.
I have another point on cost, and probably several points on environmental impact, but they are at least a blog post each. Perhaps something on that in Azure Spring Clean 2026…
In Closing
To close I will convert my opinion to a simple list:
- Speak to your stakeholders, gather opinions and use cases. Identify enablers and detractors, plan for both.
- Pick your use cases, always start with the simple ones that have measurable confirmed outcomes.
- Address Ops concerns, get the team onboard for rollout. Create your plan for enablement and adoption.
- Meet your stakeholders again, get the use case and outcome crystal clear. Leave no room for the ‘surely gap’
- Rollout and continuously adopt. Revisit use and the use case. Evolve the plan as the use case does.