
How traffic is routed within and between Azure networks isn’t something that is immediately apparent to the average admin. Therefore trying to increase the complexity of this for security reasons or by adding a virtual appliance can offer several challenges. As more companies begin to adopt a cloud strategy these scenarios will become more common. I’m here to tell you that with a little patience, taking full control of traffic routing in your Azure environment only takes a couple of well planned steps.
This is something you should see repeated often when reading about Azure; everything starts with the Virtual Network. When you create a Virtual Network (vnet) you must define some simple parameters, we’ll focus on two of these for this blog post, Address Space and Subnets.
If you are planning on a cloud-only environment, you can choose whatever address space you like (well, almost… any range defined in RFC1918) but, I would always recommend you plan vnets with the possibility they will be linked to your LAN. It is much easier to plan for this now than trying to resolve it later, trust me.
Choosing how to divide your address space up into several subnets also requires careful consideration. To start with, not all of the addresses in a subnet are usable, Azure reserves the first, last and three other addresses for Azure services. So you need to ensure there are enough usable addresses in each subnet for its intended use.
Once the above steps are completed, Azure creates a system routing table. This defines how traffic will route both within and out of the vnet. It is a combination of your vnet address space and Azure defined address spaces. Below are the effective routes for a demo network interface sitting in a vnet with the address space 10.0.0.0/16
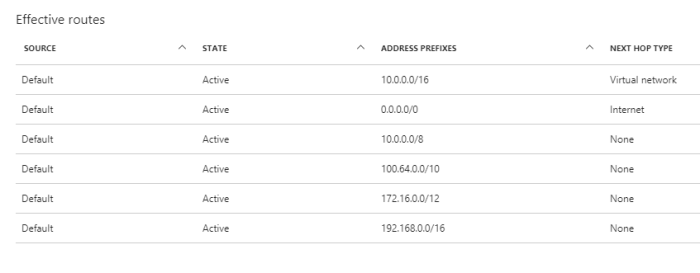
As you can see, all of the source definitions are ‘Default’ indicating they are system generated. The entry noted with ‘next hop type’ of ‘Virtual Network’ is our vnet address space, this defines the traffic as local. The rest are added by default to cover system and internet routing, more on those here.
The above table applies to all subnets within the vnet, so if you had a requirement for an incredibly secure vnet that could not route to the internet, only local traffic, you could introduce a user defined route table to overwrite the system route.
Routing in Azure is done by longest prefix match (LPM) this means that if the system table defines a 0/16 and you define a 0/24 and traffic is bound for that address space, it will follow the 0/24 route. If the LPM is an exact match, the following order is adhered to:
- User defined route
- BGP route (when ExpressRoute is used)
- System route
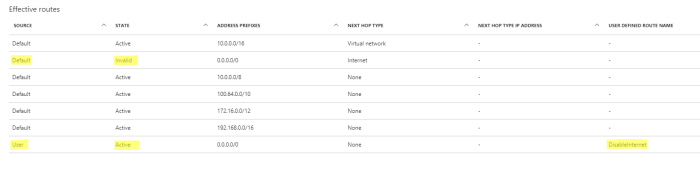
So using our example above, we would create a UDR and define a route for traffic bound for 0.0.0.0/0 as having a ‘next hop’ of none. This will prevent any outbound traffic, with the exception of your vnet (remember, LPM) from being able to route entirely.
The below grab of my demo VM effective routes shows how the system route is now marked as invalid and my user route has precedence.
There are many other scenarios where this can be useful, for example if you have a site-to-site VPN and would like all internet traffic to tunnel through on-premise appliances you can force tunnel traffic to the gateway.
Similarly if you have an appliance as part of your vnet within Azure, you can route all traffic to and from it as you see fit. Remember to always view the effective routes being applied to a network interface before pushing to a live production environment!
My final recommendation if using UDRs in your environment is to add a Network Watcher object. It greatly simplifies analysing and troubleshooting routing. There are multiple powershell and CLI commands you can also make use of for troubleshooting.
If you’ve any questions etc, get in touch!

5 thoughts on “User Defined Routing”