How To – Convert Azure Managed Disk Performance SKU

Due to some of the recent restrictions within Azure on deployments, some of you may have had to deploy VM sizes that were not idea, or didn’t exactly fit your needs. As part of that, you may have had to limit your choice in Managed Disk SKU too.

For example, I had to deploy a D8v3 for a customer and use Standard SSD until restrictions were lifted. I have no change the VM SKU to D8Sv3 and the disks to Premium SSD. For some people this is just about performance, but don’t forget, the financial SLA for VMs requires they run Premium SSD Managed Disks. Another solid reason to use them!

So, if you find yourself in a situation where you need to change the SKU, how can you do it? There are two ways I recommend, both require the VM to be deallocated so you may have to plan an outage, however the process is quick, so just a short one should be required.

Method 1: Via the Portal

This works best for individual, or a small number of VMs.

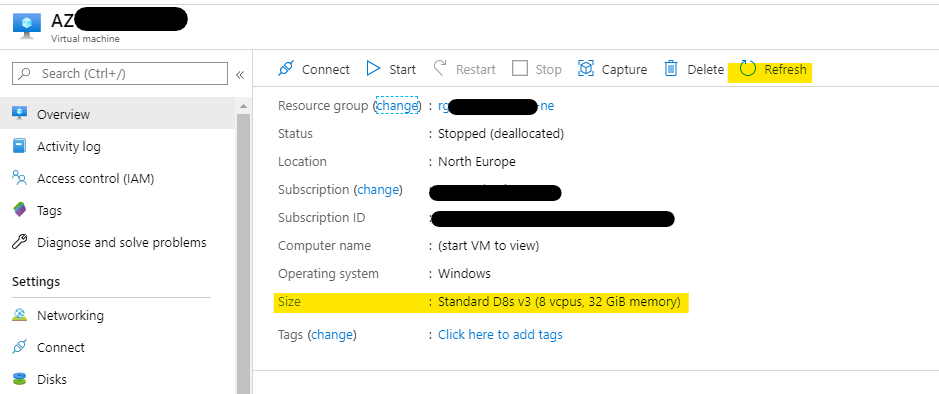
So, first up, if your VM needs to be resized to support Premium SSD, you should do that. Via the Portal, you simply stop the VM, choose your new size, and apply. One tip however, on the overview page of the VM blade, ensure you hit refresh so that the updated size is shown. For some reason, the Disk blade needs that to show that correctly or you cannot update your Disk SKU.

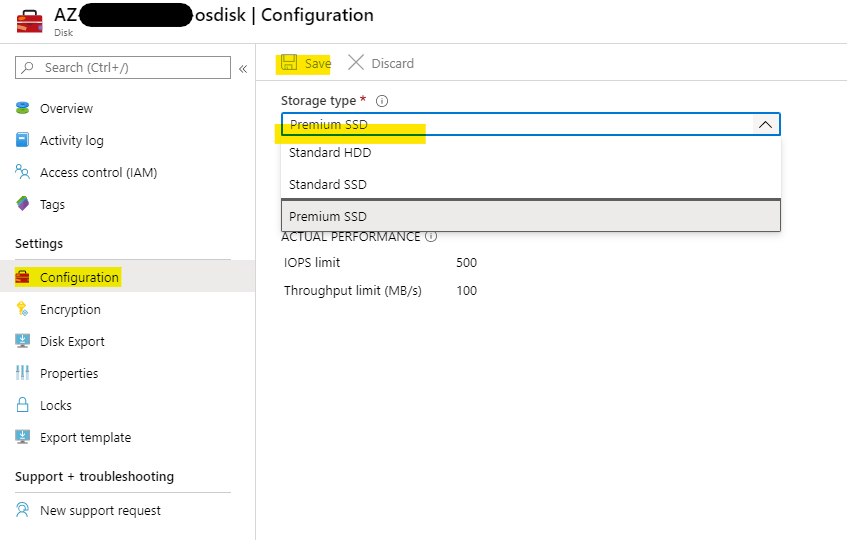
Next, choose the Disk blade, and select the disk you want to change. Click the Configuration option and simply choose the correct SKU from the drop down menu. This works for moving between any SKU by the way, as long as the VM size supports. Make sure to click Save.

Now, back to your VM blade, click Start and you’re done! VM and Disk updated.

Method 1: Via the Shell

This works best if you need to make multiple changes at once, save some time. As always with my shell examples, I am using Powershell, but the same actions can be carried out with CLI.

The below shows how to switch all Disks for a VM between tiers. In this example, we’re changing them to Premium, you can change that with the $storageType variable. Note, the below will Stop the VM for you and start it again. The VM must be running a Size that supports Premium in advance.

# Name of the resource group that contains the VM
$rgName = 'yourResourceGroup'

# Name of the your virtual machine
$vmName = 'yourVM'

# Choose between Standard_LRS and Premium_LRS based on your scenario
$storageType = 'Premium_LRS'

# Stop and deallocate the VM before changing the size
Stop-AzVM -ResourceGroupName $rgName -Name $vmName -Force

# Get all disks in the resource group of the VM
$vmDisks = Get-AzDisk -ResourceGroupName $rgName 

# For disks that belong to the selected VM, convert to Premium storage
foreach ($disk in $vmDisks)
{
	if ($disk.ManagedBy -eq $vm.Id)
	{
		$disk.Sku = [Microsoft.Azure.Management.Compute.Models.DiskSku]::new($storageType)
		$disk | Update-AzDisk
	}
}

Start-AzVM -ResourceGroupName $rgName -Name $vmName

And that’s it, you’re done!

The above example code was taken and edited slightly from the Docs article on this. The article includes multiple options for changing between tiers, single disks vs multiple etc. Check it out here – https://docs.microsoft.com/en-us/azure/virtual-machines/windows/convert-disk-storage

What is Azure Arc?

At Ignite 2019, Microsoft announced a new service; Azure Arc. It allows you to extend the capabilities of Azure to your on-prem environment, multi-cloud and edge. At launch, it’s only Azure Arc for Servers, but there will also be an option for data services at a later date. Everything is in public preview for now, so careful with those production environments!

Azure Arc for Servers

The basic concept is that with Azure Arc you can manage machines which are outside of Azure. Once connected, a non-Azure VM becomes a Connected Machine resource in Azure. Connected Machines have a Resource ID, and are manageable using the normally supported components such as Policy and Tags.

To register a Connected Machine, an agent needs to be installed on each local VM. The currently supported OS’ are 2012R2 or newer and Ubuntu 16.04 and 18.04. As Connected Machines are an Azure resource, normal resource limits apply (800 resources per RG etc).

The agent has some network requirements, documented here. For onboarding the agent is combined with a script. This process can be done via the Portal or Powershell. Recommendation here would be to follow the option to create a Service Principal if you need to onboard machines at scale.

You will also need to enable a couple of new resource providers in your Azure subcription:

  • Microsoft.HybridCompute
  • Microsoft.GuestConfiguration

Once you have a VM present in Azure as a Connected Machine, you can start managing it, but only using the following services at this time of the preview:

  • Guest Configuration
  • Log Analytics

So for now, the service is quite limited. But you can assume that many more features are on the roadmap. The end goal of Azure Arc is to give you a single tool set to manage all your servers and data services regardless of where they are provisioned. So whether you’re a small company with a hybrid footprint, or an MSP, Azure Arc could make your life a lot easier. One to keep an eye on for GA in 2020!

How to – Deploy Windows Virtual Desktop

In my opinion, one of the most interesting services to be launched this year by Microsoft was Windows Virtual Desktop (WVD). If you aren’t sure what WVD is exactly, I wrote some initial thoughts on the service here and here earlier this year. Right at the end of September, the service went GA so here is a guide on how to successfully deploy your first WVD.

So first, the things you need to start:

  • Azure AD
  • Domain Services via a server or Azure ADDS
  • A vnet with access to Domain Services

Next, you need to understand the components of WVD that you will deploy:

  • Tenants – The WVD tenant is the primary interface for managing your environment. Each tenant must be associated with the Azure Active Directory containing the users who will sign in to the environment.
  • Host Pools – A collection of Azure virtual machines that register to WVD as session hosts when you run the WVD agent. All session host virtual machines in a host pool should be sourced from the same image for a consistent user experience. There are two types, Personal and Pooled.
  • App Groups – A logical grouping of applications installed on session hosts in the host pool. An app group can be one of two types, RemoteApp or Desktop.

Now it’s time to start configuration and deployment. First, you need to grant WVD access to your Azure AD, you should read the full instructions on doing this and be sure you understand the required permissions and that they are OK within your Governance strategy. You accept two sets of permissions, a server app and a client app.

Once the permissions are accepted, you will see two new enterprise applications created in your tenant.

This is the step I have seen most people stumble on, you need to assign the TenantCreator role to a user within the Windows Virtual Desktop app. It must be a user from that AAD instance. It cannot be a group or a service principal. If you’re using AADDS, my advice is to assign the role to a user who also is a member of AAD DC Administrators. You can then use the same account for your whole deployment.

Now we move onto some Powershell configuration for your WVD tenant. You’ll need to install the module first. Then a couple of commands later has a tenant created for you. Note the tenant name must be globally unique. Also the Add-RdsAccount cmdlet requires login, ensure you use the account that was assigned the TenantCreator role in the previous step.

Now you need to create a Service Principal for use with WVD. This is made simpler with the detailed instructions at the link. Pay special attention to the fact you cannot retrieve the password at a later time, make note of it securely! Complete all of the steps in a single powershell session to avoid any headaches. When the role is assigned, and you’ve signed in as the Service Principal, simply run the following cmdlet to confirm access:

Get-RdsTenant

Now we move onto deploying resources. You can deploy your first host pool via the Marketplace. When running through the basics, if you’re using AADDS, ensure you choose the same location for deployment or domain join will fail. Fill in your requirements, I went quite light for mine, single server, shared pool, just one user with access.

When that completes, you will have access to a desktop from the default group. I’m going to change things up a bit and give access to an app group and some basic apps. Full commands required are here and easy to follow. Just remember a user can’t be part of both an app group and desktop group for the same pool.

Once deployed, you can access your resources via browser or the client. I like to test via the browser as it’s quick and simple. But I’ve found it’s an odd URL to find so here it is – https://rdweb.wvd.microsoft.com/webclient – and we can see I have access to my resources!

Next, I want to add my final piece of customisation for this post. FSLogix profiles via Azure Files. There is a straight forward guide to setting up a share on a server here and it works great but who wants to manage a server?

There is a nice comparison table for pros/cons here

FeaturesAzure FilesAzure NetApp FilesStorage Spaces Direct
Platform serviceYes, Azure-native solutionYes, Azure-native solutionNo, self-managed
Regional availabilityAll regionsSelect regionsAll regions
RedundancyLocally redundant/zone-redundant/geo-redundantLocally redundantLocally redundant/zone-redundant/geo-redundant
Tiers and performanceStandard
Premium
Up to max 100k IOPS per share with 5 GBps per share at about 3 ms latency
Standard
Premium
Ultra
Up to 320k (16K) IOPS with 4.5 GBps per volume at about 1 ms latency
Standard HDD: up to 500 IOPS per-disk limits
Standard SSD: up to 4k IOPS per-disk limits
Premium SSD: up to 20k IOPS per-disk limits
We recommend Premium disks for Storage Spaces Direct
Capacity100 TiB per share100 TiB per volume, up to 12.5 PiB per subscriptionMaximum 32 TiB per disk
Required infrastructureMinimum share size 1 GiBMinimum capacity pool 4 TiB, min volume size 100 GiBTwo VMs on Azure IaaS (+ Cloud Witness) or at least three VMs without and costs for disks
ProtocolsSMB 2.1/3. and RESTNFSv3, NFSv4.1 (preview), SMB 3.x/2.xNFSv3, NFSv4.1, SMB 3.1

Now the official doc site doesn’t include a tutorial and there are quite a few steps to configure initially, but thankfully the different sections have been put into a single post by Stefan Georgiev over on the tech community site. I’ve ran through the entire thing and it works exactly as expected.

There is so much more to explore with WVD. I’m going to use this post as a starting point and build from here with more complex configuration as I go. If there is anything you’d like to see, please get in touch!

What is Azure Dedicated Host?

This month, Microsoft announced the introduction of a new method of running your Windows and Linux VMs within Azure. Dedicated Host is a new service that provides you with a single-tenant-host to run your workloads on. Or to phrase that more simply, your very own physical server in an Azure datacentre.

Azure Dedicated Host Groups (DHG) can be created within a region, availability zone, and fault domain. Your Dedicated Host is then created as part of a DHG and you can have multiple Dedicated Hosts per DHG. A Dedicated Host is a representation of a physical server in an Azure Datacenter. As your VMs are directly provisioned into your hosts, you can choose whatever configuration is required and available from the parent resources.

View of the new resources for dedicated hosts.

Two benefits from making use of Dedicated Host are:

Increased Control

As your Dedicated Host is allocated directly to your tenant, you have more granular control of placement configuration for all of your provisioned VMs. Also, you now control the timing of all platform-initiated maintenance operations, such as OS patching, or hardware or software reboots. This means you get the option to skip the regular platform update schedule, and then apply it when it suits within a 35-day rolling window.

Compliance Requirements

Azure Dedicated Host offers hardware isolation at the physical level which means your Azure VMs run on an isolated and dedicated physical server. No other VMs can run on your Dedicated Host. This can drastically help meet corporate compliance guidelines and standards. While also gaining visibility into the underlying cores to meet server-based software licensing requirements.

Configuration Options

Dedicated Hosts come in several configuration options. Each options allow for different VM series deployment combinations you are already familiar with. A table outlines an example for the Dsv3 Series:

Physical CoresAvailable vCPUsAvailable RAMVM Size# of VMs
4064256GBD2s v3
D4s v3
D8s v3
D16s v3
D32s v3
D48s v3
D64s v3
32
16
8
4
2
1
1

So at a quick glance, you can see there are several combinations of VMs that can be run on any single Dedicated Host. For example, 2 D16s v3 VMs + 1 D32s v3 VMs. However, bear in mind you will pay for the full Dedicated Host, regardless of VMs being run on it. You can read the full details for more information on pricing.

One nice note on pricing; the usual Azure Hybrid Benefit options are available for VMs running on Dedicated Host.

DHGs use Availability Zones and Fault Domains to give the greatest High Availability possible. So both need to be taken into consideration when designing your Dedicated Host deployment. The Dedicated Host docs, give good guidance on this already.

If Dedicated Host sounds like something you could make use of, why not give it a try. But remember, it’s still in preview so be careful and be aware of the limitations below:

  • Virtual machine scale sets are not currently supported on dedicated hosts.
  • The preview initial release supports the following VM series: DSv3 and ESv3.
  • During the preview, you won’t be able to resize a virtual machine deployed to a dedicated host.
  • Control over maintenance capabilities is in a limited preview. Start by taking this nomination survey to try them out.
  • During the preview we won’t be offering the option for reserved capacity.

How to – Reduce your Azure IaaS Costs

A regular starting point for most people when first using Azure, or any public cloud, is a virtual machine. Depending on your environment, VMs can be one of the most expensive resources. It’s no surprise that this can be a strong negative when considering a move to cloud.

Before anything is deployed, it’s important that you are aware of the tools that Microsoft make available to help you estimate your costs in advance. This can help both understand and avoid unwanted surprises with your bill.

First up is the Azure Pricing Calculator, with a bit of work, you can achieve an acceptably accurate cost estimate for an environment. I normally choose the default settings when it comes to pricing options (such as PAYG) as it gives me the most expensive and therefore safest estimate for a quick quote. If you have access to other consumption offers, ensure you are signed in so you can access their rates.

For this post I’m going to use a single VM estimate to display cost and changes. As it’s a single VM I have chosen a beast – M128m

Once you have your worst case estimate, it’s time to start making some adjustments to get that price down as low as possible. To do this, I recommend the following three options.

  1. Reserved Instances
  2. Automation
  3. Hybrid Benefit

First up, and most straight forward – Reserved Instances. They are a billing object that allows you to save money over a fixed period of time by paying for the usage up-front. From the screen grab you can see the savings can be approx. 64% for a three-year reserved instance. I have an old post that is still valid on RIs over here.

Again, you will pay the entire price up front, but look at the difference it makes to the monthly rate for our beast:

Next, modifying your usage hours using Automation. Now, this doesn’t have to be using Azure Automation and its Start/Stop solution as there are alternative like over on Azure MVP, Gregor Suttie’s blog. Whatever method you choose, update your usage hours in the cost calculator to see your savings, for this post I’m going to first remove weekends (average 8 days a month = 192 hours) and cut the remaining workdays in half (538/2). So instead of 730 hours, we get 269 hours and the appropriate reduction in price to our beast:

One thing to note at this point, if you’re using Reserved Instances, there is no point in using Automation to save on costs. RIs cover the full usage for the period.

Finally, the simplest to implement but arguably most complex option, Azure Hybrid Benefit. This is a licensing option that allows you to reuse your on-prem licenses in Azure. This is an option that can only be used in Azure and therefore a unique cost saving method. Applying it is simply a tickbox within your VM blade. Microsoft have a calculator to help you work out the licensing side of things, I’d recommend leaning on your LSP for this part as it can be a bit complicated and you need to make sure you’re compliant. You can see the savings below for our beast:

You’re probably already thinking it, can I layer these together and save even more? Absolutely.

Check out the reduction to the price of the beast if we apply AHB and a three year RI:

So what are you waiting for, head over to your Azure tenant and start saving some money on those VMs ASAP. As always, if there are any questions, get in touch!