Azure Networking Security – Where to Start?

If you’ve read any of my blog posts regarding networking in Azure, you might have guessed it’s one of my favourite topics. For ITops, it’s one of the shifts in thinking required to make a change to cloud. As software-defined-networking is one of the core concepts required for a successful cloud implementation, it’s no surprise that the security of that networking is a close second.

Looking at it as simply as possible, good network security means allowing only required traffic and preventing everything else while logging what is useful for auditing. Azure offers several integrated services that can help achieve this.

With that in mind, there are three major scenarios to deal with when it comes to Azure networking:

  1. Azure Resource to Azure Resource
  2. Azure Resource to on-premises Resource
  3. Azure Resource to/from the Internet

I will reference each as we cover the different best practises available.

Access Control

Good network access control requires layering. In Azure, the most common networking concept is a vnet. A vnet does not, by default, get access to another vnet. However, within a vnet, every subnet, by default, has access to each other. So, the subnet layer is most likely where you will need to address access control. In Azure this can be done in two, free, simple ways. Custom Route Tables and/or Network Security Groups.

Custom Route Tables are exactly as they sound. They modify the system route table using routes you specify. If your route matches a system route, it will take preference, user defined routes always do. Similarly the lowest prefix match will always win. More on route tables here. CRTs are applied at subnet level and can quickly manipulate network traffic for your entire vnet. For example, preventing internet access by dropping traffic to 0.0.0.0/0.

Network Security Groups are a little bit more complex in application, but their concept is straight forward. They are an ACL for your network. They can be applied at subnet or network interface level. While NSGs allow you to create complex and granular rules quite simply, managing them at scale can be a challenge. More on them here.

Firewall

While the above allows for control of the network from a routing and access perspective, you may also need to control traffic by inspection and filtering. Within Azure, there are two main options for this; Azure Firewall or a 3rd party NVA.

Azure Firewall was released last year and is a stateful, firewall-as-a-service resource. It offers HA and scalability, however, it’s still a young product and therefore light on traditional network security options. More on it here.

Thankfully, Azure and network appliance vendors have been working better together recently. Most solutions you would expect are available in the Marketplace. The common gripe is that documentation can be light if not bad. However, if you need continuity with your local site, or a specific feature well then they are your best choice. My advice is to reach out to the Azure community if you are having issues, generally someone will have had the same issue and can help!

Perimeter

It’s best to start with some basic architecture decisions relative to your Azure perimeter.

  • Will Azure have a public perimeter?
  • Will it be inbound and outbound?
  • What requirements are there for a private perimeter?

Once the above are answered, you have a couple of well documented implementation options. They all operate on the same premise of layering. This allows for segregation of traffic most commonly with a firewall aspect. This combined with UDR can lead to a well designed and secure environment allowing only the network access required. Therefore layering everything that has been discussed already.

Monitoring

In Azure, there are two major tools to help you with this:

  • Azure Network Watcher
  • Azure Security Center

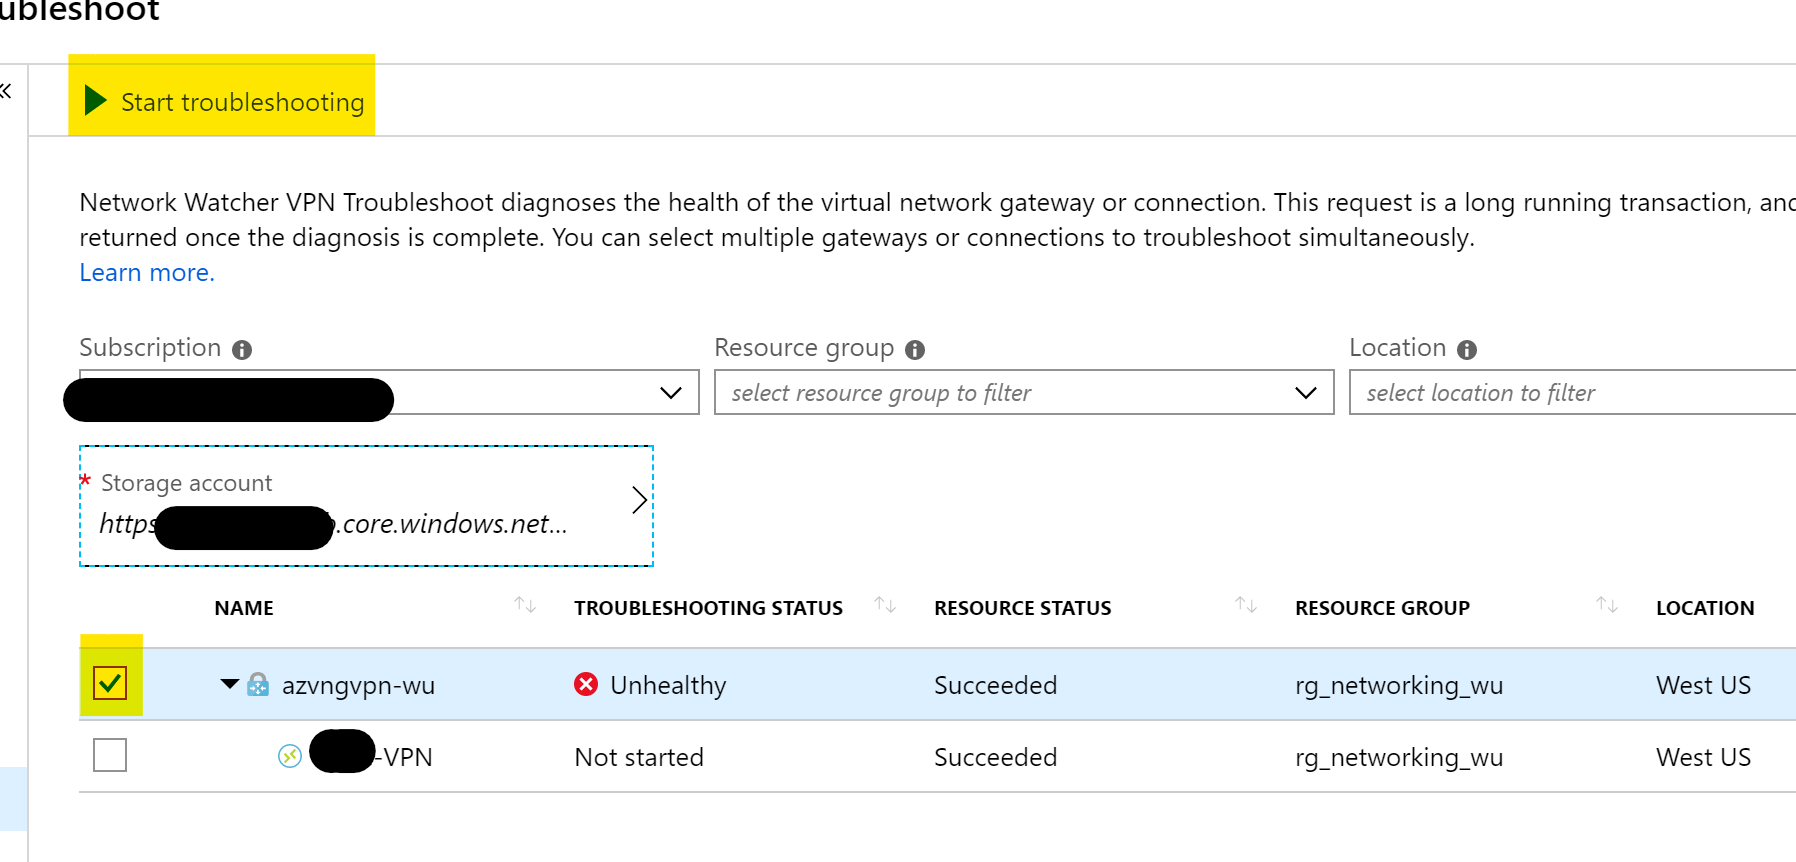
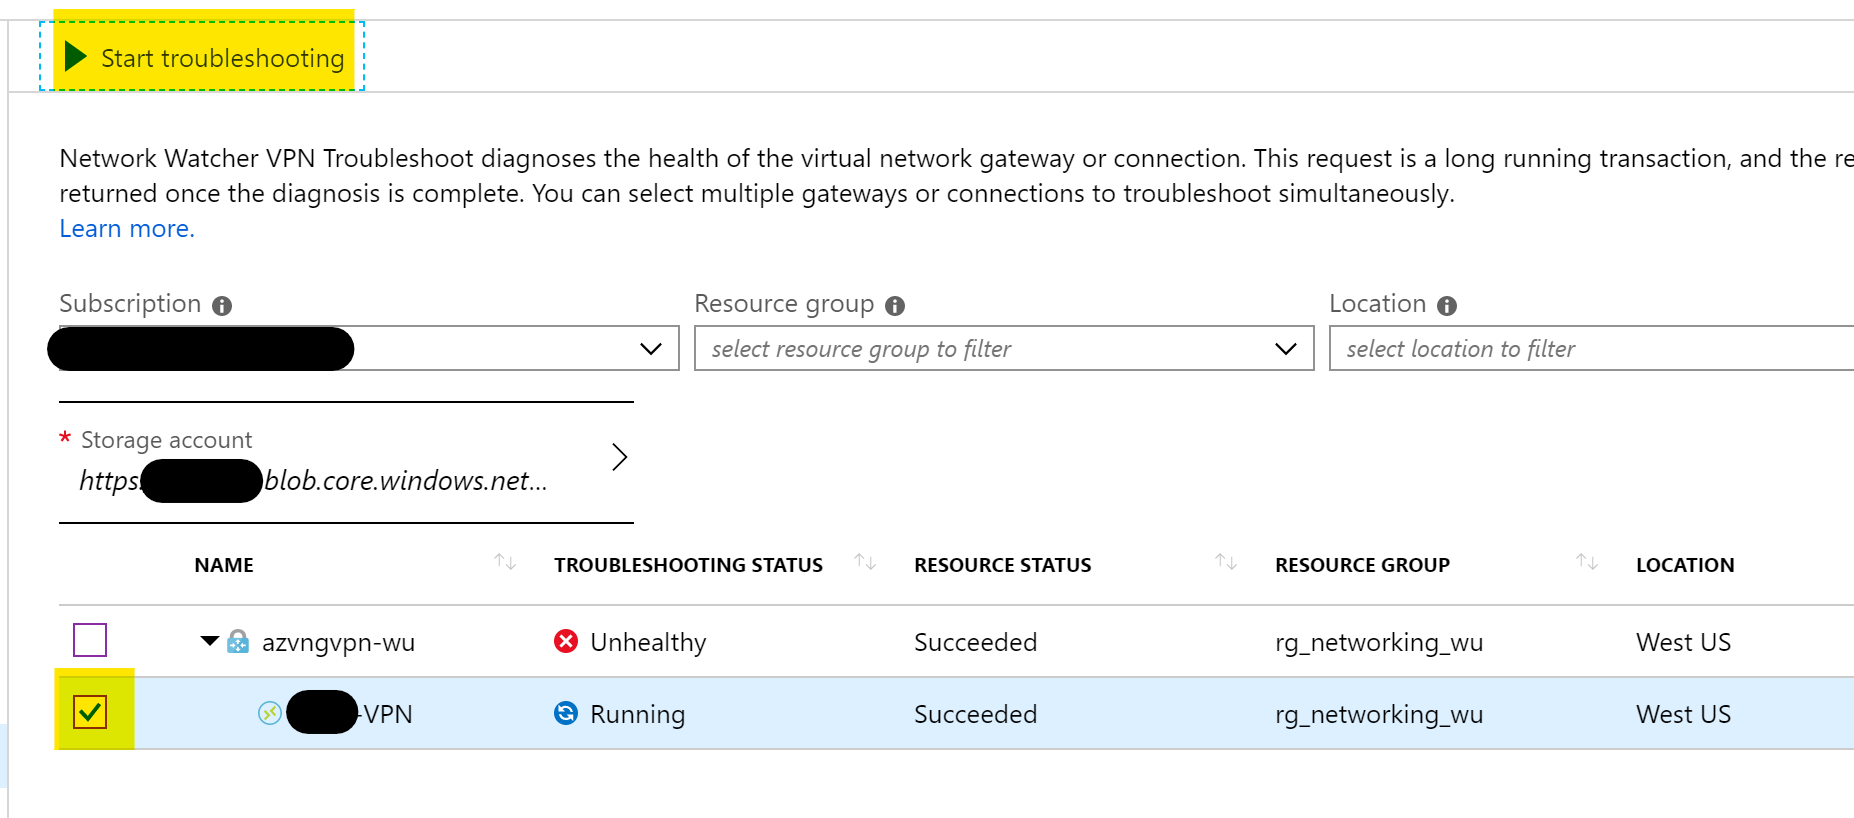
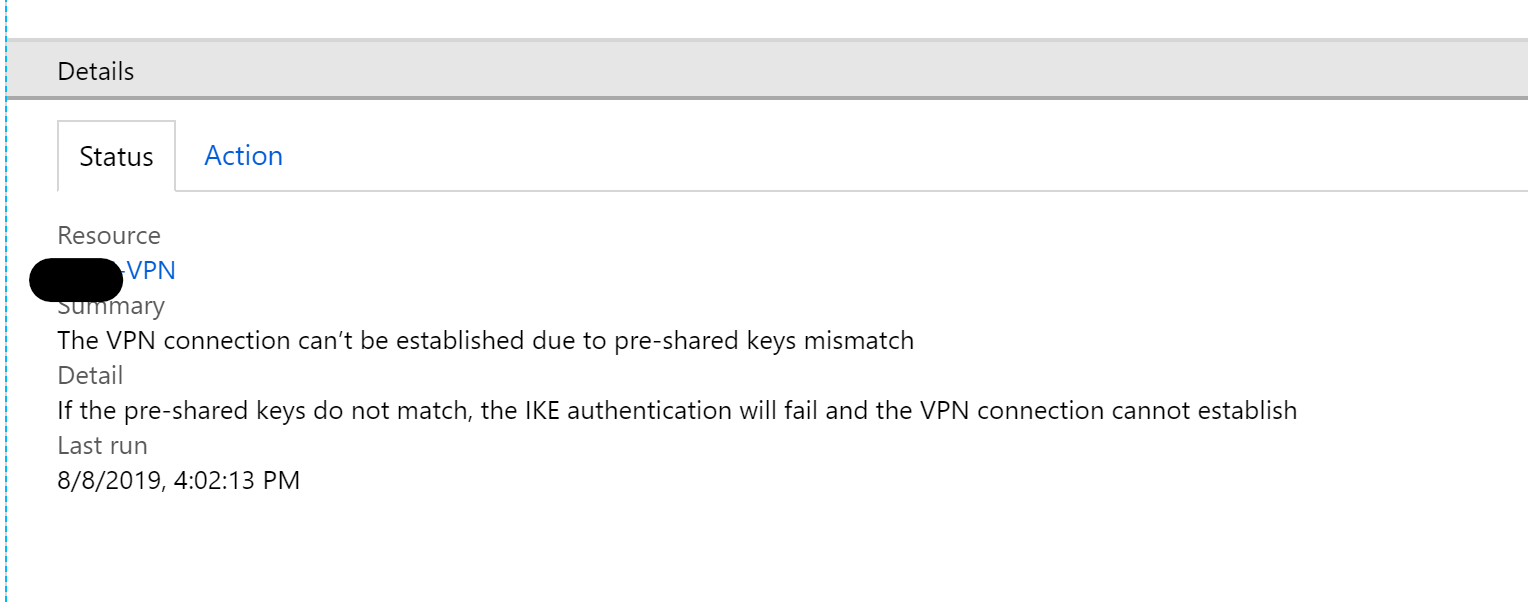
Network Watcher is one of my favourite tools in Azure. Within a couple of minutes, you can gain granular insights into your complex network issues with minimal effort. You can also integrate the output to other Azure services like Monitor and Functions to react to alerts and capture traffic automatically (*notes to self* must blog that).

Security Center, as it does for other infrastructure, offers insights into your network topology and can provide actionable recommendations at scale. Meaning you have a single pane to sanity check your network, regardless of how complex it may be.

If you take the time to understand and implement the above, you’re well on your way to having a secure networking environment. However, every single environment and workload should be treated as unique. The best network security is constantly auditing and reassessing itself. Be proactive to avoid having to be reactive!

As always, get in touch with any questions or to chat about your go-to network security steps.

Azure Firewall – Where to Start?

About a year ago, Microsoft introduced the first release of Azure Firewall. Since then, and since its general release the service has grown and the features have matured.

To begin, let’s understand what Azure Firewall is? At its core it’s a managed, network security service that protects your Azure Virtual Network resources. It functions as a stateful firewall-as-a-service and offers built-in high availability and scalability. This means you can centrally control, enforce and log all of your network traffic. It fully integrates with Azure Monitor too which means all of the usual logging and analytical goodness.

If the above sounds like something you’d like to use, or at least try, in your Azure environment, read on! To start, let’s break out what can be configured within Azure Firewall and which features could be useful for you.

When deploying an Azure Firewall, you need a couple of things in advance. It needs a dedicated subnet, specifically named “AzureFirewallSubnet” and the minimum size it can be is a /26. It also needs at least one Static Public IP. The Public IP must be on the Standard tier. My recommendation here is to look at creating a Public IP Prefix in advance of creating your Azure Firewall. That way, if you need to delete it and redeploy, you can continue to use the same Public IP again and again. If you want to use multiple Public IPs, it supports up to 100.

So, let’s look at what Azure Firewall (AFW) can do for you on your Virtual Network and then consider some deployment options.

Access

Using your single, or multiple Public IP addresses, AFW allows both source and destination NATing. Meaning it can support multiple inbound ports, such as HTTPS over 443 to different resources. Outbound SNAT helps greatly with services that require white-listing. If you are using multiple Public IPs, AFW randomly picks one for SNAT, so ensure you include all of them in your white-listing requirements.

Protection

AFW uses a Microsoft service called Threat Intelligence filtering. This allows Azure Firewall to alert and deny traffic to and from known malicious IPs and domains. You can turn this setting off, set it to just alert or to both alert and deny. All of the actions are logged.

Filtering

Finally, for filtering, AFW can use both Network Traffic and Application FQDN rules. This means that you can limit traffic to only those explicitly listed within the rule collections. For example, an application rule that only allows traffic to the FQDN – www.wedoazure.ie

A visual representation of the above features is below:

Firewall overview

Now that you understand AFW, let’s look at how to configure to your needs. Normally I would go into the deployment aspect, but it is excellently documented already and relatively easy to follow. However, there are some aspects of the configuration that warrant further detail.

Once deployed, you must create a Custom Route Table to force traffic to your AFW. In the tutorial, it shows you how to create a route for Internet traffic (0.0.0.0/0), however you may want the AFW to be your central control point for your vnet traffic too. Don’t forget, traffic between subnets is not filtered by default. Routing all traffic for each subnet to AFW could allow you to manage which subnet can route where centrally. For example, if we have three subnets, Web, App and DB. A single route table applied to each subnet can tunnel all traffic to AFW. On the AFW you can then allow Web to the Internet and the App subnet. The App subnet can access Web and DB but not Internet and finally the DB subnet can only access the App subnet. This would all be achieved with a single Network Rule collection.

Similarly you can allow/block specific FQDNs with an Application Rule collection. In the tutorial, a single FQDN is allowed. This means that all others are blocked as that is the default behaviour. This might not be practical for your environment and the good news is, you can implement the reverse. With the right priority order, you can allow all traffic except for blocked FQDNs.

A feature you may also want to consider trying is destination NATing. This thankfully has another well documented tutorial on Docs.

Finally, and in some cases most importantly, let’s look at price. You are charged in two ways for AFW. There is a price per-hour-per-instance. That means if you deploy and don’t use it for anything, you will pay approx. €770 per-month (PAYG Calculator). On top of that, you will pay for both data inbound and outbound that is filtered by AFW. You’re charged the same price either direction and that’s approx. €14 per-Tb-per-month. Depending on your environment and/or requirements this price could be OK or too steep. My main advice is to ensure you understand it before deploying!

As always, if there are any questions please get in touch!

How to – Troubleshoot your Azure Virtual Network Gateway

One of the most popular methods of connecting to Azure privately is via VPN. This can be a relatively simple process and is well documented by both Microsoft and 3rd party blogs. However, if you encounter problems, it can be difficult to get the data you need to troubleshoot efficiently. Especially if you don’t have access to both Azure and the local connection appliance.

In this post, I’m going to show you how to troubleshoot a Virtual Network Gateway and its VPN connection. As part of this, there are some required specifics:

If the above lines up with your environment, then let’s get started! (If not, get in touch and I might be able to help)

Troubleshoot a Virtual Network Gateway

Login to the Azure Portal, then click the search bar at the top, type “Network Watcher” and click on it to open your resource.

In the Network Watcher blade, under ‘Network Diagnostic Tools” select ‘VPN Diagnostics’.

You’ll have to choose a Storage Account and a Container within to run the tests. If you don’t have one, you can create one from Network Watcher. The Storage Account doesn’t have to be in the same location as your VNG.

Click the checkbox for the VNG you want to troubleshoot, then click ‘Start Troubleshooting’

Once complete, you will see your ‘Troubleshooting Status’, you can see that for mine above it is shown as ‘Unhealthy’. To get more details, there is a Details pane just below with a ‘Status’ blade giving you more information about the problem and an ‘Action’ blade which gives suggestions on how to resolve the issue.

In this instance, the VNG as a resource is healthy, but the Connection it’s facilitating is not, so we need to dig further.

Troubleshooting a Virtual Network Gateway Connection (VPN)

In the same location we ran troubleshooting for the VNG, we will repeat the steps and select the Connection instead of the VNG this time. Select your Storage Account etc. as before and then click the Connection to troubleshoot. Then click ‘Start Troubleshooting’

Once complete, you will again see a ‘Troubleshooting Status’ and can get more information from the ‘Details’ pane.


As you can see from the above, I have a very simple fix to make, as my pre-shared keys do not match.

Hopefully this helps you out when trying to figure out why those VPN tunnels aren’t working.

As always, if you have any questions, get in touch!

What is Azure Network Security Group?

If you’re considering Azure for IaaS workloads, the first aspect of cloud you will have to understand, design and deploy is networking. As with any other cloud, software defined networking is the foundation of IaaS for Azure.

You cannot deploy a workload without first deploying a Virtual Network. However, once you have a network, you then need to consider its security and specifically how you control its perimeter and access. The perimeter is something that requires its own post but for platform-native, have a look at Azure Firewall and for other topics, start by checking out the Security Center docs for an overview.

When it comes to access control on your Virtual Network, Azure offers built-in solutions for both network layer control and route control. Network Security Groups (NSG) function as the network layer control service. So, what are they and how do you use them?

NSGs filter traffic to and from resources in an Azure Virtual Network. Combining rules that allow or deny traffic for both inbound and outbound traffic, allows granular control at the network layer.

They can be viewed as a basic, stateful, packet filtering firewall, but what does that mean? First, lets note what they don’t do; there is no traffic inspection or authentication access control.

So how do they help secure your network? By combining 5 variables into a scenario which you then allow or deny, you can quickly and easily manipulate the access that is possible to your resource. For example, consider the following two rules:

PriorityPortProtocolSourceDestinationAccess
1003389TCP10.10.10.10*Allow
200****Block

Our first rule, allows RDP traffic to the resources protected by the NSG, but only from the scoped source IP. The second rule, blocks all traffic. The rules are processed in order or priority.

Source and Destination can use IPs, IP ranges, ANY or Service Tags. Service Tags really help you define simple but powerful access rules quickly. For example, consider the following change to our above rules:

PriorityPortProtocolSourceDestinationAccess
1003389TCP10.10.10.10*Allow
101443TCPVirtualNetwork*Allow
200****Block

We still allow RDP and we still block all traffic, however, we now also allow HTTPS traffic from any source tagged as VirtualNetwork. This includes everything in your Virtual Network, any peered Virtual Networks and any traffic originating across a VPN or ExpressRoute. A single Service Tag replaces multiple source ranges and simplifies management.

If you’re still struggling with the filtering aspect, check out this handy tutorial from Docs.

A couple of other items to note about NSGs; they can be applied to a Network Interface or a Subnet and they have some default rules. Which layer you apply an NSG to is important. Remember traffic is processed inbound and outbound in reversed layers. So traffic from a VM out hits Network Interface then Subnet. So how you scope and combine NSGs is critical to ensuring your access control is as you want it. There is a great example of this on Docs.

The default rules that exist within an NSG allow Virtual Network traffic IN and Internet traffic OUT. You can check out the full list for exact details.

As always, if you have any questions or require a steer on a specific scenario, please get in touch!