

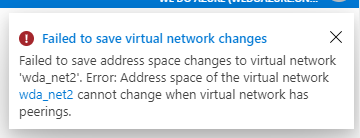
Recently, Microsoft announced a new preview feature relative to Virtual Network Peerings. This preview allows you to resize the address space of a peered virtual network. Up until the point of this preview, any resize operation on a Virtual Network with a peering activated would fail. The only previous workaround was to delete the peering, complete the required address space modifications, then recreate the peering. While this can be completed quite quickly, it does cause downtime. This preview feature is definitely a welcome addition.
So while there is a new feature available, but it’s in preview, let’s have a look at the current state of Virtual Network Peering. Starting off with what exactly they are. A peering allows you to seamlessly connect two Virtual Networks. There are a couple of the usual caveats like non overlapping adress spaces but configuration is as simple as can be. One item of note, peerings are not transient. That means that in the graphic below, even though the Hub Virtual Network is peered to both A and B, traffic cannot traverse from A directly to B or vice versa.

Using peerings allows for the creation of well architected, and secure, network footprints in Azure. If you’re new to network on Azure, and/or new to peerings, I really recommend reading this routing page on Docs, it gives clear examples and explanations of common scenarios. And for more specifically on peering, check out this page on Docs. Both will help set the context for some of the areas we are going to cover in this post, and if you’re not familiar with them, may be a challenge.
Configuration
For all explanations we will use the following architecture:

The first step to create a peering is also the first place you should confirm when troubleshooting. Often, it can simply be a missed setting in this configuration that causes your issue. A peering contains three elements of configuration, and they are repeated on both sides, leaving you with six settings in total that can impact your peering.When creating a peering, we have the following choices. These choices impact how your peering will function and should be your first check, every time, when you have an issue with a peering.
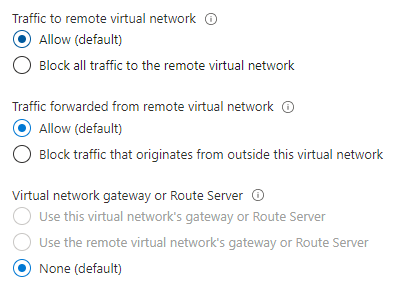
Let’s break those down a little. First, “Traffic to remote virtual network”, this enables communication between the virtual networks and allows resources connected to either virtual network to communicate with each other with the same bandwidth and latency as if they were connected to the same virtual network. So, you may ask why is there a block option if I am enabling a peering!? Good question! It’s mostly there to facilitate temporary blocks, saving you from deleting and recreating the peering. How this works is slightly complicated, as it’s based on manipulating the service tag “Virtual Network” rather than explicitly blocking traffic.
If you want to block all traffic – delete the peering.
The VirtualNetwork service tag for network security groups encompasses the virtual network and peered virtual network when this setting is Enabled. Read more about network security group service tags here. When this setting is disabled, traffic doesn’t flow between the peered virtual networks by default; however, traffic may still flow if explicitly allowed through a network security group rule that includes the appropriate IP addresses or application security groups.
Next, “Traffic forwared from remote virtual network”, when enabled, this allows traffic that didn’t originate from the virtual network. This is best explained using a routing example; take our three virtual networks, VNET A is peered to VNET B and to VNET C, however, B and C are not peered. Don’t forget, peerings are not transient, so without additional configuration, B and C cannot communicate. WE can create a service chain by using VNET A as the next hop for B to reach C and vice versa, we do this by using route tables and a network virtual appliance, such as a router or firewall etc. However, for that traffic to be allowed use the peering, we need the forwarded traffic flag enabled on BOTH sides of the peering.
Finally, “Virtual network gateway or Route Server”, this can be enabled depending on whether the services exist or not in your peered virtual networks. Using our architecture, creating a peering between A and B. On the A side, we could choose “Use this virtual network’s gateway…” and on B “Use the remote virtual network’s gateway…”. This would allow B to use the connections terminated on the gateway in A. Without this enabled, for example on our peering between A and C, traffic cannot use the connections on the gateway.
Important note here, you cannot peer and use gateways if both virtual networks have gateways. You can peer and use the other two options, but not the gateway.
One often over looked feature is the ability to use the VNG in A to route traffic from B to C. It’s a supported configuration, requiring route tables etc. and isn’t very well documented but it works! Ping me if you need help with it.
Constraints
Now, if you have confirmed that all of these settings are correct, but you are still facing issues, there are some common constraints that may be the cause of your trouble.
- Problem Resources – There are a set of resources that do not work across global peering – Listed here.
- Classic Virtual Network – while you can peer an ARM and a classic, you cannot peer two classics. Upgrade those vnets to ARM!
- Peering status – Every peering has a status when viewed within the virtual network. If it shows Initiated, traffic wont flow. Check both sides of the peering and update configuration until it shows Connected
- DNS – If you’re using the default DNS with your virtual network, you cannot resolve names in a peered virtual network. You will need custom DNS, or Azure DNS Private.
- P2S – If you have P2S configured and then add a peering, you must donwload the client config again to pick up the peered virtual network routes.
Scenarios
While 99% of the issues I have seen are resolved with some combination of the above, there are a few specific scenarios that require a slightly different focus, Microsoft have documented these all on one page.
Finally
Don’t forget, peerings are all about the system route table of the virtual networks, that’s how they function. Understanding and validating your route tables is key to successful troubleshooting. Having said that, if you are ever stuck, please get in touch, I will do my best to help!
