
At the end of July, Microsoft announced the general availability of geomatching via Custom Rules in Web Application Firewall. This is a feature I am quite fond of, and is excellent at reducing your attack surface. Thankfully, it’s also quite simple to implement!
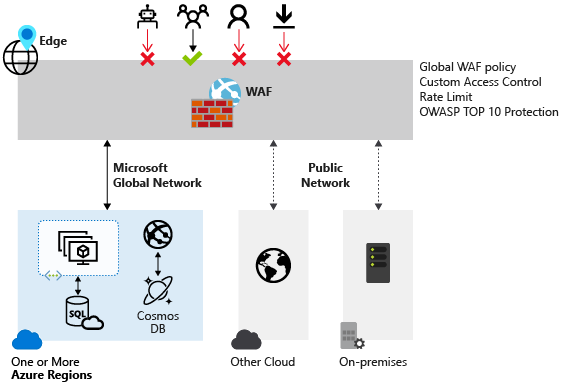
First, what is Web Application Firewall (WAF)? Well it’s a service that provides protection for your web apps from common exploits and vulnerabilities. It can be deployed with Azure Application Gateway, Azure Front Door, and Azure Content Delivery Network (CDNN is preview for now). WAF allows for central management, meaning you can react to threats faster, instead of securing each individual web application. There are a couple of specific differences depending on the service you attach a WAF policy to, and you can read about them here.
Next, what are Custom Rules? As part of each WAF policy, you have to configure a set of standard rules, such as Prevention or Detection mode, and managed rules (OWASP). However, you can also create your own rules, and in WAF these are simply called Custom Rules (CR). A CR is made up of one or more conditions followed by an action. All CRs for a WAF policy are match rules. You can have multiple CRs per policy and they are processed in order of priority in a range of 1-100, with 1 being highest priority, or processed earliest.
Now that we have the foundation, let’s look at the geomatch option. This is available within your CR as a match Condition.

Create your CR with an appropriate name and priority, then choose ‘Geo location’ from the Match type drop down as above. Next, you’ll want to ensure you choose RemoteAddr as the match variable, and decide what logic you want to apply. By logic I mean the pattern that will fire the rule. In this example, I want all traffic except Ireland blocked. So I will choose the Operation ‘Is not’, then location Ireland, then Deny. If I wanted all traffic allowed and Ireland blocked, I would simply choose the Operation ‘Is’. I recommend figuring out your pattern then working your way through the final section of the CR.
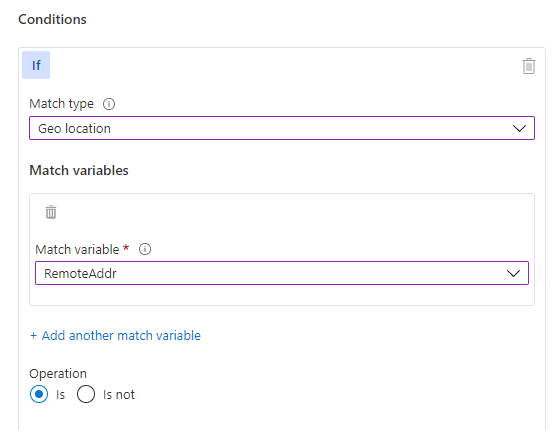
So, based on my example with Ireland, my CR now looks like this:

Now most commonly, I would see a geomatch policy applied to an Application Gateway, but it can be applied to Front Door also. On of the nice features of a WAF policy when using it with Application Gateway is that you get association choices. This means you can be as granular as having different policies per listener, or even per path rule. Giving you huge flexibility when combined with CRs.
Finally, I have obviously shown you how to create this CR in the portal, but there are other methods, like Powershell. These can be very handy if you need to recreate a geomatch CR, especially if you have multiple conditions with many countries (there is a max of 10 per condition). Note, if using these methods, you need to use country codes, like IE, and these are all listed here.
And that’s it! You have your CR created and associated. WAFs take effect pretty quickly so you should be able to test within a couple of minutes. If you want to perform a simple verify, you can switch the action from Deny traffic to Allow and retest.
Finally, a nice tip when you’re happy with your configuration is to setup an alert against your WAF should there be a change made, or worse, deleted (apply resource locks people). This runs as a signal alert from Azure Monitor against an action group as per standard

That’s it for this post, as always, if you have any questions, please get in touch!
