How to – Enable Alerts for Azure ExpressRoute

Azure ExpressRoute is Microsoft’s recommended method of accessing resources in Azure over a private connection. It is unique to the platform and can offer unparalleled resilience and performance. It also has the capability to allow you connect to Azure Public Resources, such as Storage Accounts, Azure SQL, over the same circuit and therefore, private connection.

With the above being possible, it’s clear that ExpressRoute, once implemented, becomes the key resource in your environment. As such, you would be wise to implement some level of monitoring and alerting for it.

Here, I’m going to show you how to very quickly put in place alerts should either of the required BGP sessions drop for your ExpressRoute circuit.

To add some context to that, each ExpressRoute circuit requires a pair of BGP sessions to meet SLA requirements. They will function with just one, but that’s not fully supported and definitely not recommended! So, presuming you have both active, we’ll base our alert off of that metric. We’re going to look specifically at Private Peering as it’s the most common implementation, but the logic is identical for Microsoft Peering.

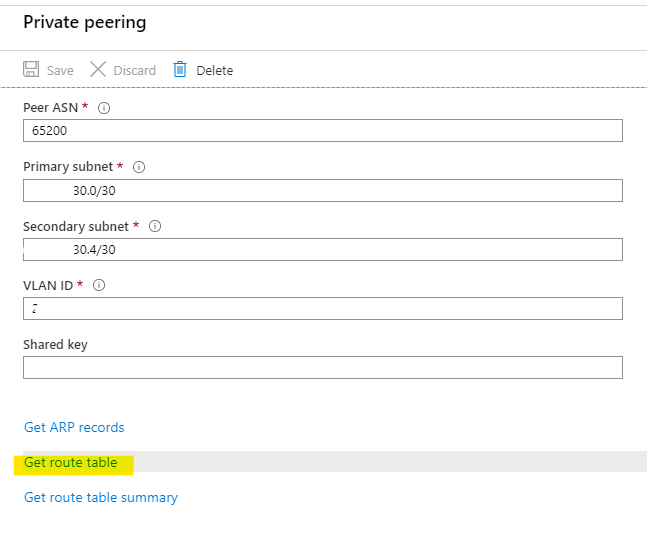
If both are active and configured correctly, you should see the same routes being advertised within the circuit if you check your route table from the Peering blade

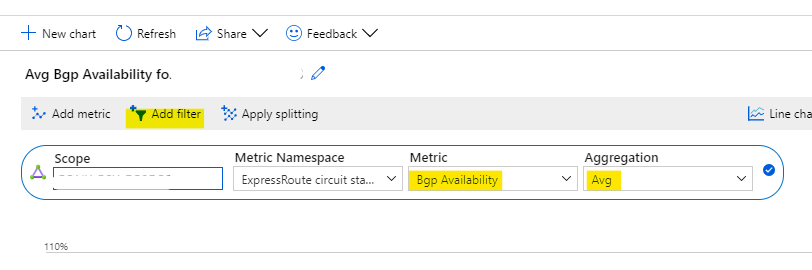
Next, let’s look at the Metric we will be using for the alert. In your ExpressRoute Circuit blade, choose Metrics. Then we’ll choose the ‘BGP Availability’ Metric and ensure Aggregation is ‘Avg’

Next, to future proof the alert, or if you have a Microsoft Peering, we’re going to apply some filtering. So choose ‘Add filter’ (highlighted above). Then we’re going to select the ‘Peering Type’ Property, and choose ‘private’ from the Values drop down and click the tiny blue tick to the right (You won’t see Microsoft if you don’t have one, but do this anyway to ensure your alert is tightly scoped).

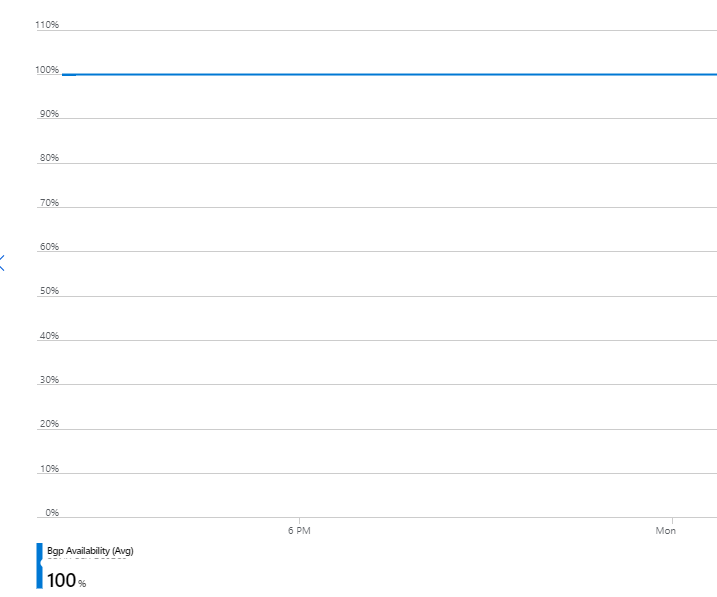
Now, we’re looking at the average BGP availability, for our Private Peering only.

To make life easier, you can now just click ‘New Alert Rule’ on the top right to use this scoped metric for your alert.

This applies the right resource scope and brings the metric across too, you now just have to configure some of the required choices on specifics.

First up, let’s confirm the condition and signal logic. Click on the blue text under Condition. You will see Private is already selected for you. I’m going to change Operator to ‘less than or equal to’ and add a value of 95.

The above settings mean that the BGP Availability metric for my private peering, over the last 5 minutes, will be assessed every minute. Should it drop below or equal to 95%, an alert will fire. You can adjust this as needed to suit your own environment.

Now, we need to define what happens when they alert fires. Click Done on the signal logic pop out, this will bring you back to the alert configuration blade.

I would recommend you create and use an Action Group, even something simple like a distribution group to email. More on Action Groups – https://docs.microsoft.com/en-us/azure/azure-monitor/platform/action-groups

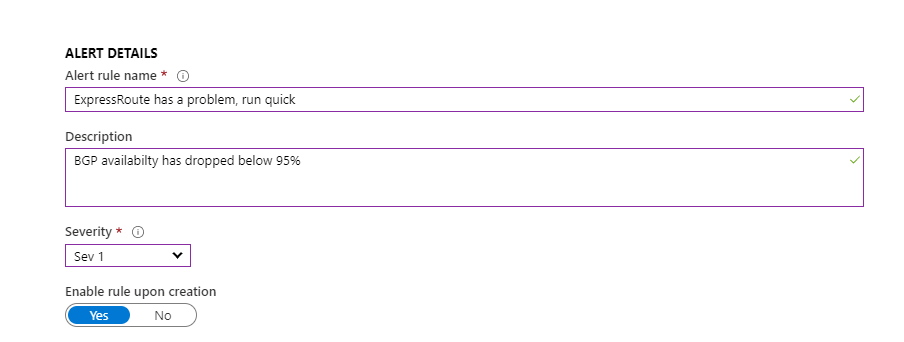
Next, define the final details for the alert. Use a descriptive name and the appropriate severity for your environment/system.

Now, the alert itself can take some time to become fully active, so I would recommend waiting about thirty minutes before attempting a test. But, please ensure you test the alert!

And that’s it. Once tested, you have now setup a fully scoped alert rule for your ExpressRoute Private Peering. You can repeat the above, and change the scope to Microsoft Peering to cover that too if you have it.

As always, if there are any questions, get in touch!

What is Azure Arc?

At Ignite 2019, Microsoft announced a new service; Azure Arc. It allows you to extend the capabilities of Azure to your on-prem environment, multi-cloud and edge. At launch, it’s only Azure Arc for Servers, but there will also be an option for data services at a later date. Everything is in public preview for now, so careful with those production environments!

Azure Arc for Servers

The basic concept is that with Azure Arc you can manage machines which are outside of Azure. Once connected, a non-Azure VM becomes a Connected Machine resource in Azure. Connected Machines have a Resource ID, and are manageable using the normally supported components such as Policy and Tags.

To register a Connected Machine, an agent needs to be installed on each local VM. The currently supported OS’ are 2012R2 or newer and Ubuntu 16.04 and 18.04. As Connected Machines are an Azure resource, normal resource limits apply (800 resources per RG etc).

The agent has some network requirements, documented here. For onboarding the agent is combined with a script. This process can be done via the Portal or Powershell. Recommendation here would be to follow the option to create a Service Principal if you need to onboard machines at scale.

You will also need to enable a couple of new resource providers in your Azure subcription:

  • Microsoft.HybridCompute
  • Microsoft.GuestConfiguration

Once you have a VM present in Azure as a Connected Machine, you can start managing it, but only using the following services at this time of the preview:

  • Guest Configuration
  • Log Analytics

So for now, the service is quite limited. But you can assume that many more features are on the roadmap. The end goal of Azure Arc is to give you a single tool set to manage all your servers and data services regardless of where they are provisioned. So whether you’re a small company with a hybrid footprint, or an MSP, Azure Arc could make your life a lot easier. One to keep an eye on for GA in 2020!

How to – Azure Policy via ARM Template

If you’ve worked with Azure for a while, you would know that one of the most efficient methods of deployment is ARM templates and one of the most powerful services is Azure Policy. What you might not know, is that you can combine the two for efficient, iterative and defined deployments.

A great point I saw recently on Twitter was that a lot of technical posts highlight features and how to use them but rarely go into why you should use them. Conscious of that, here are a couple of points on why I think you should make use of Policy via Template (PvT):

  • Quick deployment time – hilariously quick.
  • Repeatable defined structures – the exact policy definition, applied to the exact scope, with no possibility of user error.
  • Confident flexibility – Templates are idempotent; need to update the definition? Update the template, deploy the update, job done.

So if the “why” makes sense to you, let’s move onto the “how”. If it doesn’t, let me know! I’d love to hear your horror stories/use cases…

Templates can be deployed in several ways, for the sake of simplicity, I’m going to use two tools here. Visual Studio Code and Powershell. Currently you can only deploy subscription scope resources via Powershell or CLI.

There are some other differences to note. The schema for the template must be:

https://schema.management.azure.com/schemas/2018-05-01/subscriptionDeploymentTemplate.json#

When deploying the template, it must be deployed to a location and given a name (the name of the template will be used if none is specified), that combination is then immutable for that location. So if you need to change location, you need to use a new name etc.

Now, let’s create our template. For this post, I am going to use an existing Template Definition and scope it to my Subscription. While you can pass the Template Parameters via Powershell Variable, for this post I am going to define them as a Template Variable. This is tricky piece of logic as they must be defined as a nested, object array. I also define the policyID via Variable. For existing definitions, you can get this via the Portal, or Powershell command

Get-AzPolicyDefinition | select PolicyDefinitionId -ExpandProperty properties | where displayName -Match "allowed locations"
{
    "$schema": "https://schema.management.azure.com/schemas/2018-05-01/subscriptionDeploymentTemplate.json#",
    "contentVersion": "1.0.0.0",
    "parameters": {},
    "variables": {
      "policyName":"Allowed Locations",
      "policyDefinitionID":"/providers/Microsoft.Authorization/policyDefinitions/e56962a6-4747-49cd-b67b-bf8b01975c4c",
      "policyParameters":{
        "listOfAllowedLocations":{
          "value":["NorthEurope","WestEurope"]}}
    },
    "resources": [
        {
            "type": "Microsoft.Authorization/policyAssignments",
            "name": "[variables('policyName')]",
            "apiVersion": "2018-03-01",
            "properties": {
                "scope": "[subscription().id]",
                "policyDefinitionId": "[variables('policyDefinitionID')]",
                "parameters": "[variables('policyParameters')]"
            }
        }
    ]
}

Now are Policy deployment is defined and ready for use, we deploy using Powershell:

New-AzDeployment -Name "pvtDeployment" -Location northeurope -TemplateFile 'C:\Users\username\Documents\WDA\PvT.json'

You should receive a succeeded message within your shell and you can verify via the Portal. As it was a subscription level deployment, head to your Subscription blade and check the Deployments tab. You should see the Template listed as the same name as you ran for the deployment.

You can then confirm your settings via heading to Azure Policy and the Assignments blade. You will see your Policy Definition assigned at the scope you set, using the Parameters you set.

Just to go back to an early point on why you’d use this option. Look at the duration of the deployment in the above screengrab – 1 second. You simply cannot beat that!

This can obviously be used for much more complex deployments, for example, defining your own policy inline and deploying via template. The possibilities are endless with one current exception; Subscription is highest scope you can currently use, hopefully Management Groups are on the roadmap and therefore the scaling capability is excellent.

As always, if there are any questions or suggestions, please get in touch!

How to – Choose an Azure Naming Convention

When working with Azure, as with many cloud based services, one of the difficulties you may have to deal with is naming standards. Common sense would lead you to applying a single naming convention to all resources. However, in Azure, as the name of the resource can actually be used for many different things, one single convention is quite difficult to achieve. Especially if your convention requires any real degree of complexity.

The most simple reason for having a good naming convention? You cannot rename resources in Azure.

In one of my earlier posts, I discussed the benefits of using the Azure Architecture Center, we visit this again for naming conventions. The general recommendations are as follows:

So let’s look at those in some more detail.

Short and Simple

This somewhat explains itself. However there are technical justifications too. For example, a Windows VM name has a maximum character limit of 15. Keeping it simple allows you to re-use the same logic regardless of resource type, location or service.

Affix some affixes

Where possible, make use of a prefix or a suffix to add clarity to your resource names. the most common are based on environment (prod, dev, test) or instance (A, B, C or 01, 02, 03).

While trying to do the above, make sure to reference back to the matrices of support.

Policy

Depending on whether your environment is brand new, or you’re trying to implement some control on an existing environment; applying your naming convention via Policy can speed things up. You can choose all of the usual options when it comes to policy, my preferred method is to create several policies scoped to resource types that deny deployment if naming convention doesn’t match. This avoids conflicts with any auto-deployed resources. Then a catch all policy to audit everything for compliance. An example policy for VMs is below:

{
     "properties": {
         "displayName": "VM naming pattern",
         "description": "Require naming patterns for VMs.",
         "mode": "All",
         "policyRule": {
             "if": {
                 "allOf": [
                     {
                         "field": "type",
                         "match": "Microsoft.Compute/virtualMachines"
                     },
                     {
                         "not": {
                             "field": "name",
                             "match": "az-????-##"
                         }
                     }
                 ]
             },
             "then": {
                 "effect": "deny"
             }
         }
     }
 }

This checks all of the fields listed, so for Virtual Machines, where Name is Not a Match for “az-????-##” then Deny. The match pattern is defined using standard Azure Policy conditions.

Tagging

Tags can form a one to many relationship for resources. Tagging all resources that are part of a project, or have a commonality adds additional metadata to resources without adding increased complexity to your naming convention. Tagging should be viewed as a complimentary option to a good naming convention rather than an alternative. They can also be applied via Policy, saving you time and effort!

As always if there are any questions, or suggestions on how you do naming in Azure, get in touch and I’ll add them to this post!

Azure Policy – Where to Start?

One of the positives of Azure is that it can offer you so many possibilities when it comes to deployment options. However, if you don’t implement the correct governance, this can very quickly become a negative. Historically, Cloud has had difficulties when it comes to sprawl; Azure Policy is a service that will help prevent that.

Azure Policy isn’t only a tool for prevention either. With the right policies, you can audit and enhance your environment in terms of efficiency, security and compliance. This gives you greater insight into your Azure deployment and confidence in your requirements.

Governance in Azure is addressed in many ways; a good place to start for overall strategy is the Azure Architecture Center. It has specific sections on Governance as well as overall design guidelines.

So how does Azure Policy work? At its core, it is an assessment service. You create policies with specific rules and scopes. Once the policies are active, they audit all resources in the included scope for compliance. Policies can range in complexity; you can use the default templates or create a custom one to meet your needs.

There are two core areas when dealing with Azure Policy:

Policy Definition

Every policy must have a definition. The definition contains all the details of the conditions under which it’s enforced. It also has the defined effect that occurs if the conditions are met. Definitions are created using JSON and the full structure is defined here. You will need familiarity with this if you are going to write your own custom policies.

Allowed Locations Policy Example:

{
    "properties": {
        "mode": "all",
        "parameters": {
            "allowedLocations": {
                "type": "array",
                "metadata": {
                    "description": "The list of locations that can be specified when deploying resources",
                    "strongType": "location",
                    "displayName": "Allowed locations"
                },
                "defaultValue": [ "westus2" ]
            }
        },
        "displayName": "Allowed locations",
        "description": "This policy enables you to restrict the locations your organization can specify when deploying resources.",
        "policyRule": {
            "if": {
                "not": {
                    "field": "location",
                    "in": "[parameters('allowedLocations')]"
                }
            },
            "then": {
                "effect": "deny"
            }
        }
    }
}
Policy Assignment

A policy assignment is a policy definition that has been assigned to take place within a specific scope. Assignments range from Management Groups to a single Resource Group. The scope of the assignment refers to all the Resource Groups, Subscriptions, or Management Groups that the Definition is assigned to. Inheritance is enabled for all assignments. Therefore, a policy applied to a resource group is also applied to all resources in that resource group. However, you can include exclusions as a sub-scope of the assignment. For example, a Definition is assigned to a Subscription; all Resource Groups inherit the Definition but you need a single Resource Group excluded. Rather than redo the Assignment for each Resource Group, you can simply exclude it from the Subscription assignment.

Your First Policy

Now that you understand what Azure Policy is, let’s get started with our first policy. For this example, I’m going to prevent Public IP addresses being deployed within a Subscription. This is something I commonly add to IaaS projects that are connected to a local LAN.

Once you’ve logged in to the Azure Portal, make your way to the Azure Policy service, I normally use the search bar as below as it’s quick!

Once you’re on the Overview blade, a handy option for your first time is to click the Getting Started option. This details the steps to take and we’re going to start by browsing default Definitions so click that View Definitions option as below:

This will bring you to the Definitions blade. You will see a lot of built-in policies. To simplify things, click the search bar and enter “not allowed”, this will bring up the Definition we will use, then go ahead and click on the Policy name “Not allowed resource types” as below:

You’re now in the Definition page, where you can see the exact structure in JSON format. We’re going to jump straight to Assignment from here by clicking “Assign” as below:

This will bring you the assignment blade. Our first step is to set a scope. I’m going to go ahead and choose my Subscription and a Resource Group, then click “Select” as below:

We’re going to leave most of the settings as they are, but you can where you can set Exclusions below. We’re going to click the drop down arrow as highlighted:

This opens a huge list of resource providers and types. Thankfully, there is a search bar, so type in “public” to narrow the list and tick the checkbox for Microsoft.Network/publicIPAddresses, then click away from the list as below:

We’re almost there! You can see that publicIPAddresses are now defined as a parameter. So click the blue “Assign” button as below:

Now your policy is assigned, we need to give it a couple of minutes to propagate. Now, when I try to create a Public IP resource in my scoped Resource Group (I’ve used POSH in Cloudshell, but deployment method doesn’t matter) I’m told I cannot as it’s disallowed by policy:

You’ve now successfully applied your first Azure Policy! As you can see, even though this is a single Definition it is still very powerful. Your options to layer Definitions and apply custom ones allow for full control of your environment with very little effort. Azure Policy should be high on your list of priorities for your Azure deployments.

As always, if there are any questions, please get in touch!