How to – Connect to an Azure VM

If you’ve just created your first Azure VM and are struggling to connect to it, this post should offer some help. I’ll cover connecting to both a Windows VM and a Linux VM, so RDP and SSH.

Connect to a Linux VM in Azure

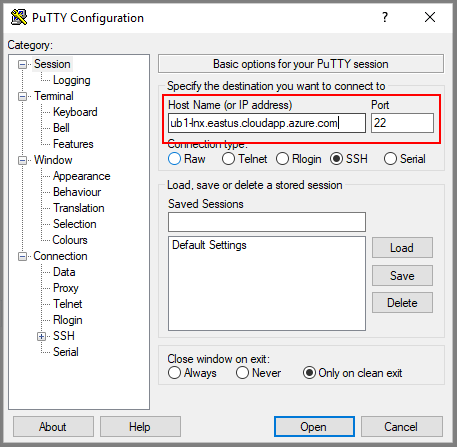
To connect over SSH, you’ll need a client. A commonly used client is Putty, but you can use whichever you like. The first step is to know the details of your VM that are required to make a connection. When you built your VM, you would have created an administrator username and either a password or SSH key, ensure you have those to hand.

Next, you will need the IP or DNS name of the VM to connect to it. You can get this via the Azure Portal. If you click on the VM you want to connect to, it will by default open the Overview blade. From here, you will be able to copy the IP or DNS as required.

VM Overview settings

Then, using Putty, or a similar client, you can use that IP or DNS name, and port 22, to access SSH

PuTTY terminal settings

Once your session opens, you’ll be prompted for the credentials mentioned earlier.

Connect to a Windows VM in Azure

To connect via RDP, you’ll need to be using a machine that has an RDP client. This comes built into Windows. Next, you need to know the details of your VM that are required to make a connection. When you built your VM, you would have created an administrator username and a password, ensure you have those to hand.

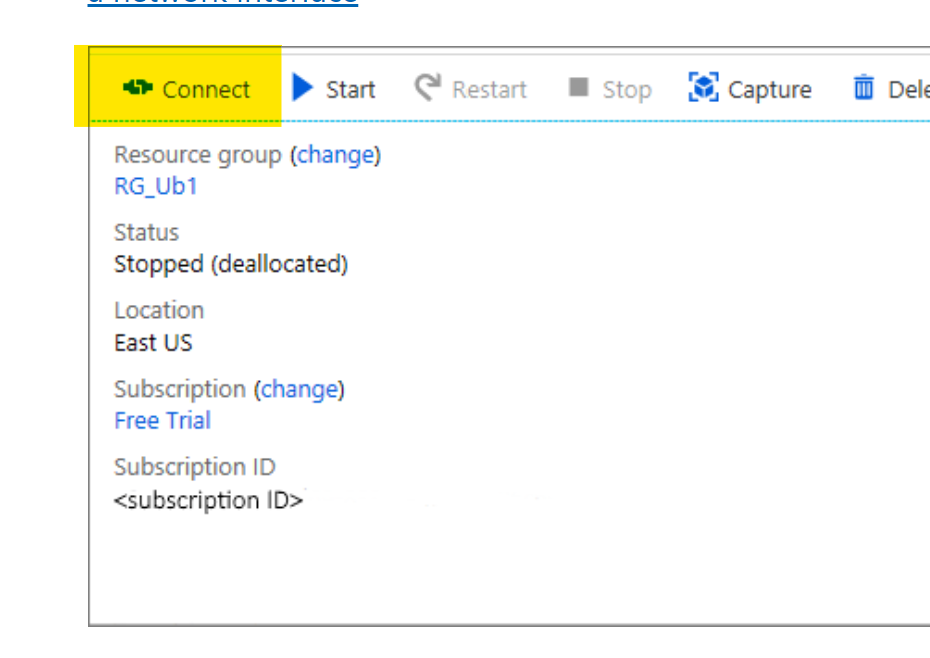
Next, login to the Azure Portal, click the VM you want to connect to. This will open the Overview blade. From here you can click the Connect button. This will generate an RDP file for you to download and use.

Open the RDP file once downloaded. You may see some warnings relative to certificates, these can be ignored. Click connect.

Screenshot of a warning about an unknown publisher.

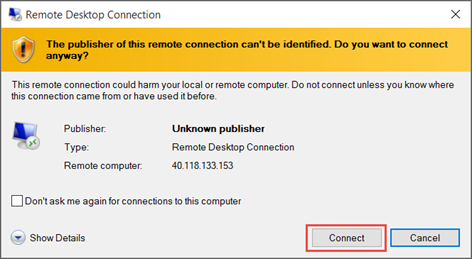
You will be prompted for credentials, these are the credentials as mentioned earlier. Once entered, you may see some warnings relative to certificates, these can be ignored.

Troubleshooting

If you’re having problems establishing a connection to your VM, first check if there is an NSG assigned to the VM or subnet the VM resides in. If there is, this NSG will require a rule to allow RDP/SSH access. By default, all connections via Public IP are blocked.

How to – Find your Azure Tenant ID

Before you can start with Azure, you need an Azure Subscription. Each and every Azure Subscription must be associated with an Azure AD Tenant. This is sometimes referred to as a directory.

For those who have Office 365, one would have been created for you automatically as part of your deployment. If you don’t have/use Office 365, then a tenant can be created as part of the process required to sign up for an Azure Subscription.

All Azure AD tenants have a naming format as follows: %uniquestring%.onmicrosoft.com e.g. contoso.onmicrosoft.com

However, for several services you may need to use the unique ID rather than the name. Here is how to find it.

1. Log into Azure AD via the Azure Portal, here is a direct link to the Azure AD blade

2. Once on the Azure AD blade, scroll down and click on the Properties option

3. This opens a new blade, which gives you all the specific details relevant to your tenant. Right in the middle is your tenant ID, there is a copy button to the right.

How to – Resize an Azure VM

When using VMs in Azure, one of the important things to get right is the sizing. Azure offers several VM series and multiple sizes within each that have fixed allocations of resource such as vCPU and RAM. There are also speciality series that offer additional capabilites like vGPU. Below is a table that covers the majority of series available and their recommended purpose.

There are many reasons you may need to resize a VM, but this post is about how to do it, rather than why. A quick tip, make sure you check out Azure Advisor for some help with this! Regardless of if you run a Windows VM or a Linux VM the below steps are accurate.

The first thing to note, you can resize a VM using any of the ARM tools you like. Such as CLI, Templates etc. However, for this post, I’m going to explain how to do it via the Portal. I would recommend that if you are new to Azure, this is also where you start, until you are familiar with the series and sizes as well as their respective costs.

Azure VMs are deployed on physical servers within an Azure datacenter. These servers are grouped together into hardware clusters. By design, each cluster does not support all VM series that are available. So if you are currently running a DSv3 series you may not be able to resize to a different series, such as an NCv2 immediately. You will however, always be able to resize within your current series.

Basic steps to resize

  • Login to the Azure Portal
  • Select the VM you need to resize
  • Click the Size option under Settings
  • Click the size you would like
  • Click Resize

NOTE: Your VM will need to restart, be wary of Dynamic Public IPs – the Portal should flag this.

Some things to note with the above process, when the VM is active and you click on Size, you will be displayed with a table of series and size currently available in the active cluster, as mentioned earlier. So for my VM, when active I see the below screengrab, note the highlighted number of sizes available.

If I Stop my VM before choosing the Size blade, I am now given the option to choose from the entire range available in the current region. Again note the highlighted number available in the below screengrab.

So, as I am sure you’ve guessed, to resize to any series VM, you must first Stop your VM. This ensure that the VM instance can be moved to a different hardware cluster when it’s started. Changing to a different series obviously takes slightly longer as you have to Stop your VM first etc. However, there is nothing else you have to do for this change.

Hopefully this post has helped understand how to resize and some of the series options you may need to address.

As always, if there are any questions please get in touch!

Azure Migrate – Where to Start?

If you’re thinking about making a move to Azure, it’s important to first understand how to approach it. With the correct approach and sufficient planning, a migration can be straight forward, efficient and void of surprises.

Therefore, the place to start is the Microsoft Cloud Operating Model. This is a detailed white paper that allows you to create a strategy for migration. Covering cloud readiness, people strategy and technical analysis, it’s a comprehensive document. Once you have an understanding of your business strategy, read “Why am I moving to Azure?” and your people strategy, read “Who is moving us to Azure?” you can progress to the technical phase.

The vast majority of initial moves to Azure are often re-host migrations, or “lift and shift”, as these are most common, I will reference this scenario as an example. There are four stages:

The first step of the technical phase is to Assess. This means understanding what it is that you are moving and what the best process will be. This includes everything from involving the business stake holders, to cost calculation to application evaluation. This analysis should give you an output that not only details where the application could go but more importantly, where it can go.

Microsoft offer several tools to help with some of this. First up is Azure TCO. This allows you to estimate the cost savings you could make by migrating to Azure. Next is Azure Migrate, this is an assessment tool that is FREE and allows you to discover, document and assess your workloads and their dependencies. You can then create cost estimates for running them in Azure.

Azure Migrate Dependencies Example

Now that you have your environment discovered, grouped and sized correctly, you can begin to migrate your workloads. Microsoft provide a service for this also, Azure Site Recovery (ASR). This service allows you to replicate your servers from your on-premises environment. For most services it is application aware, meaning it can replicate services like SQL server without any data loss. Before you implement ASR it is important to use your data from Azure Migrate to capacity plan for your replication requirements. Taking this step allows for greater speed and efficiency during replication and migration of workloads.

Microsoft also provide a script repository for migrating large numbers of VMs at once. These can be from VMware, AWS, GCP or physical servers. There are some limitations, most restrictive is lack of support for Managed Disks, but you can always flip these manually later. The scripts and guide can be found here.

How long it takes to migrate your workloads is determined by your business requirements. However, once complete, it is vital that you revisit these workloads for optimisation. Azure Advisor can provide recommendations but the key areas to focus on are:

  • VM sizing – Ensure the VM is running on an appropriate size to gain maximum cost efficiency
  • Storage tier – Ensure the disks associated with the VM are using the correct tier to balance performance requirements against cost.
  • Reserved Instances – Once the VM is sized correctly, purchase Reserved Instances to achieve the maximum discount to run your workload for one to three years.

Now that your workloads are migrated and optimised, your final step is to ensure they’re secure and managed correctly. The best place to start with this process is Azure Security Center. This provides unified security management and allows you to take action to mitigate risk and implement actionable recommendations. This will include common requirements like disk encryption and anti virus. More advanced and platform specific features like Just In Time Access are also available.

So to recap, there is 1 prerequisite then 4 main steps:

  1. Understand and create your Cloud Operating Model
  2. Assess your current environment
  3. Migrate it!
  4. Optimise your utilisation
  5. Secure and Manage it

If all of the above is completed and optimisation and security are reviewed regularly you can be confident in the quality of your environment state. If you have any questions, feel free to tweet me @wedoAzure or leave a comment!

Azure Monitor – Show me all the data!

A significant put possibly less exciting update to Azure over the past few months has been the revamp and update of Azure Monitor (AzMon). In my opinion, this is a resource that should be included in your design for all deployments. It is now a comprehensive solution for collecting, analysing, and acting on your telemetry from Azure as well as on-premises environments.

The below graphic gives an overview of AzMon and it’s three key areas. Left-to-right, you start with the six possible data ingestion sources for telemetry data. As you can see, everything from application to infrastructure is supported. The two key forms of data used is next, Metrics and Logs. The final area, highlights the processing functions available.

monitoroverview

AzMon collects the following data for processing:

  • Application monitoring data: Data about the performance and functionality of the code you have written, regardless of its platform.
  • Guest OS monitoring data: Data about the operating system on which your application is running. This could be running in Azure, another cloud, or on-premises.
  • Azure resource monitoring data: Data about the operation of an Azure resource.
  • Azure subscription monitoring data: Data about the operation and management of an Azure subscription, as well as data about the health and operation of Azure itself.
  • Azure tenant monitoring data: Data about the operation of tenant-level Azure services, such as Azure Active Directory.

As mentioned previously, the data slots neatly into two categories:

  1. Metrics – You can use Metrics Explorer to view resource performance among other things over periods of time. These can be presented immediately within the portal or additional dashboards can be created to visualise.
  2. Logs –  Using Log Analytics helps to quickly retrieve, consolidate, and analyse the collected log data. This can be then be re-used in visualisations as well as alerting.

The Docs site for AzMon is fantastic. It is filled with guidance on setup as well as tutorials relating to common scenarios, rather than regurgitate, below are my personal picks:

Visualise your log data

Respond to events using alerts

Application health alerts

Also hugely important is the level of integration with other services that AzMon offers, take a look here for the currently supported list.