Microsoft continues to update it’s role based exams and next on the list is AZ-303. This is the updated version of AZ-300 and should launch at the end of June 2020. Currently this is arguably the most difficult exam certification path as it is one of only two Expert level certifications for Azure. This post will cover AZ-303 and here is what Microsoft have to say about it:
Candidates for this exam are Azure Solutions Architects who advise stakeholders and translate business requirements into secure, scalable, and reliable solutions. Candidates should have advanced experience and knowledge of IT operations, including networking, virtualization, identity, security, business continuity, disaster recovery, data platform, budgeting, and governance. This role requires managing how decisions in each area affects an overall solution. Candidates must have expert-level skills in Azure administration and have experience with Azure development processes and DevOps processes.
As the exam is still in beta, if you take it, it will not be scored immediately. So bear that in mind before you sit it! Of course, if you pass the exam, once scored, it will count towards the certification.
If you do want to sit the exam and register before August 10th 2020, there are 300 discounted exams on offer if you use the code – AZ303DonSuperStar
As always, a great place to start is Microsoft Learn. There are several interactive learning paths that are free that you can work through at your own pace. I find this a great way to study and gain greater understanding of the services by actually using them and you will need to be very familiar with Azure to pass this exam.
Below I’ve put together a collection of links relevant to the sections Microsoft have highlighted as being part of the skills measured for this exam. These are only guide links, sometimes you need to explore a topic much more deeply if you are not familiar with it. Hopefully these study materials will help guide you to successfully passing AZ-303!
Implement and Monitor an Azure Infrastructure (50-55%)
Implement cloud infrastructure monitoring
- Security
- https://docs.microsoft.com/en-us/azure/security/fundamentals/management-monitoring-overview
- https://docs.microsoft.com/en-us/azure/security-center/security-center-monitoring
- Monitor Performance
- https://docs.microsoft.com/en-us/azure/azure-monitor/platform/diagnostic-settings
- https://docs.microsoft.com/en-us/rest/api/monitor/metricbaseline/get
- https://docs.microsoft.com/en-us/azure/cost-management-billing/costs/tutorial-acm-opt-recommendations
- https://docs.microsoft.com/en-us/azure/azure-monitor/overview (search the contents for performance, multiple tutorials)
- https://docs.microsoft.com/en-us/azure/azure-monitor/visualizations
- Monitor Health and Availability
- https://docs.microsoft.com/en-us/azure/networking/network-monitoring-overview
- https://docs.microsoft.com/en-us/azure/service-health/overview
- Monitor Cost
- https://docs.microsoft.com/en-us/azure/cost-management-billing/costs/cost-mgt-alerts-monitor-usage-spending
- https://docs.microsoft.com/en-us/azure/cost-management-billing/costs/tutorial-export-acm-data
- Configure Advanced Logging
- https://docs.microsoft.com/en-us/azure/azure-monitor/insights/insights-overview
- https://docs.microsoft.com/en-us/azure/azure-monitor/learn/quick-create-workspace (go deeper on config options)
- Configure logging for workloads
- https://docs.microsoft.com/en-us/azure/azure-monitor/platform/data-platform-logs#sources-of-azure-monitor-logs
- Action Groups
- https://docs.microsoft.com/en-us/azure/azure-monitor/platform/action-groups
- Advanced Alerts
- https://docs.microsoft.com/en-us/azure/azure-monitor/platform/alerts-managing-alert-instances
- https://docs.microsoft.com/en-us/azure/azure-monitor/platform/alerts-log
Implement storage accounts
- https://docs.microsoft.com/en-us/azure/storage/common/storage-introduction
- https://docs.microsoft.com/en-us/azure/storage/files/storage-files-planning
- https://docs.microsoft.com/en-us/azure/storage/common/storage-account-overview
- https://docs.microsoft.com/en-us/azure/storage/common/storage-network-security
- https://docs.microsoft.com/en-us/azure/storage/common/storage-sas-overview
- https://docs.microsoft.com/en-us/azure/storage/common/storage-auth-aad
- https://docs.microsoft.com/en-us/azure/storage/common/storage-account-keys-manage
- https://docs.microsoft.com/en-us/azure/storage/common/storage-redundancy
- https://docs.microsoft.com/en-us/azure/storage/common/storage-disaster-recovery-guidance
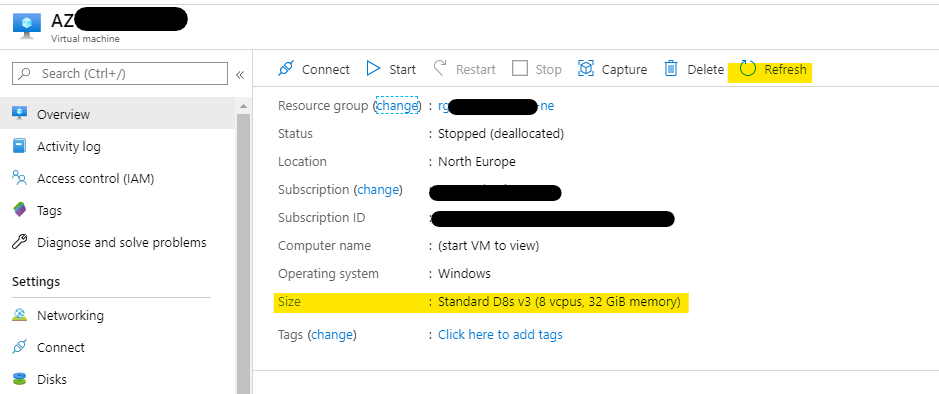
Implement VMs for Windows and Linux
- https://docs.microsoft.com/en-us/azure/virtual-machines/windows/tutorial-availability-sets
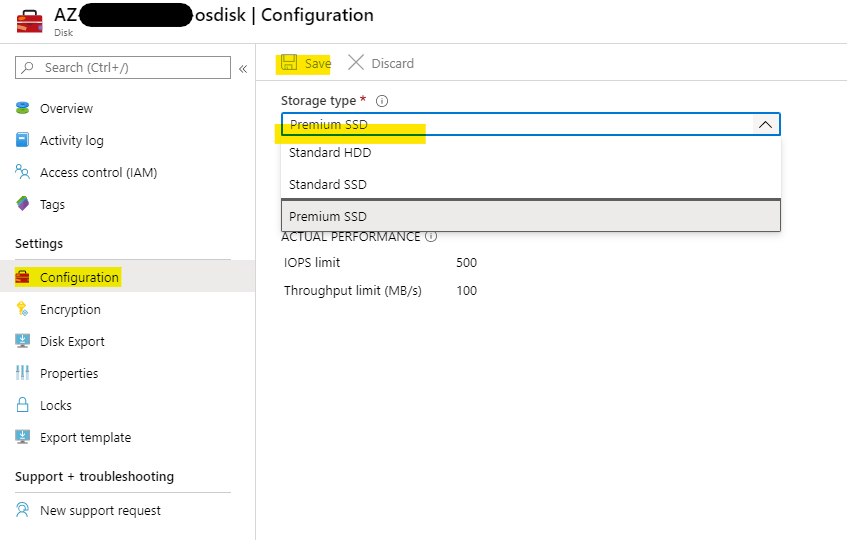
- https://docs.microsoft.com/en-us/azure/virtual-machines/windows/managed-disks-overview
- https://docs.microsoft.com/en-us/azure/virtual-machines/windows/sizes (go deeper on size purpose)
- https://docs.microsoft.com/en-us/azure/virtual-machines/windows/dedicated-hosts
- https://docs.microsoft.com/en-us/azure/virtual-machine-scale-sets/overview
- https://docs.microsoft.com/en-us/azure/security/fundamentals/azure-disk-encryption-vms-vmss
Automate deployment and configuration of resources
- https://docs.microsoft.com/en-us/azure/azure-resource-manager/templates/export-template-portal
- https://docs.microsoft.com/en-us/azure/azure-resource-manager/templates/template-syntax ( go deeper on templates overall)
- https://docs.microsoft.com/en-us/azure/azure-resource-manager/templates/template-tutorial-create-first-template?tabs=azure-powershell (whole tutorial)
- https://docs.microsoft.com/en-us/azure/virtual-machines/windows/using-managed-disks-template-deployments
- https://docs.microsoft.com/en-us/azure/azure-resource-manager/templates/deployment-tutorial-local-template?tabs=azure-powershell
- https://docs.microsoft.com/en-us/azure/automation/automation-quickstart-create-runbook
Implement virtual networking
- https://docs.microsoft.com/en-us/azure/virtual-network/tutorial-connect-virtual-networks-portal
- https://docs.microsoft.com/en-us/azure/vpn-gateway/vpn-gateway-vnet-vnet-rm-ps?toc=/azure/virtual-network/toc.json
- https://docs.microsoft.com/en-us/azure/virtual-network/virtual-network-manage-peering
Implement Azure Active Directory
- https://docs.microsoft.com/en-us/azure/active-directory/fundamentals/add-custom-domain
- https://docs.microsoft.com/en-us/azure/active-directory/identity-protection/overview-identity-protection (try an implementation using docs)
- https://docs.microsoft.com/en-us/azure/active-directory/authentication/concept-sspr-howitworks
- https://docs.microsoft.com/en-us/azure/active-directory/conditional-access/concept-conditional-access-policies
- https://docs.microsoft.com/en-us/azure/active-directory/authentication/howto-mfa-userstates
- https://docs.microsoft.com/en-us/azure/active-directory/authentication/howto-mfa-mfasettings#fraud-alert
- https://docs.microsoft.com/en-us/azure/active-directory/authentication/howto-mfa-mfasettings#one-time-bypass
- https://docs.microsoft.com/en-us/azure/active-directory/authentication/howto-mfa-mfasettings#trusted-ips
- https://docs.microsoft.com/en-us/azure/active-directory/authentication/howto-mfa-mfasettings#verification-methods
- https://docs.microsoft.com/en-us/azure/active-directory/b2b/what-is-b2b
- https://docs.microsoft.com/en-us/azure/active-directory/users-groups-roles/licensing-directory-independence
Implement and manage hybrid identities
- https://docs.microsoft.com/en-us/azure/active-directory/hybrid/whatis-azure-ad-connect
- https://docs.microsoft.com/en-us/azure/active-directory/hybrid/how-to-connect-syncservice-duplicate-attribute-resiliency
- https://docs.microsoft.com/en-us/azure/active-directory/hybrid/how-to-connect-password-hash-synchronization
- https://docs.microsoft.com/en-us/azure/active-directory/hybrid/concept-azure-ad-connect-sync-architecture
- https://docs.microsoft.com/en-us/azure/active-directory/hybrid/how-to-connect-sso-quick-start
- https://docs.microsoft.com/en-us/azure/active-directory/hybrid/how-to-connect-health-operations
Implement Management and Security Solutions (25-30%)
Manage workloads in Azure
- https://docs.microsoft.com/en-us/azure/migrate/how-to-create-assessment
- https://docs.microsoft.com/en-us/azure/cloud-adoption-framework/migrate/azure-migration-guide/migrate?tabs=Tools
- https://docs.microsoft.com/en-us/azure/migrate/prepare-for-migration
- https://docs.microsoft.com/en-us/azure/backup/backup-azure-vms-introduction
- https://docs.microsoft.com/en-us/azure/site-recovery/azure-to-azure-quickstart
- https://docs.microsoft.com/en-us/azure/automation/automation-onboard-solutions-from-browse
Implement load balancing and network security
- https://docs.microsoft.com/en-us/azure/load-balancer/concepts (and deploy how-tos)
- https://docs.microsoft.com/en-us/azure/application-gateway/how-application-gateway-works (and deploy how-tos)
- https://docs.microsoft.com/en-us/azure/web-application-firewall/overview
- https://docs.microsoft.com/en-us/azure/firewall/tutorial-firewall-deploy-portal
- https://docs.microsoft.com/en-us/azure/frontdoor/front-door-overview (and quickstart)
- https://docs.microsoft.com/en-us/azure/traffic-manager/traffic-manager-overview (and all tutorials)
- https://docs.microsoft.com/en-us/azure/virtual-network/security-overview
- https://docs.microsoft.com/en-us/azure/virtual-network/application-security-groups
- https://docs.microsoft.com/en-us/azure/bastion/bastion-overview
Implement and manage Azure governance solutions
- https://docs.microsoft.com/en-us/azure/cloud-adoption-framework/ready/azure-setup-guide/organize-resources?tabs=AzureManagementGroupsAndHierarchy
- https://docs.microsoft.com/en-us/azure/role-based-access-control/overview
- https://docs.microsoft.com/en-us/azure/role-based-access-control/custom-roles
- https://docs.microsoft.com/en-us/azure/role-based-access-control/quickstart-assign-role-user-portal
- https://docs.microsoft.com/en-us/azure/role-based-access-control/conditional-access-azure-management
- https://docs.microsoft.com/en-us/azure/role-based-access-control/best-practices
- https://docs.microsoft.com/en-us/azure/role-based-access-control/role-assignments-list-portal
- https://docs.microsoft.com/en-us/azure/active-directory/privileged-identity-management/pim-how-to-perform-security-review?toc=/azure/active-directory/governance/toc.json
- https://docs.microsoft.com/en-us/azure/governance/policy/overview (and concepts)
- https://docs.microsoft.com/en-us/azure/governance/blueprints/create-blueprint-portal (and all how-tos)
Manage security for applications
- https://docs.microsoft.com/en-us/azure/key-vault/general/basic-concepts (and tutorials)
- https://docs.microsoft.com/en-us/azure/active-directory/managed-identities-azure-resources/overview
- https://docs.microsoft.com/en-us/azure/active-directory/develop/quickstart-register-app
Implement Solutions for Apps (10-15%)
Implement an application infrastructure
- https://docs.microsoft.com/en-us/azure/app-service/overview (and tutorial for your preferred code)
- https://docs.microsoft.com/en-us/azure/app-service/app-service-web-get-started-windows-container
- https://docs.microsoft.com/en-us/azure/app-service/overview-hosting-plans
- https://docs.microsoft.com/en-us/azure/app-service/configure-common
- https://docs.microsoft.com/en-us/azure/app-service/web-sites-integrate-with-vnet
- https://docs.microsoft.com/en-us/azure/app-service/deploy-staging-slots
- https://docs.microsoft.com/en-us/azure/logic-apps/quickstart-create-first-logic-app-workflow (and tutorials)
- https://docs.microsoft.com/en-us/azure/azure-functions/functions-overview (all overview and quickstarts)
Implement container-based applications
- https://docs.microsoft.com/en-us/azure/container-registry/container-registry-tutorial-quick-task
- https://docs.microsoft.com/en-us/azure/aks/tutorial-kubernetes-prepare-app (full tutorial)
- https://docs.microsoft.com/en-us//azure/container-registry/container-registry-get-started-docker-cli
- https://docs.microsoft.com/en-us/azure/container-instances/container-instances-tutorial-prepare-app (all 3 steps)
Implement and Manage Data Platforms (10-15%)
Implement NoSQL databases
- https://docs.microsoft.com/en-us/azure/cosmos-db/table-storage-overview
- https://docs.microsoft.com/en-us/azure/cosmos-db/introduction
- https://docs.microsoft.com/en-us/azure/cosmos-db/cassandra-introduction (look at other APIs too)
- https://docs.microsoft.com/en-us/azure/cosmos-db/distribute-data-globally
Implement Azure SQL databases
- https://docs.microsoft.com/en-us/azure/azure-sql/database/quickstart-content-reference-guide (all quickstarts)
- https://docs.microsoft.com/en-us/azure/azure-sql/managed-instance/quickstart-content-reference-guide (all quickstarts)
- https://docs.microsoft.com/en-us/azure/azure-sql/database/active-geo-replication-overview
- https://docs.microsoft.com/en-us/azure/azure-sql/database/firewall-create-server-level-portal-quickstart