How to – Deploy Azure Firewall Premium using Bicep

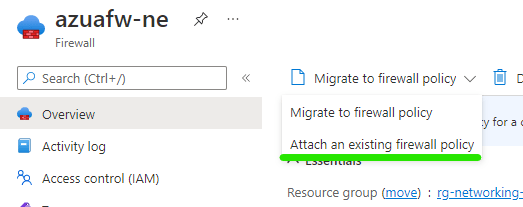
With the launch of a premium SKU for Azure Firewall, many people became interested in both testing and migrating to the SKU for new features. However, the migration path requires that you stop/deallocate your Azure Firewall (AFW), modify the SKU, then start up again.

With the outage required, it’s nice to have an infrastructure-as-code solution to allow for quick testing in advance/parallel. It’s also a worthwhile piece of effort to have your rules and config documented, as these can be kept somewhat separate to your SKU requirements, especially rules.

This post will go through what is required to have Azure Firewall Premium ready to deploy using Bicep. The repo includes some bare minimums to complete testing, but you can modify as required by simply modifying and reusing the AFW module for your own environment. An example would be adding your own certificate for TLS inspection testing.

All of the code discussed in this post is located on Github in this repo.

So I have split out the test resources into several modules, which allows for better organisation, but also allows me to reuse code blocks when I want to. As I go, I am building up a set of bicep files I can reuse as needed on other environment with minimal changes.

Code directory structure

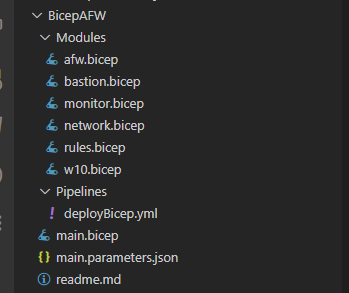
As this post is about Azure Firewall, lets’ start there – afw.bicep

afw.bicep in visualiser

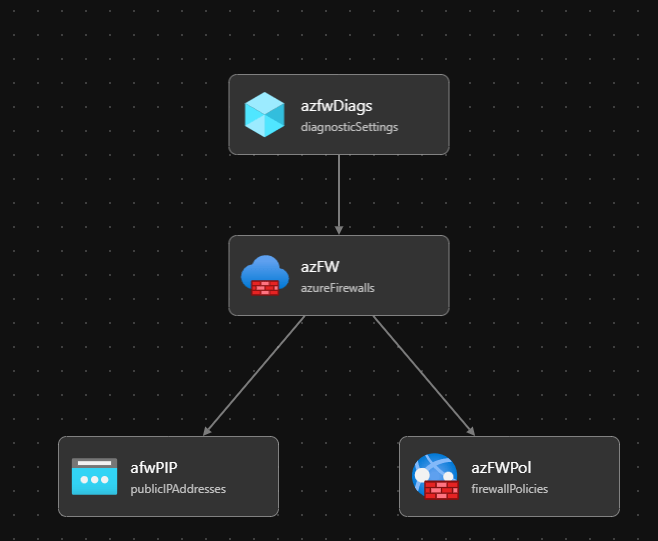
As you can see, the Azure Firewall module is quite simple. The rest of the core network resources required to actually build an Azure Firewall are in network.bicep. This module can be viewed as a grouping for your AFW settings.

The Firewall Policy resource – azFWPol – is where some complexity comes into play, especially the differences for Premium. You may need to consider conditional deployments here, if you wanted your code to be flexible depending on your tier. For example, if Dev, deploy Standard SKU etc. Although SKU is set within the Firewall resource – azFW.

Now, you might be asking (if you have looked at the code!) but where are my rules? I have moved these out to a separate module to allow for simplicity of changes. Which means we will rarely have to modify the AFW module, and our edit risks are reduced.

The module – rules.bicep – simply contains a single rule collection, with a single rule. But the premise is this, using Bicep, you can control and document all rules as code, making operation much easier. Where it can become quite complex is where you have complex, large scale rule collection groups. If this is the case, you may consider splitting these out into their own individual modules. This will depend on your environment.

However, the beauty of having this setup, and one of the reasons behind this post, is so that you can quickly test things if/when required. This whole build consistently takes under ten minutes deploying to North Europe using Microsoft hosted agents

Pipeline deploy runtime example

And that is it, the repo contains all you need to deploy Azure Firewall Premium, and edit to your specific requirements. Good luck with your testing, and as always if there are any questions – just ask!

How to – Control your Network with Azure Policy

In many Azure environments, Network is core to the solution. As such, it is one of the most critical components to design correctly and with the required configuration relative to posture and security.

For example, you create a well architected network, with a focus on security and performance. It works well, but then changes occur outside of your original design – and it starts to come apart.

Azure Policy is one solution to ensure that this does not happen. For this specific topic, Azure Policy will focus on two areas:

  1. Enforce standards
  2. Systematically assess compliance

It can also action remediation using DINE or deploy-if-not-exists policies. That may be your preference, but for me that’s not something I like at the network layer πŸ™‚

So first, my preference is to create a core policy set, derived from your core network design. On Azure Policy, this will be policy definitions grouped as an initiative. Where possible, it is efficient to use existing built-in definitions. However, if required you can create custom definitions and also include them in your initiative.

For this post, I have created a simple example initiative that includes several built-in policies based on some network and security requirements for an app architecture.

Within this set, you can see “Not allowed resource types”, in here I have included several public or connection focussed resources such as:

  • Public IP addresses
  • VNET Peerings
  • Local Network Gateways

The idea behind the above aligns with the purpose of Azure Policy, restrict and define the platform. This core initiative obviously has a focus on network type resources, but the same basic principal applies. Similar again in approach is the ability to allow exclusions where necessary. For example, allowing VNET peering in a network resource group. However, don’t forget/ignore RBAC, this should at minimum compliment your policy requirements.

While this example is quite simple, as I mentioned, you can layer complexity in via custom policies (creation tutorial here). One I have always liked is a policy to ensure that your subnets have the appropriate Route Table applied to ensure traffic is being directed appropriately, for example, to a firewall. The linked example is just an audit for subnets without ANY route table, but you can expand on this to include a specific route table.

{
  "properties": {
    "displayName": "AINE Route Table for subnets in vnets",
    "policyType": "Custom",
    "mode": "All",
    "description": "Custom policy to audit if a route table exists on appropriate subnets in all vnets",
    "metadata": {
      "version": "1.1.0",
      "category": "Network"
    },

    "policyRule": {
      "if": {
        "allOf": [
          {
            "field": "type",
            "equals": "Microsoft.Network/virtualNetworks/subnets"
          },
          {
            "field": "name",
            "notEquals": "AzureBastionSubnet"
          },
          {
            "field": "Microsoft.Network/virtualNetworks/subnets/routeTable.id",
            "exists": false
          }
        ]
      },
      "then": {
        "effect": "audit"
      }
    }
  }
}

The above is stored on a repo in Github for you to re-use if needed, and don’t forget if you are using VS code to install the Azure Policy extension to make life a bit simpler!

How to – Create an Outbound Static IP for App Services

Azure App Services are an excellent way to run all sorts of applications within Azure. Multiple tiers offer several sets of performance and functionality, generally meaning there is something to suit all requirements and budgets.

As these are PaaS there are a few specific network elements to consider and be aware of. One that I have seen become more common is the request to safelist an App Service. This request regularly requires IPs and this is when we start to run into an issue.

First up, your App Service will be assigned quite a few IPs. When you deploy an App Service Plan, it’s placed in a deployment unit, or you might see this referred to as a webspace. Each one of these is assigned a set of outbound IPs.

An example is below:

Many Outbound IPs assigned to an App Service

This generally causes concern with network/security teams as they are hoping to simply allow a small range, maybe a second for DR. Whereas this outbound range is actually the range for all App Service Plans deployed in that deployment unit, not just your App Service.

Next, you might make a change to your App Service that could invoke a change to these IPs. While you cannot simply change the deployment unit you are in, and therefore the IPs we discussed above, there are cases that it can happen

  • Delete an app and recreate it in a different resource group (deployment unit may change).
  • Delete the last app in a resource group and region combination and recreate it (deployment unit may change).
  • Scale your app between the lower tiers (Basic, Standard, and Premium), the PremiumV2, and the PremiumV3 tier (IP addresses may be added to or subtracted from the set).

Obviously the most common here is most likely scaling. And either this, or simply the requirement to avoid sharing a large, shared set justifies the ask.

Thankfully, the answer is relatively straight forward, but there are a few prerequisites. The two elements of configuration required are:

  • Regional Vnet Integration
  • NAT Gateway

However, vnet integration requires the use of one of the following App Service Plans – Standard,Β Premium,Β PremiumV2Β andΒ PremiumV3. If you do have one of those plans, or can justify the cost to add the feature, implementation is quite simple and well documented here.

Once integrated, our App Service now has the ability to reach resources within the vnet. However, what we want is to now manipulate the routing and the integration subnet to force traffic outbound via a NAT Gateway. There are a couple of steps, and one item to note before pulling the trigger.

First, the item of note, once this is done, access to Storage Accounts for the app will have to be via Private Endpoint or Service Endpoint, not difficult, just be aware of it.

In terms of configuration, we need to modify routing and enable a NAT Gateway. Modifying the routing is straight forward, it’s a tick box! However, I like to reverse the order here, build the NAT, ensure any ACLs, or allow lists are updated, then tick the box. Don’t forget any Storage Accounts!

For our NAT Gateway, when building, it should be the same region as your app and vnet. Choose either a Public IP or a Prefix, the choice is yours, and when creating, associate it to the subnet our app is integrated with, like the below:

For options on building a NAT Gateway, here is Portal driven and here is a Bicep option.

Now that we have our NAT Gateway and it is associated to our subnet, let’s modify the integration routing. As I said, it is simply a tick box, but it does change the entire flow of traffic, so this is your impact point. On the vnet integration blade, tick “Enabled” for Route All as below:

And that’s it. Your app will now use the outbound IP(s) configured on your NAT Gateway. The additional benefit is that this remains through regardless of what operations you perform on your App Service. Also, NAT Gateway can scale and handle multiple subnets within the same vnet, therefore allowing multiple integrations depending on your specific use case.

How to – Migrate Azure Firewall from Classic Rules to Policy

If you have been using Azure Firewall since it went GA, you are most likely using the classic option. This means all rules are managed within the Azure Firewall resource itself. As a result, you’ve most likely noticed the below context menu pop up when accessing your resource:

The fact there is a portal driven option I personally think is great. Often “classic to new” scenarios require a rebuild, or several shell based commands. However, I found the docs a bit light in terms of details.

So this post will provide a bit more context. On the portal, you are presented with two options, migrate the existing rules to a new policy, or, attach an existing policy. Meaning you could build your policy from scratch and simply attach it, with the operation then removing the classic rules entirely.

My preference here is to attach an existing policy, however, I am not going to start from scratch. As part of creating a new firewall policy, on the rule tab, you can import your Azure Firewall rules.

This means you can capture your existing configuration, work on any changes in advance, then simply attach your newly updated policy

Two more clicks, and the Azure Firewall will replace the classic rules config with your policy. And this is the really important part – without any downtime. However, ensure you remember with my choice, I am building the policy in advance, if I make changes to that policy, they will be adhered to once live. So your changes may cause impact, but the operation of switching to policy will not.

That’s it, you’re done! A change such as this to Azure Firewall can be a concern, especially if it is handling all of your environment traffic. But this process is simple and straight forward.

As always, if any questions get in touch! Oh and if you would prefer to do this via Powershell, here are the details.

How To – Manage an NSG Using Bicep and Azure DevOps

In many Azure environments that rely on Virtual Networks, Network Security Groups (NSGs) are still king when it comes to access control. However, this post isn’t going to get into the pros and cons of that approach, that’s possibly an entire series, never mind another post!

This post is simply showing a method for managing your NSGs and rules as IaC. Using Bicep, Github and an Azure DevOps Pipeline.

Now, for anyone new to IaC, there is a learning curve. There is also a tradeoff when it comes to effort. It can often be quicker to deploy resources via portal driven methods. However, there are two fundamental reasons to deploy and manage a resource such as an NSG via IaC.

  • BCP – think version history, backup, DR deployments
  • Security – Managed releases/commits control who can approve and change your NSGs

This post keeps it simple, but the principles can expand to managing a full set of NSGs as required. It also includes deploying an empty NSG, which you wouldn’t in theory need either.

As this uses Bicep, let’s take a look at how it handles NSGs and their rules. The NSG itself is quite a simple resource, in my example I am creating it without any config, similar to when you create one in the portal, no rules included.

resource nsg 'Microsoft.Network/networkSecurityGroups@2021-05-01' = {
  name: nsgName
  location: location
  tags: {
    CreatedOn: date
    Owner: email
  }
  properties: {}   
}

However, you can include security rules here as part of the properties section, details on that here. I have chosen not to, as I would like to manage the rules as separate Bicep files. As a result, I need to understand how Parent and Child resources work in Bicep. With this in mind, I have split my rules into two files, inbound and outbound, as this is the core logic split for ACLs on NSGs. You could do this other ways, an allow file, a deny file etc. but this is the one that works best for my brain πŸ™‚

In terms of the file itself, it becomes a collection of bicep resources, each being a rule itself. This gives you full and immediate granularity. I reference the rule priority in my symbolic name to allow for an order of declaration that makes sense to me, but again, lots of options here and no wrong decision. The below are example from my inbound file. I have declared the direction as a variable, as that will always be the same in this file.

resource nsgRule4000 'Microsoft.Network/networkSecurityGroups/securityRules@2021-05-01' = {
  name: '${nsgName}/IN_VNET_Deny'
  properties: {
    access: 'Deny'
    description: 'Deny default VNET traffic'
    destinationAddressPrefix: 'VirtualNetwork'
    destinationPortRange: '*'
    direction: dir
    priority: 4000
    protocol: '*'
    sourceAddressPrefix: '*'
    sourcePortRange: '*'
  }
}

resource nsgRule3000 'Microsoft.Network/networkSecurityGroups/securityRules@2021-05-01' = {
  name: '${nsgName}/IN_Ping_ALLOW'
  properties: {
    access: 'Allow'
    description: 'Allow PING from VNET'
    destinationAddressPrefix: 'VirtualNetwork'
    destinationPortRange: '*'
    direction: dir
    priority: 3000
    protocol: 'Icmp'
    sourceAddressPrefix: 'VirtualNetwork'
    sourcePortRange: '*'
  }
}

Once your files, structure, and rules are created; congratulations! You now have one of the more cumbersome resources for management addressed as code. Giving you quick RTO should it be needed, human readable documentation of your NSG rules, and version history.

How you then control who can edit rules/files by using releases or pull requests etc is up to you and your workflow. But think about including logic to require approvals or at least reviews.

The files I have used as examples are here, again they keep things very simple so if there are questions, get in touch!