Updated: March 2024 – repo link now updated to new Github structure!
A common requirement for many tenants is to control or restrict the regions in which Azure can be used, this is most commonly done via Azure Policy. Wanting/needing to restrict regions can be for several reasons, below are some of the most common:
Alignment – Align to local presence for performance etc.
Governance – Align to compliance, residency and data restriction requirements.
Features – Not all data regions are created equally – restrict to those with features required.
For anyone who has created a Policy like this in the past, the experience is quite straight forward. Azure provides an out-of-the-box template, you simply have to pick which regions are allowed from a drop down. However, there are actually three policies you should consider for this in my opinion, all are included here.
Allowed Locations – when a resource deploys, it must align
Allowed Locations for Resource Groups – when an RG deploys, it must align
Audit resource location matches resource group location – just nice to have for governance!
So, with multiple policies to deploy, a controlled and accurate solution is to define these Policies via code, in my case, Bicep. How you manage this (i.e. deployment and repo management etc) is not for this blog post, but is achievable with this as your base Policy. Two elements are required for this to work correctly:
Bicep file to deploy our Policy resources
Parameters file for policy definitions IDs and regions required.
Item 1 is simple, I’ve included the code below, and will link off to a repo with all of this at the end too.
//vars var allowedLocations = 'Allowed locations' var rgLocations = 'Allowed locations for resource groups' var locationMatch = 'Audit resource location matches resource group location'
We will pass an array of chosen regions/locations, and the strings of the built-in Policy definitions.
We use a variable to define the Policy names.
We deploy a resource object per policy, combining each of these into one Policy deployment.
The only real decision required here is which regions you want to allow. Some pointers from me, always include Global, otherwise some features like Traffic Manager, cannot be deployed. Only include the regions you need now, you can always update later.
How to decide on your regions? That’s probably a whole blog post by itself (adds idea to drafts) but my advice would be choose local, and choose as mature a region as possible. This should offer you the best mix of features, performance, and reliability. Once that is decided, also allow the paired region, so BCDR is possible when needed.
Once you have your list completed, that is now the detail we will use in the parameter file to pass our array of regions for deployment, note these must be in exact format required by ARM.
Now to deploy, simply pick your method! For this post, I am using PowerShell (as I am already logged in) and will complete a Subscription level deployment, as this is a Policy. I will pass both files as command parameters, Azure will do the rest! The below should work for you, and I will include a PS1 file in the repo too for reference, but adjust as per your files, tenant etc.
Once that runs successfully, you can verify all is correct via the Portal. Again, as this is Bicep, you can run this over and over and it will simply update the Policy if there are changes. Meaning all it requires is an update of your location parameters to add or remove regions from being allowed.
And that’s it! As promised, here is a repo with the files for reference. Please note – as always, all code is provided for reference only and should not be used on your environment without full understanding and testing. I cannot take responsibility for your environment and use of code. Please do reach out if you have questions.
Updated: March 2024 – repo link now fully working!
A common Azure Policy requirement for many tenants that deal with Virtual Machine infrastructure, is to restrict the sizes that are allowed to be used for deployment. This can be for several reasons, below are some of the most common:
Cost prevention – remove high cost VM SKUs
Alignment – align to existing SKUs for reservation flexibility
Governance – align to a governance policy of VM family (e.g. AMD only)
For anyone who has created a Policy like this in the past, the experience is quite straight forward. Azure provides an out-of-the-box template, you simply have to pick which VM SKUs are allowed from a drop down. However, several years ago this was straight forward. Pick X SKUs from about 100 SKUs. This list has grown exponentially, and only continues to get larger. This makes implementing the Policy, and modifying it, exceedingly cumbersome via the Portal.
So, one technical and accurate solution is to define this Policy via code. How you manage this (i.e. deployment and repo management etc) is not for this blog post, but is achievable with this as your base Policy. Two elements are required for this to work correctly
Bicep file to deploy Policy resource
Parameters file for VM SKUs
Item 1 is simple, I’ve included the exact code, and will link off to a repo with all of this at the end too.
We will pass an array of chosen VM SKUs, and the string of the built-in Policy definition.
We use a variable to define the Policy name.
We deploy a single resource object, combining these into one Policy deployment.
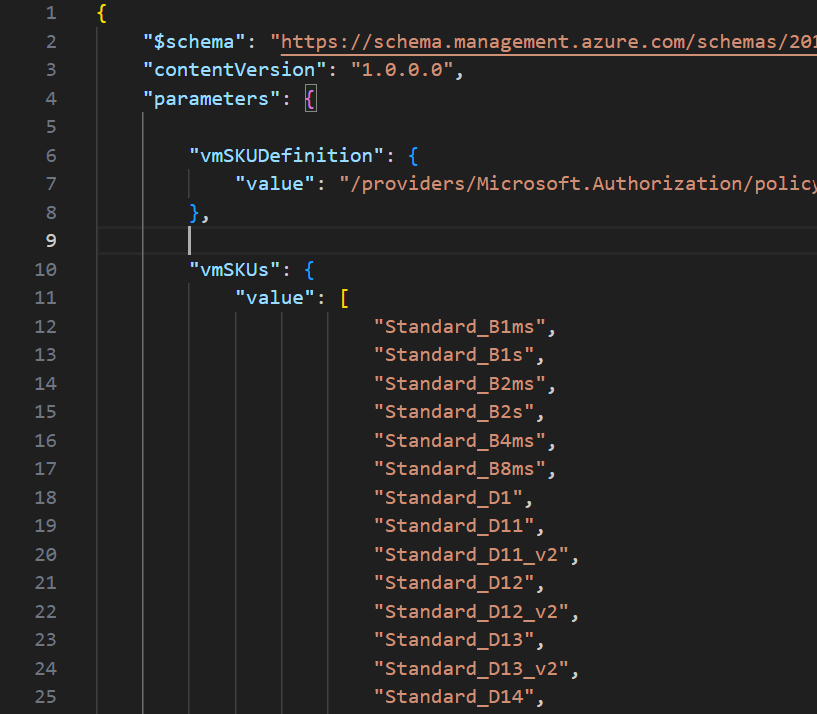
Now, to get to the point where this can be deployed, we need to define our list of chosen VM SKUs. But to get that, we need a list of possible VM SKUs, to then filter down from. There are a couple of ways to achieve this, but to avoid the misery of formatting a hundred or so lines, here is how I did it.
First, not all VM SKUs are possible in all regions, so this is our start point. Figure out the region(s) in scope for this Policy, and work from there. For this example I will use North Europe.
Get-AzVMSize -Location 'northeurope'
The above gets us a big long list of VM SKUs possible in North Europe via PowerShell. However, it’s a nightmare to use and format, so a small change and an export will help…
Get-AzVMSize -Location 'northeurope' | select Name | export-csv C:\folderthatexists\vmksu.csv
Now, that gives me a list of 500+ VMs, again not very manageable directly, but what is important, is that if you open that CSV file in VS Code, they are formatted exactly as you need for JSON parameters file! You can simply copy and paste lines needed. I found it quicker here to actually remove lines I don’t want than select those I do.
Once you have your list completed, that is now the detail we will use in the parameter file to pass our array of SKUs for deployment.
Now to deploy, simply pick your method! For this post, I am using PowerShell (as I am already logged in) and will complete a Subscription level deployment, as this is a Policy. I will pass both files as command parameters, Azure will do the rest! The below should work for you, and I will include a PS1 file in the repo too for reference, but adjust as per your files, tenant etc.
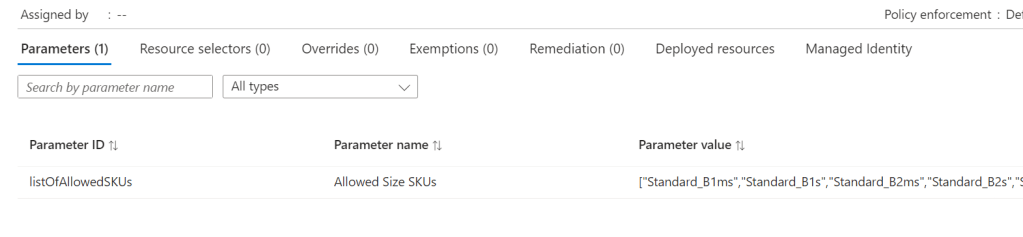
Once that runs successfully, you can verify all is correct via Portal too. Again, as this is Bicep, you can run this over and over and it will simply update the Policy if there are changes. Meaning all it requires is an update of your VM SKU parameters to add or remove VMs from being allowed.
And that’s it! As promised, here is a repo with the files for reference. Please note – as always, all code is provided for reference only and should not be used on your environment without full understanding and testing. I cannot take responsibility for your environment and use of code. Please do reach out if you have questions.
Recently, I was lucky enough to gain access to Microsoft Copilot for Azure as part of a limited preview. For anyone who missed the announcement at Ignite, here is what Microsoft describe it as:
Microsoft Copilot for Azure (preview) is an AI-powered tool to help you do more with Azure. With Microsoft Copilot for Azure (preview), you can gain new insights, discover more benefits of the cloud, and orchestrate across both cloud and edge. Copilot leverages Large Language Models (LLMs), the Azure control plane, and insights about your Azure environment to help you work more efficiently.
So – what does that mean in practice? For me, this means reading the docs, then getting stuck into actually trying elements of this out. To be transparent, I had low expectations for this service. I am not 100% sure whether it is aimed at me, or someone with less Azure experience. I was also conscious that this is the limited preview I am working with, so there will be some oddities.
First up, the integration into the Portal UX – I like it. It’s simple, and consistent. As it is a tenant level service, it stays in place as you jump around the Portal from a Subscription to a Resource to Entra ID for example.
Next, what can I use this for that is quicker than me doing this myself? I will be honest, I struggled a bit here. This is for two reasons. One, this is enabled in my MVP tenant, so I have very little Production or day-to-day work to be done. Two, I was looking for something interesting rather than ‘tell me how to build a VM’.
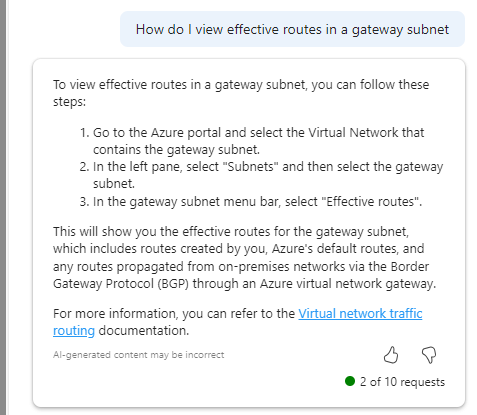
So, I started with a question I know the answer to, but anyone who follows #AzNet knows we are all dying for progress on…
Imagine my surprise with how confident that response is! OH MY GOD I FOUND A THING. Well no, it doesn’t work. And I have no idea what it means in Step 3. If you find out – please let me, Aidan and Karl know, thanks 🙂 But I do like that it attempts to back up its answer with links to documentation.
As you make requests, it dynamically updates the text to tell you what it is ‘thinking’ which I really like.
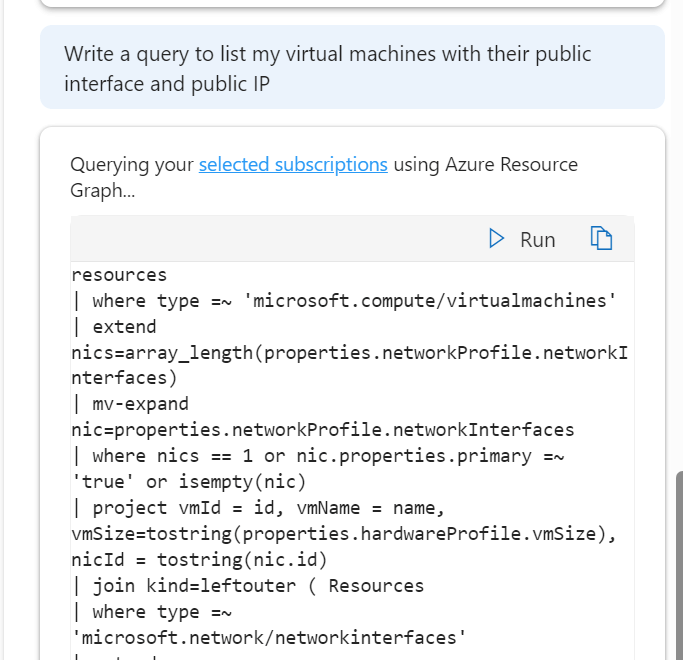
And that ability to write queries, is a real winner for me. saves a lot of time, but you need to be quite specific with the ask and detail, but that’s no real surprise at this stage.
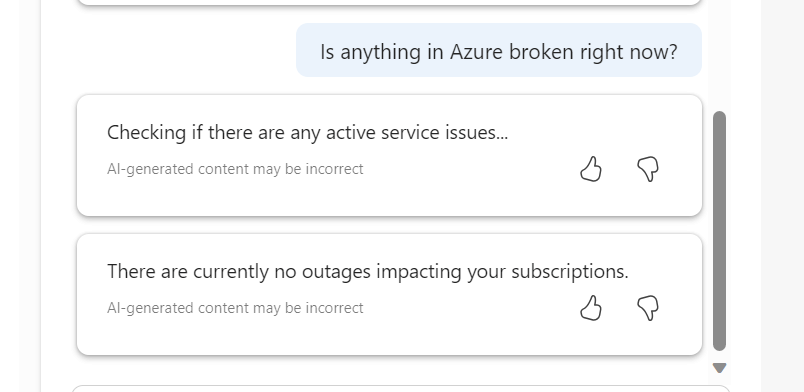
I do like its ability to take quite a non specific question and offer a decent and useful output in response
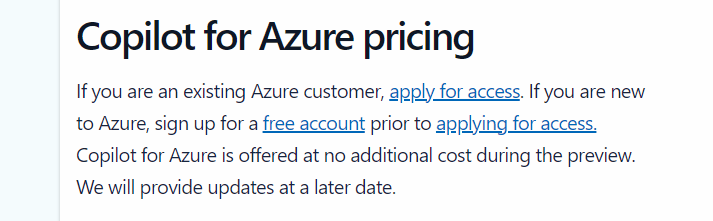
However, I am finding myself trying to find things for it to do. This is OK during preview, where there is no additional cost, however, it’s not clear on what pricing will actually be just yet, vague language on the landing site makes me think this will be charged for
Overall, I think it’s a welcome addition to the AI assistant space from Microsoft. I think those of us working with Azure would feel quite left behind otherwise. But I do think that as the platform is so vast and as each environment is unique, the core use case for different people will vary and that could significantly impact whether this is used widely or not. Having said that, I am looking forward to how this progresses, and more people having access can only mean improvements.