Azure Policy – Where to Start?

One of the positives of Azure is that it can offer you so many possibilities when it comes to deployment options. However, if you don’t implement the correct governance, this can very quickly become a negative. Historically, Cloud has had difficulties when it comes to sprawl; Azure Policy is a service that will help prevent that.

Azure Policy isn’t only a tool for prevention either. With the right policies, you can audit and enhance your environment in terms of efficiency, security and compliance. This gives you greater insight into your Azure deployment and confidence in your requirements.

Governance in Azure is addressed in many ways; a good place to start for overall strategy is the Azure Architecture Center. It has specific sections on Governance as well as overall design guidelines.

So how does Azure Policy work? At its core, it is an assessment service. You create policies with specific rules and scopes. Once the policies are active, they audit all resources in the included scope for compliance. Policies can range in complexity; you can use the default templates or create a custom one to meet your needs.

There are two core areas when dealing with Azure Policy:

Policy Definition

Every policy must have a definition. The definition contains all the details of the conditions under which it’s enforced. It also has the defined effect that occurs if the conditions are met. Definitions are created using JSON and the full structure is defined here. You will need familiarity with this if you are going to write your own custom policies.

Allowed Locations Policy Example:

{
    "properties": {
        "mode": "all",
        "parameters": {
            "allowedLocations": {
                "type": "array",
                "metadata": {
                    "description": "The list of locations that can be specified when deploying resources",
                    "strongType": "location",
                    "displayName": "Allowed locations"
                },
                "defaultValue": [ "westus2" ]
            }
        },
        "displayName": "Allowed locations",
        "description": "This policy enables you to restrict the locations your organization can specify when deploying resources.",
        "policyRule": {
            "if": {
                "not": {
                    "field": "location",
                    "in": "[parameters('allowedLocations')]"
                }
            },
            "then": {
                "effect": "deny"
            }
        }
    }
}
Policy Assignment

A policy assignment is a policy definition that has been assigned to take place within a specific scope. Assignments range from Management Groups to a single Resource Group. The scope of the assignment refers to all the Resource Groups, Subscriptions, or Management Groups that the Definition is assigned to. Inheritance is enabled for all assignments. Therefore, a policy applied to a resource group is also applied to all resources in that resource group. However, you can include exclusions as a sub-scope of the assignment. For example, a Definition is assigned to a Subscription; all Resource Groups inherit the Definition but you need a single Resource Group excluded. Rather than redo the Assignment for each Resource Group, you can simply exclude it from the Subscription assignment.

Your First Policy

Now that you understand what Azure Policy is, let’s get started with our first policy. For this example, I’m going to prevent Public IP addresses being deployed within a Subscription. This is something I commonly add to IaaS projects that are connected to a local LAN.

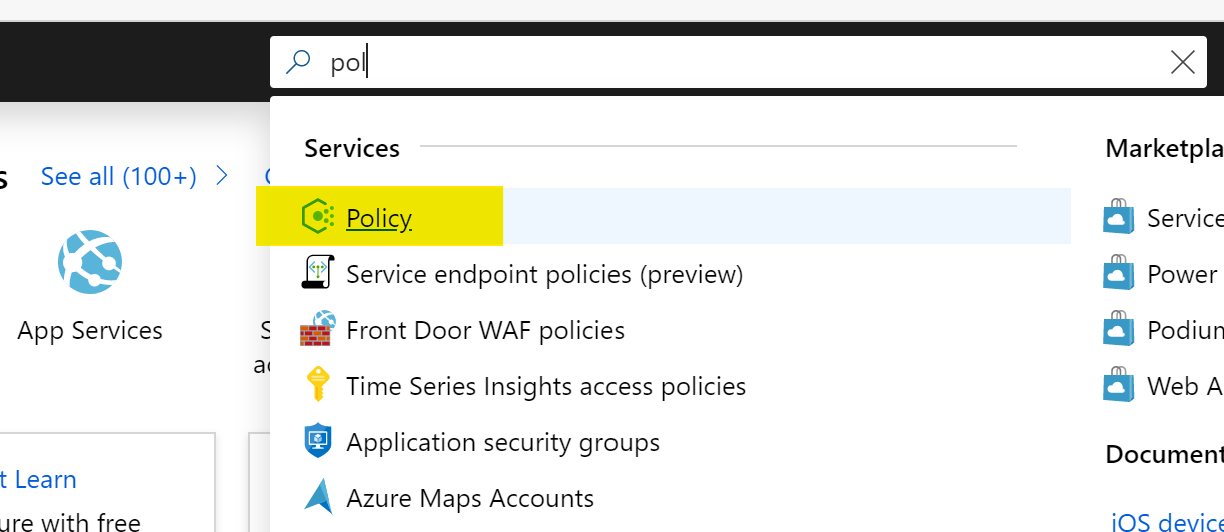
Once you’ve logged in to the Azure Portal, make your way to the Azure Policy service, I normally use the search bar as below as it’s quick!

Once you’re on the Overview blade, a handy option for your first time is to click the Getting Started option. This details the steps to take and we’re going to start by browsing default Definitions so click that View Definitions option as below:

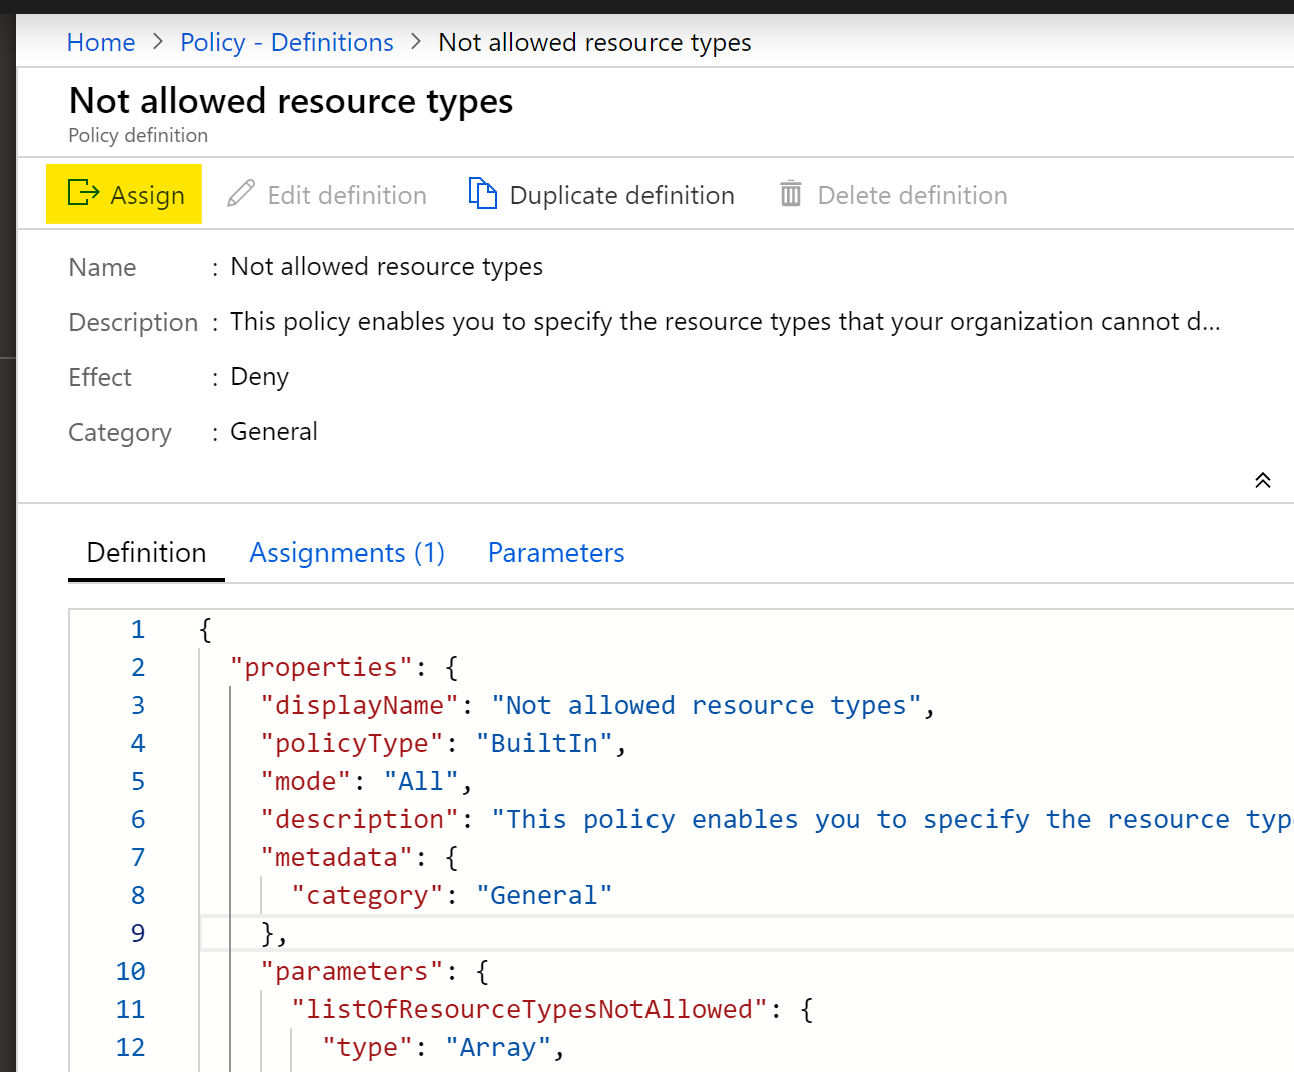
This will bring you to the Definitions blade. You will see a lot of built-in policies. To simplify things, click the search bar and enter “not allowed”, this will bring up the Definition we will use, then go ahead and click on the Policy name “Not allowed resource types” as below:

You’re now in the Definition page, where you can see the exact structure in JSON format. We’re going to jump straight to Assignment from here by clicking “Assign” as below:

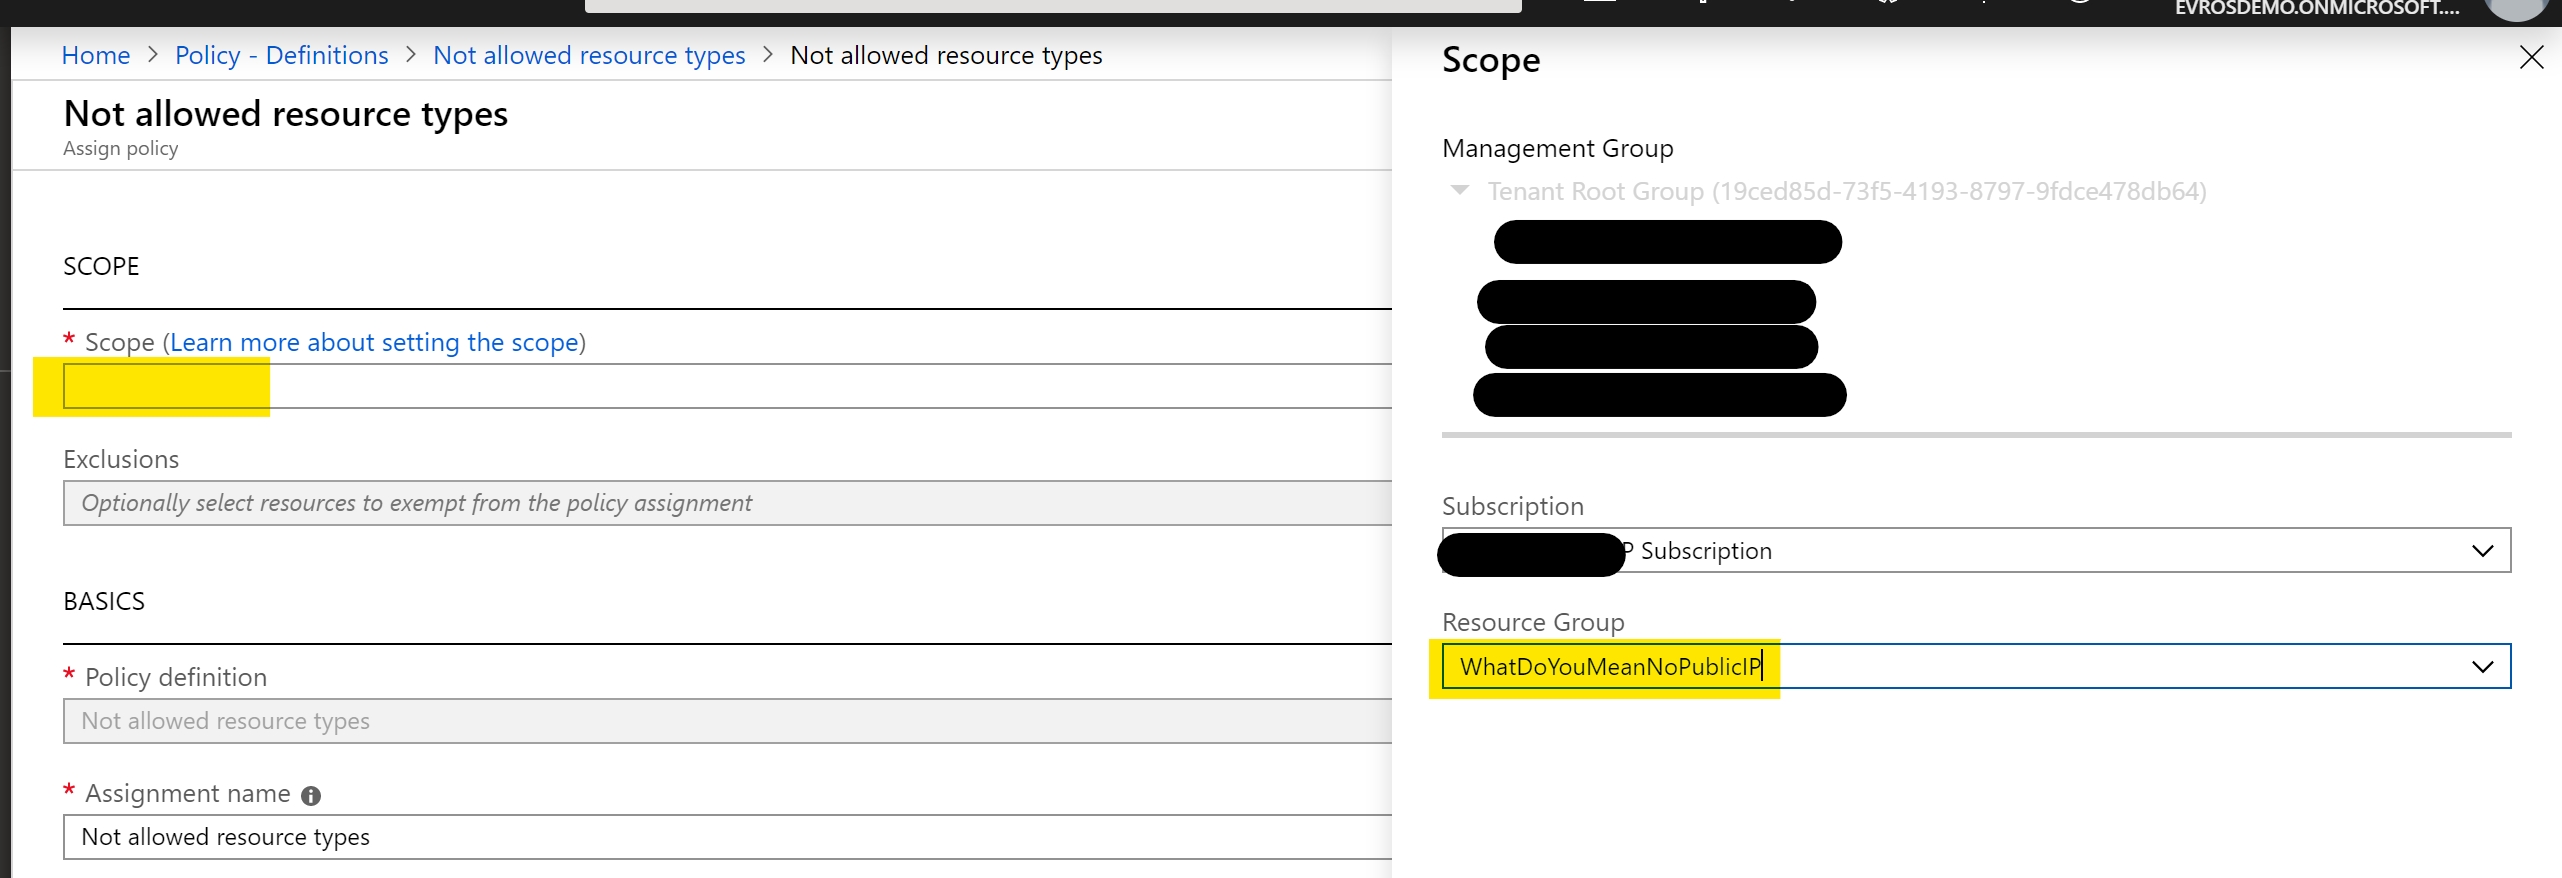
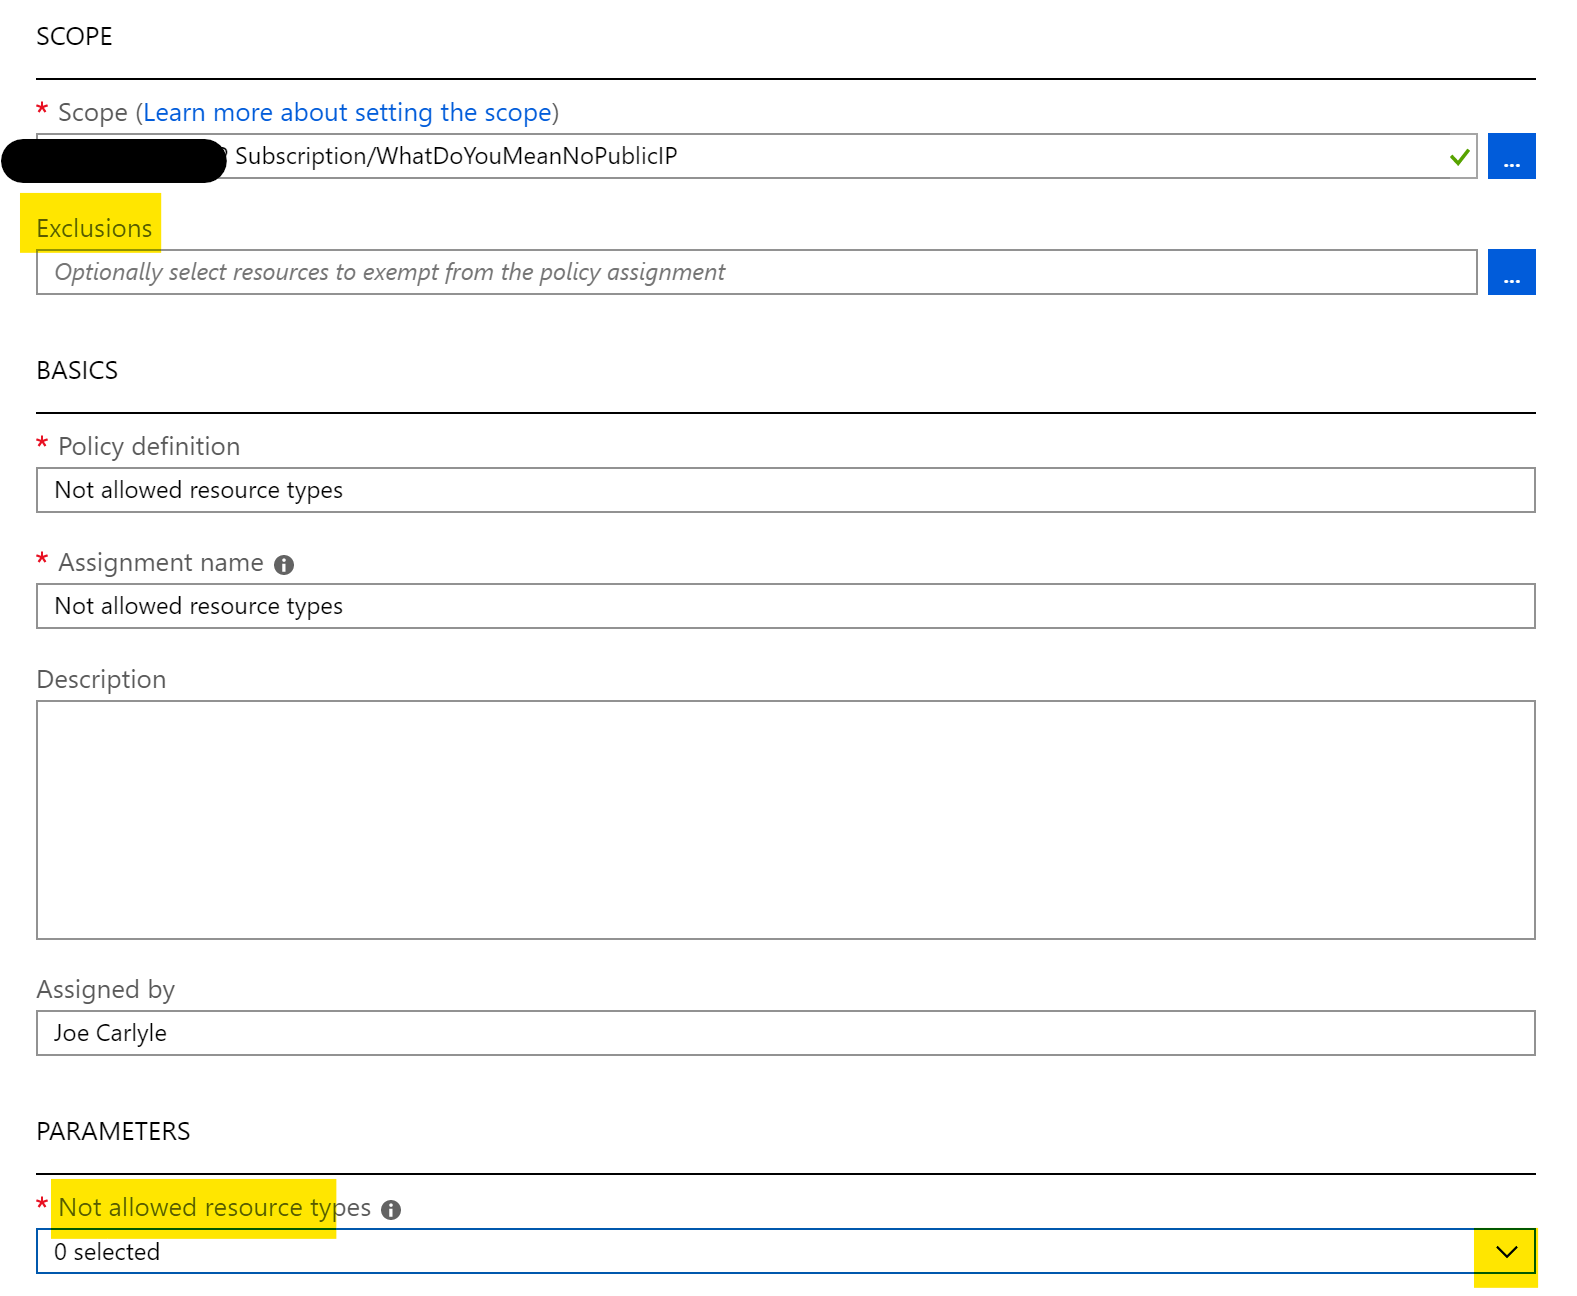
This will bring you the assignment blade. Our first step is to set a scope. I’m going to go ahead and choose my Subscription and a Resource Group, then click “Select” as below:

We’re going to leave most of the settings as they are, but you can where you can set Exclusions below. We’re going to click the drop down arrow as highlighted:

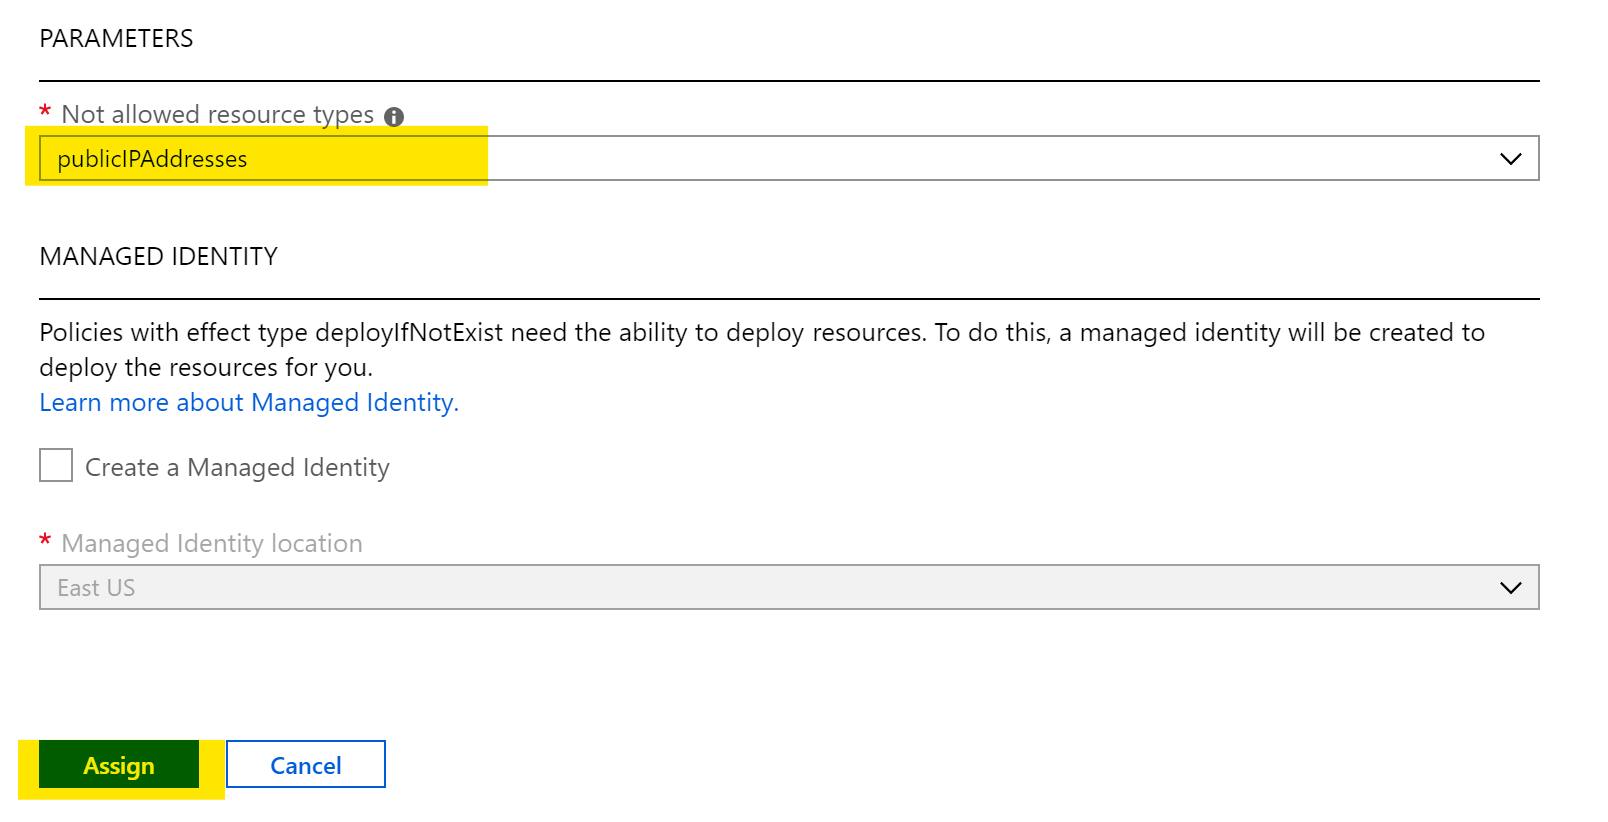
This opens a huge list of resource providers and types. Thankfully, there is a search bar, so type in “public” to narrow the list and tick the checkbox for Microsoft.Network/publicIPAddresses, then click away from the list as below:

We’re almost there! You can see that publicIPAddresses are now defined as a parameter. So click the blue “Assign” button as below:

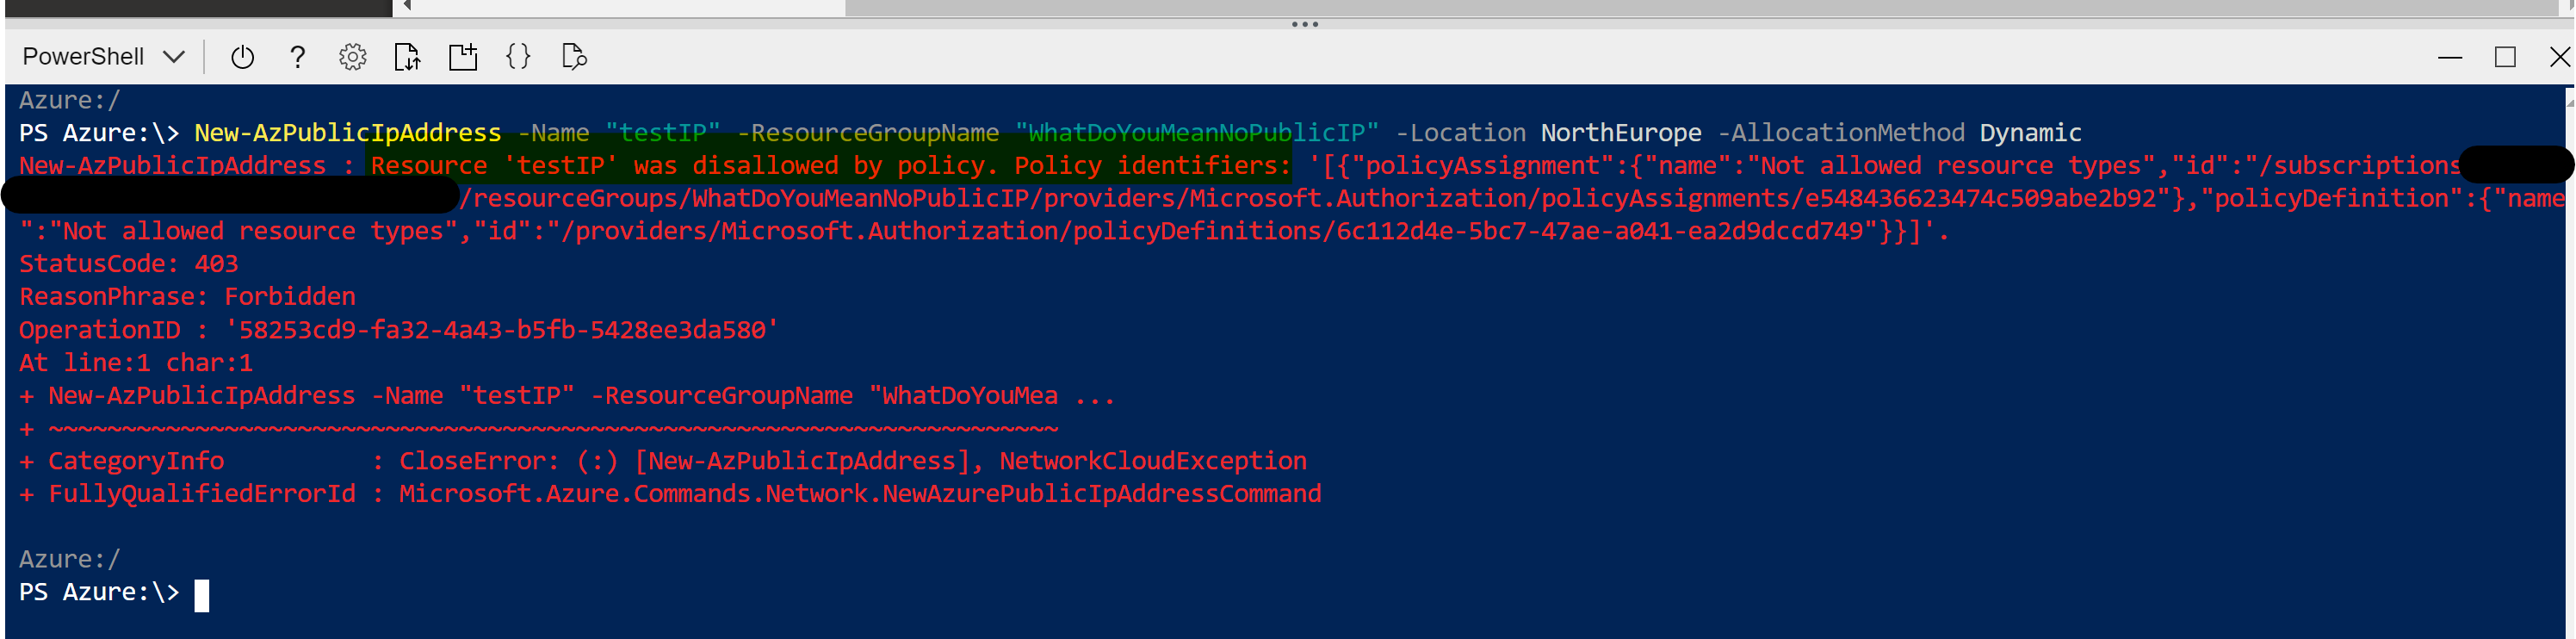
Now your policy is assigned, we need to give it a couple of minutes to propagate. Now, when I try to create a Public IP resource in my scoped Resource Group (I’ve used POSH in Cloudshell, but deployment method doesn’t matter) I’m told I cannot as it’s disallowed by policy:

You’ve now successfully applied your first Azure Policy! As you can see, even though this is a single Definition it is still very powerful. Your options to layer Definitions and apply custom ones allow for full control of your environment with very little effort. Azure Policy should be high on your list of priorities for your Azure deployments.

As always, if there are any questions, please get in touch!

Azure Firewall – Where to Start?

About a year ago, Microsoft introduced the first release of Azure Firewall. Since then, and since its general release the service has grown and the features have matured.

To begin, let’s understand what Azure Firewall is? At its core it’s a managed, network security service that protects your Azure Virtual Network resources. It functions as a stateful firewall-as-a-service and offers built-in high availability and scalability. This means you can centrally control, enforce and log all of your network traffic. It fully integrates with Azure Monitor too which means all of the usual logging and analytical goodness.

If the above sounds like something you’d like to use, or at least try, in your Azure environment, read on! To start, let’s break out what can be configured within Azure Firewall and which features could be useful for you.

When deploying an Azure Firewall, you need a couple of things in advance. It needs a dedicated subnet, specifically named “AzureFirewallSubnet” and the minimum size it can be is a /26. It also needs at least one Static Public IP. The Public IP must be on the Standard tier. My recommendation here is to look at creating a Public IP Prefix in advance of creating your Azure Firewall. That way, if you need to delete it and redeploy, you can continue to use the same Public IP again and again. If you want to use multiple Public IPs, it supports up to 100.

So, let’s look at what Azure Firewall (AFW) can do for you on your Virtual Network and then consider some deployment options.

Access

Using your single, or multiple Public IP addresses, AFW allows both source and destination NATing. Meaning it can support multiple inbound ports, such as HTTPS over 443 to different resources. Outbound SNAT helps greatly with services that require white-listing. If you are using multiple Public IPs, AFW randomly picks one for SNAT, so ensure you include all of them in your white-listing requirements.

Protection

AFW uses a Microsoft service called Threat Intelligence filtering. This allows Azure Firewall to alert and deny traffic to and from known malicious IPs and domains. You can turn this setting off, set it to just alert or to both alert and deny. All of the actions are logged.

Filtering

Finally, for filtering, AFW can use both Network Traffic and Application FQDN rules. This means that you can limit traffic to only those explicitly listed within the rule collections. For example, an application rule that only allows traffic to the FQDN – www.wedoazure.ie

A visual representation of the above features is below:

Firewall overview

Now that you understand AFW, let’s look at how to configure to your needs. Normally I would go into the deployment aspect, but it is excellently documented already and relatively easy to follow. However, there are some aspects of the configuration that warrant further detail.

Once deployed, you must create a Custom Route Table to force traffic to your AFW. In the tutorial, it shows you how to create a route for Internet traffic (0.0.0.0/0), however you may want the AFW to be your central control point for your vnet traffic too. Don’t forget, traffic between subnets is not filtered by default. Routing all traffic for each subnet to AFW could allow you to manage which subnet can route where centrally. For example, if we have three subnets, Web, App and DB. A single route table applied to each subnet can tunnel all traffic to AFW. On the AFW you can then allow Web to the Internet and the App subnet. The App subnet can access Web and DB but not Internet and finally the DB subnet can only access the App subnet. This would all be achieved with a single Network Rule collection.

Similarly you can allow/block specific FQDNs with an Application Rule collection. In the tutorial, a single FQDN is allowed. This means that all others are blocked as that is the default behaviour. This might not be practical for your environment and the good news is, you can implement the reverse. With the right priority order, you can allow all traffic except for blocked FQDNs.

A feature you may also want to consider trying is destination NATing. This thankfully has another well documented tutorial on Docs.

Finally, and in some cases most importantly, let’s look at price. You are charged in two ways for AFW. There is a price per-hour-per-instance. That means if you deploy and don’t use it for anything, you will pay approx. €770 per-month (PAYG Calculator). On top of that, you will pay for both data inbound and outbound that is filtered by AFW. You’re charged the same price either direction and that’s approx. €14 per-Tb-per-month. Depending on your environment and/or requirements this price could be OK or too steep. My main advice is to ensure you understand it before deploying!

As always, if there are any questions please get in touch!

Azure Sentinel – Where to start?

First announced back in late February, Azure Sentinel is the first cloud native SIEM service from a major provider. SIEM (security information and event management) is a primary component in any security service. Sentinel aims to leverage cloud specific benefits like elastic scale and AI to allow customers detect and respond to security incidents as quickly and efficiently as possible.

The workflow of Azure Sentinel can be broken into four steps:

Azure Sentinel core capabilities

1. Collect

Sentinel allows you to collect data at scale from multiple users, devices, applications and infrastructure, hosted in Azure, on-premises, and even in multiple clouds. This means you can aggregate all security data using industry standard log formatting. With built-in integration, you can enable collection for features such as Office 365 or Azure AD within seconds.

2. Detect

Having all of your data collected to Sentinel allows for more simple analysis and detection at scale than was previously possible. This more efficient triage, and the capability to leverage Microsoft Machine Learning allows you to be more productive, minimise false positives and react to those high accuracy alerts as early as possible.

3. Investigate

Sentinel allows you to visualise and resolve alerts using the same dashboards. Proactively hunting for incidents can be automatic or scripted into a set of queries. Microsoft have provided some to get you started too based on their analysis and response teams.

4. Respond

Continuing the efficiency seen in previous steps, Sentinel allows you to orchestrate and automate responses to incidents. Allowing you to automatically handle repeat and/or known incidents.

So now that you know what it is, the next step is to put it in action and see if it can be of use to you and your client/business. Currently still in preview, Sentinel is free to use, which is always good and allows you to assess the service without any significant financial impact. Bear in mind, you will pay for the Log Analytics workspace which stores the data!

First, you’ll need to enable Sentinel and a workspace, this can be done via the portal and a walkthrough is here. Then, you need to connect some services to start streaming data to Sentinel. As you can see below, there are multiple options and you can choose which logs/data is sent to Sentinel too.

Once your data connector is active, you can make use of the built in dashboards to visualise it. Below is a subsection of the Azure AD sign-in log dashboard, which is available immediately via Sentinel. You can also create your own custom dashboards, there is a guide with samples here.

Now that is being collected and you have visuals, your next step is analysis. The first thing you will need to do is to create Detection Rules. These are essentially Log Analytics queries with alerting parameters wrapped around them. Microsoft offer sample queries on Github which are updated regularly. Alternatively, you can simply write your own to meet your needs.

The results of your Detection Rules are then fed into the Cases section of Sentinel. Here you can triage, investigate and remediate incidents. The cases are created dynamically from the parameters you set for Detection Rules such as severity and entity mapping. As such, be prepared to have to tweak those thresholds and alert patterns a bit. I have Sentinel running within several customer tenants, and am still not 100% happy with my detection rules yet. Always remember to update the status of your case too, in progress, resolved etc.

Finally, you should set up some Playbooks to respond to your alerts. A Playbook is simply a set of procedures that you can run from Azure Sentinel. They help automate and orchestrate your responses to alerts, and you can run them manually or ideally set them up to run automatically in response to certain alerts. They are based on Logic Apps, which means all of the same actions are available via Sentinel. One quick note, there is a charge for Logic Apps and therefore Playbooks, so ensure you understand your costs first.

When creating a Playbook, regardless of it is going to be run automatically by Sentinel or manually by you, you should first define your scenario. My preferred approach here is to come up with “If-This-Then-That” loops and apply them as needed. This is another section that will take some tweaking over time. In my experience, I only run Playbooks manually initially, then start to add automated triggering once I’m happy with the alert and response. Docs have a nice sample alert-response playbook with messaging and actions which is a great place to start.

Another function which I haven’t covered here is Hunting. I haven’t spent enough time with this feature yet to give a detailed opinion but you can read more on it over on Docs.

So, if you haven’t given Sentinel a try yet, I’d recommend you review the quickstarts and deploy in your tenant for one or two of the data sources like Azure AD. While it’s in Preview, it is a great chance to assess it relevant to your tenant and hopefully gain some greater insight and response capability too.

As always, if there any questions or if you have any problems with your Sentinel, get in touch!

Azure Migrate – Where to Start?

If you’re thinking about making a move to Azure, it’s important to first understand how to approach it. With the correct approach and sufficient planning, a migration can be straight forward, efficient and void of surprises.

Therefore, the place to start is the Microsoft Cloud Operating Model. This is a detailed white paper that allows you to create a strategy for migration. Covering cloud readiness, people strategy and technical analysis, it’s a comprehensive document. Once you have an understanding of your business strategy, read “Why am I moving to Azure?” and your people strategy, read “Who is moving us to Azure?” you can progress to the technical phase.

The vast majority of initial moves to Azure are often re-host migrations, or “lift and shift”, as these are most common, I will reference this scenario as an example. There are four stages:

The first step of the technical phase is to Assess. This means understanding what it is that you are moving and what the best process will be. This includes everything from involving the business stake holders, to cost calculation to application evaluation. This analysis should give you an output that not only details where the application could go but more importantly, where it can go.

Microsoft offer several tools to help with some of this. First up is Azure TCO. This allows you to estimate the cost savings you could make by migrating to Azure. Next is Azure Migrate, this is an assessment tool that is FREE and allows you to discover, document and assess your workloads and their dependencies. You can then create cost estimates for running them in Azure.

Azure Migrate Dependencies Example

Now that you have your environment discovered, grouped and sized correctly, you can begin to migrate your workloads. Microsoft provide a service for this also, Azure Site Recovery (ASR). This service allows you to replicate your servers from your on-premises environment. For most services it is application aware, meaning it can replicate services like SQL server without any data loss. Before you implement ASR it is important to use your data from Azure Migrate to capacity plan for your replication requirements. Taking this step allows for greater speed and efficiency during replication and migration of workloads.

Microsoft also provide a script repository for migrating large numbers of VMs at once. These can be from VMware, AWS, GCP or physical servers. There are some limitations, most restrictive is lack of support for Managed Disks, but you can always flip these manually later. The scripts and guide can be found here.

How long it takes to migrate your workloads is determined by your business requirements. However, once complete, it is vital that you revisit these workloads for optimisation. Azure Advisor can provide recommendations but the key areas to focus on are:

  • VM sizing – Ensure the VM is running on an appropriate size to gain maximum cost efficiency
  • Storage tier – Ensure the disks associated with the VM are using the correct tier to balance performance requirements against cost.
  • Reserved Instances – Once the VM is sized correctly, purchase Reserved Instances to achieve the maximum discount to run your workload for one to three years.

Now that your workloads are migrated and optimised, your final step is to ensure they’re secure and managed correctly. The best place to start with this process is Azure Security Center. This provides unified security management and allows you to take action to mitigate risk and implement actionable recommendations. This will include common requirements like disk encryption and anti virus. More advanced and platform specific features like Just In Time Access are also available.

So to recap, there is 1 prerequisite then 4 main steps:

  1. Understand and create your Cloud Operating Model
  2. Assess your current environment
  3. Migrate it!
  4. Optimise your utilisation
  5. Secure and Manage it

If all of the above is completed and optimisation and security are reviewed regularly you can be confident in the quality of your environment state. If you have any questions, feel free to tweet me @wedoAzure or leave a comment!