How to – Design a Virtual Network with Microsoft Azure Copilot

Having access to Microsoft Azure Copilot has been really interesting. On one hand, the use cases are almost limitless, essentially a choice of what do you want to try do with it? On the other, there is still work to be done to maximise its potential (acknowledge by Microsoft throughout use in fairness).

Working with any of the ‘Copilots’, one important element for me is to get a grounded understanding of what it is capable of, based on something I am an expert on. I cannot tell how good it is if I am asking it help with something I don’t know arguably better than it does. So – let’s I decided to push it with a Virtual Network.

My objective when starting this post was to hopefully reach the point where one single, detailed prompt would spit out an acceptable VNET design statement, perhaps even the code to build it, but that part was less important to me right now. Anyone can create a good Azure design right? 🙂

I am first going to outlay my thinking with respect to a VNET, it’s purpose, my security posture, connectivity requirements, and likely workloads. Rewording this into a statement that is aligned to the Cloud Adoption Framework, and Azure Network Architecture details.

To get a baseline of a basic prompt, I started with the below. I believe this helps work towards the ‘best’ prompt.

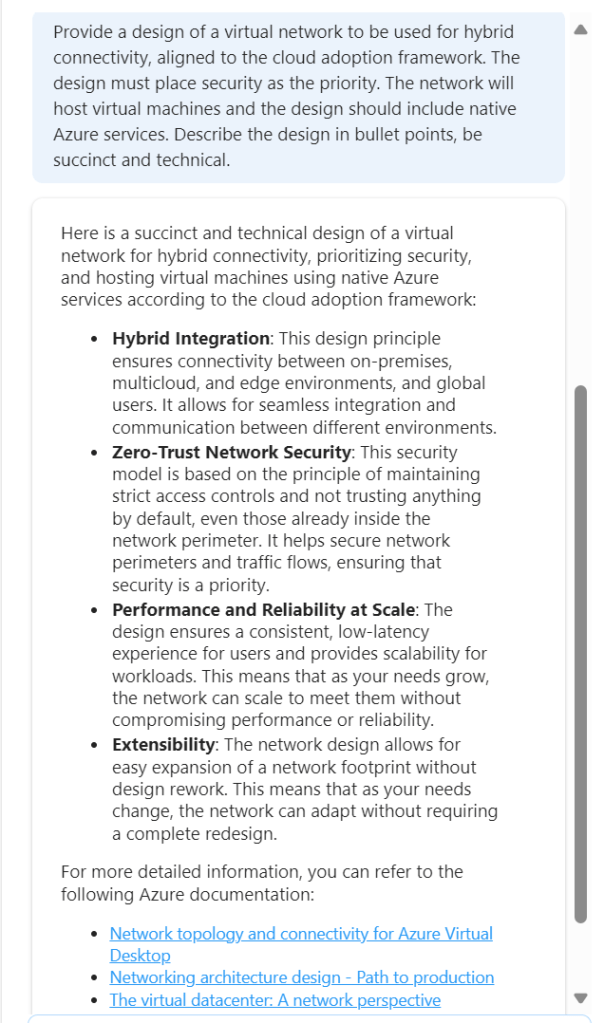
So this jumps all over the place. We have perimeter references, AVS and App Gateway all mentioned. Not ideal. But I did ask for an example, and it does provide links. So let’s tighten our prompt.

This is much better, proper sequential statements, however that third link to hybrid with Citrix is irrelevant. Now, as Copilot functions in a chat method, let’s use this prompt and response to expand detail.

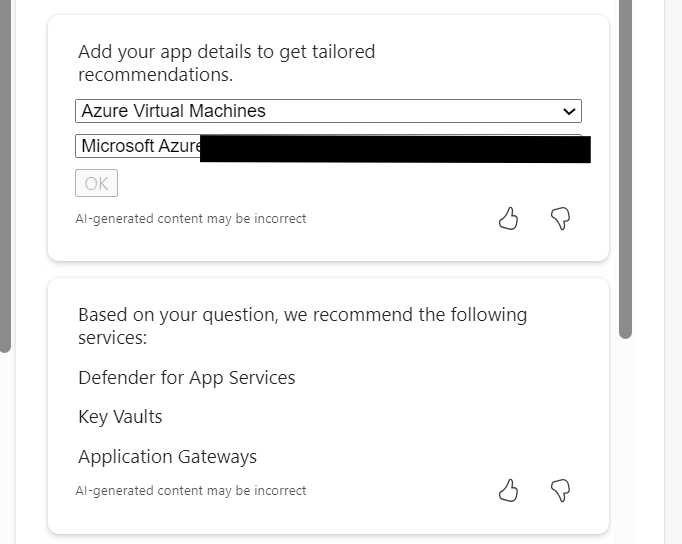
So this approach doesn’t work. When you select the (perhaps) relevant items, the output is not aligned to the original ask.

So – let’s try this another way. We know the first recommend prompt returned good results. Rather than continue in a chat-response format, let’s try one very specific prompt. To ensure no confusion – I started a new chat for this.

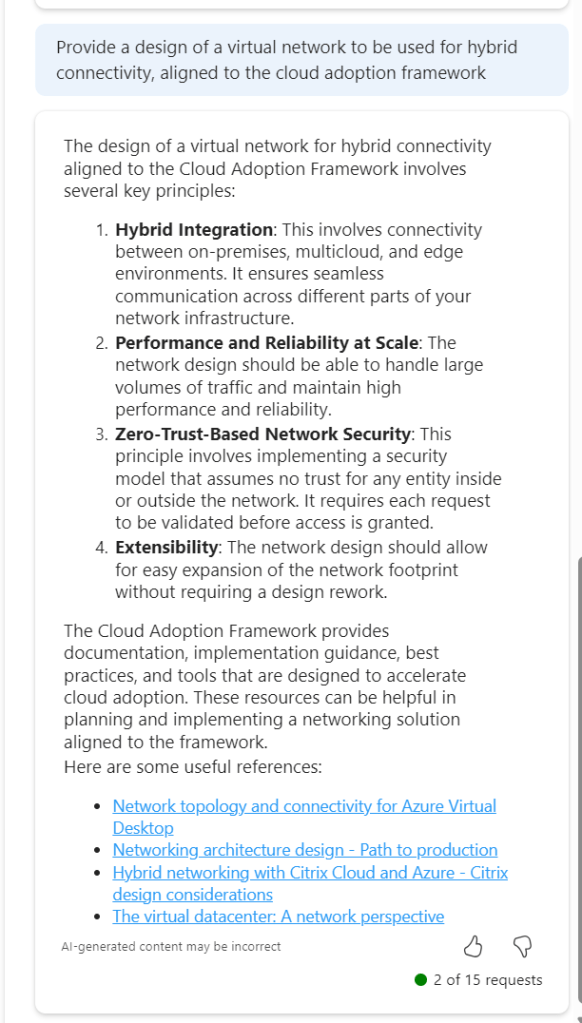
This is better, but to be honest – I am not looking for design principles like ‘zero trust’. So we need to adjust the wording. Again, I have started a new chat for this.

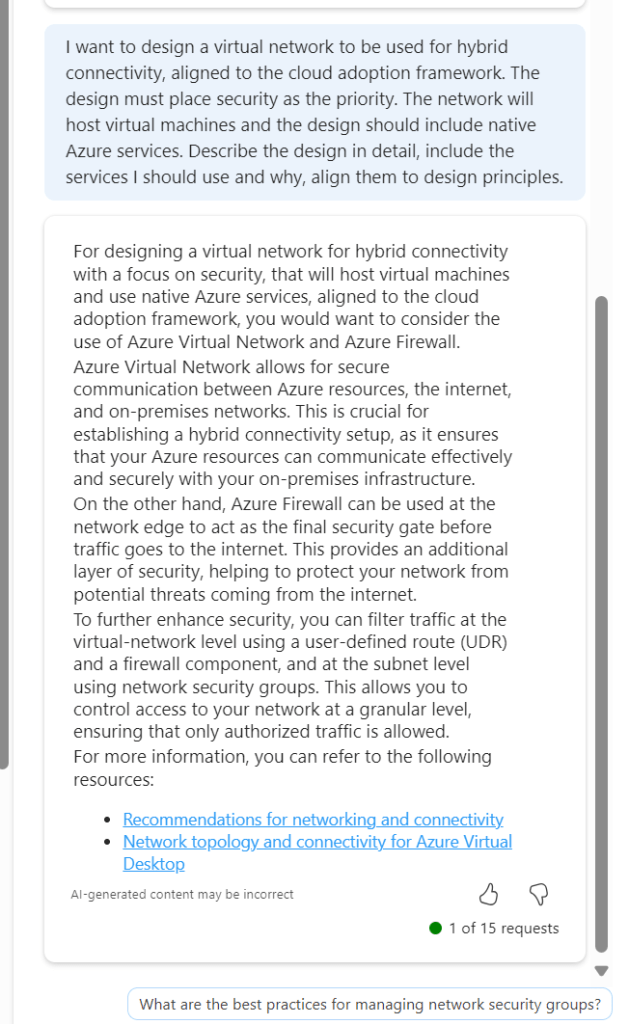
Now we are getting somewhere. If this had included Bastion I would have ranked it 9/10. The first link is good, second link is not so this scores a 7/10 for me. It is a great improvement on previous asks, and I am trying to ask as few leading questions as possible. I tried another following response to get some more detail

Again, the general detail is good, but the links are hit and miss. This could introduce some confusion. I tried another follow on from this, but again it went a different route based on my existing subscription services.

Rather than say this didn’t work, I think I have set out with a task that isn’t really achievable at present. There are so many elements that require consideration, some sequential, some overlapping, some interdependent, that a single chat response is going to be very difficult if not impossible. At the same time, repeat responses are also challenging, especially when you’re not looking for something relevant to what you currently have, but aligned to best practice.

Overall, I think Copilot for Azure is improving every month, and the use cases are constantly expanding. However, I don’t believe, based on current functionality that it will be able to fully assist with design guidance and decisions, beyond providing principles and guided links. For the real design work – you will still need an expert 😉

How to – Control Azure Regions with Azure Policy and Bicep

Updated: March 2024 – repo link now updated to new Github structure!

A common requirement for many tenants is to control or restrict the regions in which Azure can be used, this is most commonly done via Azure Policy. Wanting/needing to restrict regions can be for several reasons, below are some of the most common:

  • Alignment – Align to local presence for performance etc.
  • Governance – Align to compliance, residency and data restriction requirements.
  • Features – Not all data regions are created equally – restrict to those with features required.

For anyone who has created a Policy like this in the past, the experience is quite straight forward. Azure provides an out-of-the-box template, you simply have to pick which regions are allowed from a drop down. However, there are actually three policies you should consider for this in my opinion, all are included here.

  • Allowed Locations – when a resource deploys, it must align
  • Allowed Locations for Resource Groups – when an RG deploys, it must align
  • Audit resource location matches resource group location – just nice to have for governance!

So, with multiple policies to deploy, a controlled and accurate solution is to define these Policies via code, in my case, Bicep. How you manage this (i.e. deployment and repo management etc) is not for this blog post, but is achievable with this as your base Policy. Two elements are required for this to work correctly:

  1. Bicep file to deploy our Policy resources
  2. Parameters file for policy definitions IDs and regions required.

Item 1 is simple, I’ve included the code below, and will link off to a repo with all of this at the end too.

To explain the above:

  • We will pass an array of chosen regions/locations, and the strings of the built-in Policy definitions.
  • We use a variable to define the Policy names.
  • We deploy a resource object per policy, combining each of these into one Policy deployment.

The only real decision required here is which regions you want to allow. Some pointers from me, always include Global, otherwise some features like Traffic Manager, cannot be deployed. Only include the regions you need now, you can always update later.

How to decide on your regions? That’s probably a whole blog post by itself (adds idea to drafts) but my advice would be choose local, and choose as mature a region as possible. This should offer you the best mix of features, performance, and reliability. Once that is decided, also allow the paired region, so BCDR is possible when needed.

Once you have your list completed, that is now the detail we will use in the parameter file to pass our array of regions for deployment, note these must be in exact format required by ARM.

Now to deploy, simply pick your method! For this post, I am using PowerShell (as I am already logged in) and will complete a Subscription level deployment, as this is a Policy. I will pass both files as command parameters, Azure will do the rest! The below should work for you, and I will include a PS1 file in the repo too for reference, but adjust as per your files, tenant etc.

New-AzSubscriptionDeployment -Name 'az-region-policy-deploy' -Location northeurope -TemplateFile 'C:\folderthatexists\region-restrict-policy.bicep'
-TemplateParameterFile 'C:\folderthatexists\policy.parameters.json'

Once that runs successfully, you can verify all is correct via the Portal. Again, as this is Bicep, you can run this over and over and it will simply update the Policy if there are changes. Meaning all it requires is an update of your location parameters to add or remove regions from being allowed.

And that’s it! As promised, here is a repo with the files for reference. Please note – as always, all code is provided for reference only and should not be used on your environment without full understanding and testing. I cannot take responsibility for your environment and use of code. Please do reach out if you have questions.

How to – Share your Certification from Microsoft Learn

Update: As flagged by my friend Dwayne Natwick, online verifiable certifications only appear to be available when renewed or newly passed from July 1st. Older certs will still be active via Credly.
Looks like more of the historic certs are now available as online verifiable. My entire role based cert collection, regardless of upcoming renewal are now available.

Recently, Microsoft announced that they were moving on from Credly. Which personally I thought was a shame, as so many providers use the service, and a regular business can also sign up too meaning everything was in one place.

However, my guess here is the cost was outweighing the benefit for a service they could deliver themselves at scale. So, here we are.

Here is Microsoft’s piece on your current Credly setup:

Microsoft is introducing new features to the Microsoft Learn profile, providing learners with more flexible options for viewing and sharing their Microsoft Certifications directly from Microsoft Learn. With this feature release, Credly badge services will no longer be used for most Microsoft Certifications. All your new and previously earned Microsoft Certifications will automatically be associated with your Learn profile. Once you’ve connected your Microsoft certification profile to your Learn Profile, you can view and share all of your Microsoft Certifications from your Learn profile. Microsoft Certifications earned and claimed on Credly before June 30, 2023, will be available for viewing and sharing through Credly until June 30, 2024. However, your Microsoft Certifications on Credly will no longer be kept current or updated as you pass renewal exams or earn new Microsoft Certifications. The only exception is Microsoft Certifications issued by Certiport which will still be managed and updated on Credly indefinitely.

So, if you take a renewal, or exam that earns a certification from July 2023 onwards, you will be able to share it from Microsoft Learn, rather than it being claimed in Credly. I was very curious about this, so I went and renewed my Azure Network certification a few days ago. And thankfully, nothing about that process was any different.

Once passed, again everything appears the same

However, if I click on the ‘view all’ Certifications link, this cert now shows as ‘Online Verifiable’. See below in comparison to another.

If I click on the ‘View certification details’ link just below the cert title, it brings me to a new page with my verified credential.

The ‘Share’ link on the top right hand corner then allows me to choose from several options that link to this verifiable credential anonymously.

The whole process appears to just work to be honest! Here is the link to my cert for reference –

Microsoft Certified: Azure Network Engineer Associate

Learn have a FAQ page that also may help!

Thanks for reading, and as always if there are any questions just ping me!

How To – Enable Azure Firewall Resource Specific Diagnostics

There is a new format of logs coming to Azure resources. Currently most people are familiar with what is called Diagnostics Table logs. The resource log for each Azure service has a unique set of columns. The AzureDiagnostics table includes the most common columns used by Azure services. If a resource log includes a column that doesn’t already exist in the AzureDiagnostics table, that column is added the first time that data is collected. If the maximum number of 500 columns is reached, data for any additional columns is added to a dynamic column.

Resource Specific logs however are platform logs that provide insight into operations that were performed within an Azure resource. The content of resource logs varies by the Azure service and resource type. Resource logs aren’t collected by default.

So onto enabling them. Via the Portal, this is straight forward in terms of choice and is well documented here. However, when I went to include this enablement in a Bicep build that I have, I noticed there wasn’t anything clearly documented. So, here is an example using Azure Firewall.

Normally, my diagnostics resource looks like the below and this enables Diagnostics table logs:

resource azfwDiags 'Microsoft.Insights/diagnosticSettings@2021-05-01-preview' = {
  name: '${afwName}-diags'
  scope: azFW
  properties: {
    logs: [
      {
        category: 'AzureFirewallApplicationRule'
        enabled: true
        retentionPolicy: {
          days: 90
          enabled: true
        }
      }
      {
        category: 'AzureFirewallNetworkRule'
        enabled: true
        retentionPolicy: {
          days: 90
          enabled: true
        }
      }
    ]
    workspaceId: log
  }
}

However, to enable Resource Specific, a few changes are required. Obviously the category names are different however you also need to include the Property – logAnalyticsDestinationType as you see below on line 5.

resource azfwDiags 'Microsoft.Insights/diagnosticSettings@2021-05-01-preview' = {
  name: '${afwName}-diags'
  scope: azFW
  properties: {
    logAnalyticsDestinationType: 'Dedicated'
    logs: [
      {
        category: 'AZFWApplicationRule'
        enabled: true
        retentionPolicy: {
          days: 90
          enabled: true
        }
      }
      {
        category: 'AZFWNetworkRule'
        enabled: true
        retentionPolicy: {
          days: 90
          enabled: true
        }
      }
    ]
    workspaceId: log
  }
}

Using the resource above within your Bicep code will allow you to deploy Resource Specific diagnostics settings as needed.

As usual, if there are any questions get in touch!

How to – Migrate Azure Firewall from Classic Rules to Policy

If you have been using Azure Firewall since it went GA, you are most likely using the classic option. This means all rules are managed within the Azure Firewall resource itself. As a result, you’ve most likely noticed the below context menu pop up when accessing your resource:

The fact there is a portal driven option I personally think is great. Often “classic to new” scenarios require a rebuild, or several shell based commands. However, I found the docs a bit light in terms of details.

So this post will provide a bit more context. On the portal, you are presented with two options, migrate the existing rules to a new policy, or, attach an existing policy. Meaning you could build your policy from scratch and simply attach it, with the operation then removing the classic rules entirely.

My preference here is to attach an existing policy, however, I am not going to start from scratch. As part of creating a new firewall policy, on the rule tab, you can import your Azure Firewall rules.

This means you can capture your existing configuration, work on any changes in advance, then simply attach your newly updated policy

Two more clicks, and the Azure Firewall will replace the classic rules config with your policy. And this is the really important part – without any downtime. However, ensure you remember with my choice, I am building the policy in advance, if I make changes to that policy, they will be adhered to once live. So your changes may cause impact, but the operation of switching to policy will not.

That’s it, you’re done! A change such as this to Azure Firewall can be a concern, especially if it is handling all of your environment traffic. But this process is simple and straight forward.

As always, if any questions get in touch! Oh and if you would prefer to do this via Powershell, here are the details.