First Impressions – Azure Firewall Preview

Recently Microsoft announced that a new Azure Firewall service was entering a managed public preview. Azure Firewall is a managed, network security service that protects your Azure Virtual Network resources. It is a fully stateful firewall as a service with built-in high availability and scalability.

firewall-overview.png

The services uses a static public IP meaning that your outbound traffic can be identified by third party services as/if required. Worth nothing, that only outbound rules are active within this preview. Inbound filtering will hopefully be available by GA.

The following capabilities are all available as part of the preview:

  • Stateful firewall as a Service
  • Built-in high availability with unrestricted cloud scalability
  • FQDN filtering
  • Network traffic filtering rules
  • Outbound SNAT support
  • Centrally create, enforce, and log application and network connectivity policies across Azure subscriptions and VNETs
  • Fully integrated with Azure Monitor for logging and analytics

As with all previews it should not be used for production environments, but for testing purposes this is how to register your tenant for deployment.

To enable the Azure Firewall public preview follow the guide here: Enabling the preview

Once enabled, follow this tutorial for a sample implementation: Deployment Tutorial

Now that you’re familiar with the deployment, you should apply to your specific test scenarios. Be wary of some operations that could be limited by applying a default route to your VM. There is an updated FAQ for the service here: Azure Firewall FAQ

Overall, this is a welcome addition to Azure networking. As the preview progresses and more service options are added, especially inbound options, I see this being as common as deploying an NSG in your environment. Combining it with peering and the right set of rule collections for your environment allows for an easily managed, scalable, and most importantly, secure environment within Azure with minimal cost and infrastructure footprint.

Securing Azure PaaS

When considering Azure as a platform, part of the conversation should revolve around transformation. That is, how do we transform our approach from what is viewed as traditional to something more modern. Often this could lead to redesigning how your application/service is deployed, but with some workflows, a simple change from IaaS to PaaS is viewed as a quick win.

This change isn’t suitable in all scenarios, but depending on your specific requirement it could allow for greater resiliency, a reduction in costs, and a simpler administration requirement. One service that is often considered is SQL. Azure has its own PaaS SQL offering which removes the need for you to manage the underlying infrastructure. That alone makes the transformation a worthy consideration.

However, what isn’t often immediately apparent to some administrators is that PaaS offerings are, by their nature, public facing. For Azure SQL to be as resilient as possible and scale responsively, it sits behind a public FQDN. Therefore, how this FQDN is secured must be taken into consideration as a priority to ensure your data is protected appropriately.

Thankfully, Azure SQL comes with a built in firewall service. Initially, all Transact-SQL access to your Azure SQL server is blocked by the firewall. To allow traffic, you must specify one or more server-level firewall rules that enable access. The firewall rules specify which IP address ranges from the Internet are allowed. There is also the ability to choose whether Azure applications can connect to your Azure SQL server.

The ability to grant access to just one of the databases within your Azure SQL server is also possible. You simply create a database-level rule for the required database. However, while this limits the traffic to specific IP ranges, the traffic still flows via the internet.

To communicate with Azure SQL privately, you will first need an Azure V-Net. Once in place, you must enable the service endpoint for Azure SQL, see here. This will allow communication directly between listed subnets within your v-net and Azure SQL via the Azure backbone. This traffic is more secure and possibly faster than via the internet.

Once your endpoint is enabled, you can then create a v-net firewall rule on Azure SQL for the subnet which had a service endpoint enabled. All endpoints within the subnet will have access to all databases. You can repeat these steps to add additional subnets. If adding your v-net replaces the previous IP rules, remember to remove them from your Azure SQL firewall rules.

Also worth noting is the option for “Allow all Azure Services”, the presumption here is that this somehow would only access from Azure Services within your subscription, but this is not the case. It means every single Azure service in all subscriptions, even mine! My recommendation is to avoid this whenever possible, however, there are some cases where this required and this access should be noted as a risk.

More on Azure SQL Firewall – https://docs.microsoft.com/en-us/azure/sql-database/sql-database-firewall-configure

More on Azure SQL with V-Nets – https://docs.microsoft.com/en-us/azure/sql-database/sql-database-vnet-service-endpoint-rule-overview


Resource Locks and Policies

When considering production workloads for your Azure environment there are some simple features that ensure the safety of your workloads that are being overlooked. The features I’m referring to are Resource Locks and Resource Manager Policies (RMPs).

Both features allow you greater control over your environment with minimal administrative effort. In my opinion, regardless of whether you are running production workloads or not, you should at the very least be using Locks and RMPs as a preventative method of control over your deployments.

Locks are a very simple and quick tool that can prevent changes to your environment in an instant. They can be applied at different tiers of your environment. Depending on your governance model, you might want to apply at the subscription, resource group or resource level, all are possible. Locks have only two basic operations:

  • CanNotDelete means authorized users can still read and modify a resource, but they can’t delete the resource.
  • ReadOnly means authorised users can read a resource, but they can’t delete or update the resource. Applying this lock is similar to restricting all authorised users to the permissions granted by the Reader role.

Locks obey inheritance, so if you apply at resource group level, all resources contained within will receive the applied lock, the same is true for subscription level assignments.

Of the built-in roles, only Owner and User Access Administrator are granted the ability to apply and remove locks. In general, my recommendation is that all production resources are assigned a CanNotDelete lock. Environments such as UAT where performance etc is being monitored are more suited to a ReadOnly lock to ensure consistent environment results.

RMPs can be used individually or in conjunction with Locks to ensure even more granular control of your environment. RMPs define what you can and cannot do with your environment. For example, all resources created must be located in the European datacentres, or, all resources created must have a defined set of tags applied.

In terms of scope, RMPs can be applied exactly the same as Locks and also obey inheritance. A common scenario here is to apply a policy at subscription level to specify your allowed datacentres, then if you have a traditional IT Resource Group design, specify policies at RG level allowing only specific VM sizes for dev/test to manage cost.

There are many combinations that can be put to use to allow you greater control of your environment. At the end of the day, Azure allows for huge flexibility by design, but it is important for many companies for both security and cost management reasons to be able to exercise a degree of control over that flexibility.

A little tip if you are using both features, make sure you apply a CanNotDelete Lock to your important RMPs!

Windows Update Management

Update management is a necessary evil in the IT world. Some admins enjoy “Patch Tuesday” and for some it’s the most dreaded day of the month. Microsoft have made strides in relieving the stress that can be associated with patching certain core VMs but good management still requires a lot of administration.

Within Azure, every time you deploy a Windows server VM from a Marketplace image, you are getting the latest available patches, but what options do you have should those VMs need to run for an extended period of time? How do you keep them patched so they adhere to company security policies?

Traditionally linking Azure to your existing on-premise solution, or building a WSUS or SCCM implementation were options. Both of these obviously work well but for smaller sites could be considered cumbersome. Now, within Azure itself, making use of some platform objects that you may already be using, you can get a central console view of all of your machine updates.

The two requirements, outside of a VM to manage, are:

  1. Automation Account
  2. Log Analytics Workspace

Both of these implementations are basically free,  (see latest pricing details for limits etc.) and relatively easy to set up separately. However, part of the process for enabling update management can also set these up for you should that be required.

To enable update management for a single VM, open the VM blade and choose the Update Management button from the left action menu, it is part of the Operations section. This will run a validation operation to see if the feature is enabled and assess whether there are automation accounts and log analytics workspaces available. The validation process also checks to see if the VM is provisioned with the Microsoft Monitoring Agent (MMA) and Automation hybrid runbook worker. This agent is used to communicate with the VM and obtain information about the update status. This information is stored in the log analytics workspace.

Once you choose your current available options, or request to have new ones created, the solution takes roughly 15 minutes to enable. Once enabled, you will now see a management page, it will take some time for the live data to be collected from the server, but once that completes, this page will display information regarding the status of updates available/missing. You can click on individual updates for more information. You can also analyse the log search queries that run for checking updates, these can be modified to suit your environment if/as required.

Now that your management pane is displaying what updates are missing, you need to install them. You can schedule the installation of the updates you require from the same management pane. To install updates, schedule a deployment that follows your release schedule and service window. You can choose which update types to include in the deployment. For example, you can include critical or security updates and exclude update rollups. One thing to note that is important, if an update requires a restart the VM will reboot automatically.

The scheduling process is very simple. You choose a name for the deployment, the classification of updates you would like to install, your scheduled time to begin the process of installation and finally a maintenance window to ensure compliance with your defined service windows.

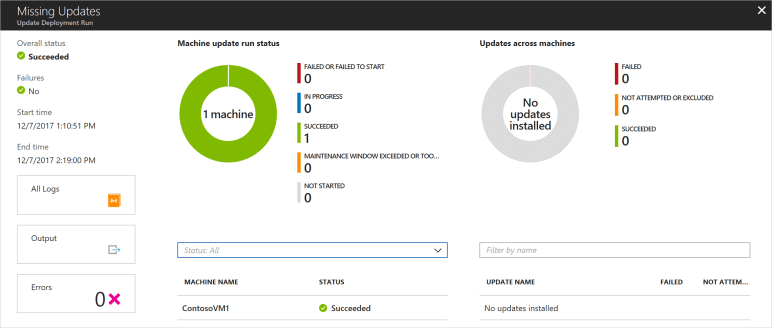
Once the scheduled deployment runs, you can then view its status. Again, this is via the Update Managment blade. This reports on all stages of the deployment from “In Progress” to “Partially Failed” etc. You can then troubleshoot any issues should they arise.

Overall, I really like this solution. It also scales, you can add several machines using the same automation etc. From the Automation Account, you can then access the Update Management blade and manage multiple enabled VMs at once, including scheduling mutli-VM deployments of updates.

While I haven’t covered it here, this solution also works with Linux distributions and can be integrated with SCCM.

More here:

Update Management Overview

Patching Linux

Manage multiple VMs

SCCM Integration

Securing Remote RDP Access

Accessing a VM in your local environment is generally a straight forward operation. You initiate an RDP connection to a private IP and enter your credentials. Simple and relatively secure as all traffic is local relative to your LAN. With Azure, this can become  more complex as the option to attach a public IP is available.

Even with added complexity, attaching a public IP to your VM should not be viewed as a negative. The functionality it offers is incredibly useful in many scenarios.  However, as this allows the VM to be accessed from the internet, the correct precautions must be taken to ensure your VM is kept safe and secure.

Let’s start with the most basic but often overlooked piece of security; username and password. Choose a username that is unique to your organisation and choose a password that is complex. RDP ports are one of the most tried perimeter ports on Microsoft’s public network, having your credentials as secure as possible adds a minimal but useful level of security to your VM.

Next up, a Network Security Group. This can prevent or allow IP addresses accessing your VMs network interface and/or subnet. An example configuration would be to allow access to RDP for your outbound IP range and deny all other access. This would mean that only your outbound IP range can access the RDP port. This works well but what if the VM requires access from multiple locations? What if you don’t have access to their IP range?

This is where we add our final layer of security, a public facing Azure Load Balancer. This object will carry it’s own public IP address and allows for the creation of NAT rules. To secure the RDP port (3389 by default) simply create an inbound NAT rule to translate a random public facing port, for example 50001 or 100003, to our standard internal port 3389. Once this rule is in place, you should remove the public IP associated to your VM. The LB association will route traffic inbound and outbound via the LB public IP and therefore use the NAT translation for secure access. For those of you who used ASM VMs, this is similar to how endpoints were setup within Cloud Services, but this offers a more granular control.

Below are some links on some of the features and points mentioned in this post as well as a technet blog on provisioning and attaching an LB for RDP. As always, any questions, get in touch, enjoy!