What are Azure Blueprints?

I’m sure most of you have seen recent announcements relative to Blueprints as well as multiple Microsoft posts about the service and what it can do to improve your environments. However, what if you’re not sure about what they are and if they are usable for your environment? Hopefully, that’s where this post comes in. I’m going to explain exactly what they are and why you might use an Azure Blueprint. This should allow you to make a decision on whether you need them or not.

Following on from that, I think that’s the first basic point about Azure Blueprints. Similar to several other new services in Azure, the functionality is great and could help progress a lot of environments, but that doesn’t mean they help, or are even useful in a lot of other environments. Never feel guilt-ed into using a new service because there is a “buzz” about it at launch. Assess the service, understand it, assess it’s usability versus your requirements then TEST TEST TEST! Don’t forget, Blueprints are still in preview so no production workloads yet.

So, what is an Azure Blueprint? To try explain it plainly, it is a collection of governance and resource services, defined in such a way to allow you to repeat deployments to a set standard.

Azure Blueprints overview

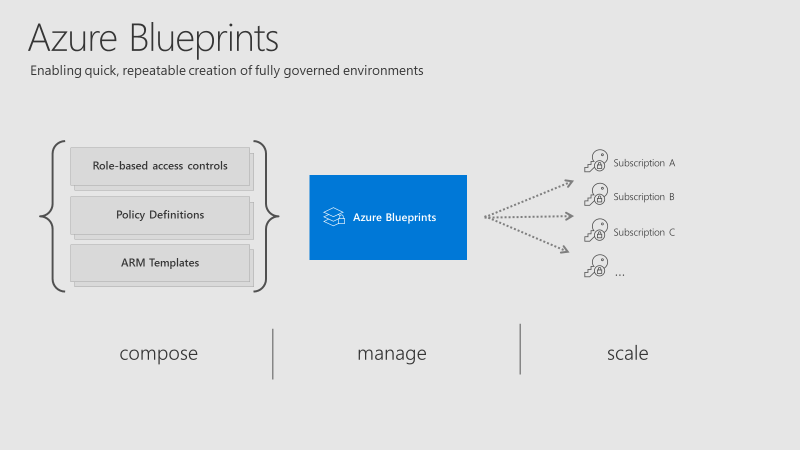
The collection of governance and resource services within a Blueprint are referred to as Artifacts. Within each Blueprint, you can make use of any combination of the following:

ResourceHierarchy optionsDescription
Resource GroupsSubscriptionCreate a new resource group for use by other artifacts within the blueprint. This enables you to organize resources and provides a scope for other artifacts.
Azure Resource Manager templateSubscription, Resource Group
Templates are used to create resources. This could range from individual deployments to entire environments.
Policy AssignmentSubscription, Resource GroupAllows assignment of a policy or initiative to the subscription and/or resource group the blueprint is assigned to. Any
parameters are assigned at creation of the blueprint or during blueprint assignment.
Role AssignmentSubscription, Resource GroupRole assignments can be defined for the entire subscription or nested to a specific resource group included in the blueprint.

As you can see above, artifacts can be deployed/assigned at different levels. However, the Blueprint itself must be located in either a subscription you have at least Contributor access to or a Management Group. If located within a Management Group the Blueprint is available to any of the child subscriptions of that group.

When defining your Blueprint, several artifact options allow you to choose parameters that are passed from Blueprint to artifact. For example, when defining a Resource Group, you can choose to specify the name and location. You don’t have to specify these parameters within the Blueprint, you can also allow these to be passed when the Blueprint is assigned.

Once you have your Blueprint defined, your next step is to publish it. When publishing, you must indicate a version. I found it odd that this isn’t restricted in some way, you can literally name one version “1.0” and the next “B” so I’d recommend adding notes with each version and try to stick to a pattern. However, it makes sense if you’re going to use different versions for different assignments (I’ll explain that next), so choose relative to your requirements.

When your Blueprint is published, you can then assign it. A nice feature is the ability to assign different versions of a Blueprint to different subscriptions. For example you could have two versions of a Blueprint, that have different artifact definitions (think test version and production version) assigned to different subscriptions. They can be independently updated too.

At assignment, there are some options to chose as well as subscription. They are Resource Locking and Managed Identity.

For Managed Identity, it’s recommended you simply choose System Assigned as the Blueprints service will then manage the security lifecycle. More on Managed Identities to help you understand and choose what’s right for your environment.

The Resource Locking feature really allows you to maintain control of your governed deployment. If you’re not familiar with Resource Locks, check out this post. The familiar status applies to resources deployed by a Blueprint assignment:

  • Not locked
  • Read Only
  • Cannot delete

However, once a status is applied, not even a user/object with the Owner role can modify it. This is due to how these statuses are applied. An RBAC deny assignments deny action is applied to artifact resources during assignment of a blueprint if the assignment selected the Read Only or Do Not Delete option. The deny action is added by the managed identity of the blueprint assignment and can only be removed from the artifact resources by the same managed identity.

So, how do you edit or delete your resources? Update your Blueprint to “Not locked” and push the update to the relevant assignment. This method prevents unwanted and unexpected changes occurring outside of the scope of the Blueprint.

There is quite a learning curve for Blueprints I think as they combine several other services you must be familiar with, so for me, you have to start there. Understand each of the artifacts fully so you can see how they may work well if defined in your environment.

Recently, sample Blueprints have been released to allow you to deploy governed pre-designed environments with a couple of clicks, one sample is the ISO27001 Shared Services which I think is good to help understand the service, even if it might be slightly complex for your first test.

Again, Blueprints are still in Preview. So be as cautious as always with your production environments. I look forward to seeing what changes come with GA, which shouldn’t be much longer considering Blueprints were announced back at Ignite. I will update this post relevant to GA when it happens.

As always, if you have questions, leave a comment, mail me, or ping me on Twitter!

Azure Backup – New! Instant Restore

Azure Backup is a service offered within the platform that allows you to backup and restore your IaaS data both from within Azure and on-premises. The integration out-of-the-box within Azure, and the attractive cost point make it a great option for many deployments. Simplicity is also key, for example, you can enable backup right from within the VM blade, or, for several VMs within your environment from the recovery services vault itself.

Another benefit is the speed and efficiency with which you can test and confirm your required restore processes. This has been recently improved on again by the introduction of Instant Restore. This introduces the ability to use snapshots taken as part of a backup job, which are then available for recovery without waiting for any data transfer to the vault. This greatly reduces the wait time to trigger a restore.

While Instant Restore is the quickest option, it does incur additional cost for the storage required to hold the snapshots. Also, it currently is only available in four regions, West Central US, India South, Australia East, and North Europe.

There are other alternatives included in the cost prices of Azure Backup. They are as follows:

  • Create a new VM
    • This quickly creates a basic VM from a chosen restore point. Configuration options are limited.
  • Restore disk
    • This creates new disks from a restore point. These disks can then be attached manually or via script. You pay for the disks while they are active but this option offers great flexibility.
  • Replace existing
    • This is more automated. Azure Backup takes a snapshot of the currently active VM, powers it off, then detaches current disks. While this is happening, it creates new disks from a restore point. Once restore is complete, it attaches them to the VM and powers it back on. There are some limitations here due to the automation used, it’s not supported for unmanaged disks, generalized VMs, or for VMs created using custom images.

There is also a fourth option that combines some automation for file level recovery. This is well detailed here – Azure Backup File Recovery.

Based on the previous options available, I think the new Instant Restore capability is a welcome addition. It brings Azure Backup more in line with traditional snapshot-as-a-quick-backup solutions people regularly leverage on-premises. If you are running significant IaaS workloads in Azure that require regular changes, I would strongly consider upgrading your Recovery Services Vault to support Instant Restore.

How to – Connect to an Azure VM

If you’ve just created your first Azure VM and are struggling to connect to it, this post should offer some help. I’ll cover connecting to both a Windows VM and a Linux VM, so RDP and SSH.

Connect to a Linux VM in Azure

To connect over SSH, you’ll need a client. A commonly used client is Putty, but you can use whichever you like. The first step is to know the details of your VM that are required to make a connection. When you built your VM, you would have created an administrator username and either a password or SSH key, ensure you have those to hand.

Next, you will need the IP or DNS name of the VM to connect to it. You can get this via the Azure Portal. If you click on the VM you want to connect to, it will by default open the Overview blade. From here, you will be able to copy the IP or DNS as required.

VM Overview settings

Then, using Putty, or a similar client, you can use that IP or DNS name, and port 22, to access SSH

PuTTY terminal settings

Once your session opens, you’ll be prompted for the credentials mentioned earlier.

Connect to a Windows VM in Azure

To connect via RDP, you’ll need to be using a machine that has an RDP client. This comes built into Windows. Next, you need to know the details of your VM that are required to make a connection. When you built your VM, you would have created an administrator username and a password, ensure you have those to hand.

Next, login to the Azure Portal, click the VM you want to connect to. This will open the Overview blade. From here you can click the Connect button. This will generate an RDP file for you to download and use.

Open the RDP file once downloaded. You may see some warnings relative to certificates, these can be ignored. Click connect.

Screenshot of a warning about an unknown publisher.

You will be prompted for credentials, these are the credentials as mentioned earlier. Once entered, you may see some warnings relative to certificates, these can be ignored.

Troubleshooting

If you’re having problems establishing a connection to your VM, first check if there is an NSG assigned to the VM or subnet the VM resides in. If there is, this NSG will require a rule to allow RDP/SSH access. By default, all connections via Public IP are blocked.

How to – Find your Azure Tenant ID

Before you can start with Azure, you need an Azure Subscription. Each and every Azure Subscription must be associated with an Azure AD Tenant. This is sometimes referred to as a directory.

For those who have Office 365, one would have been created for you automatically as part of your deployment. If you don’t have/use Office 365, then a tenant can be created as part of the process required to sign up for an Azure Subscription.

All Azure AD tenants have a naming format as follows: %uniquestring%.onmicrosoft.com e.g. contoso.onmicrosoft.com

However, for several services you may need to use the unique ID rather than the name. Here is how to find it.

1. Log into Azure AD via the Azure Portal, here is a direct link to the Azure AD blade

2. Once on the Azure AD blade, scroll down and click on the Properties option

3. This opens a new blade, which gives you all the specific details relevant to your tenant. Right in the middle is your tenant ID, there is a copy button to the right.

How to – Resize an Azure VM

When using VMs in Azure, one of the important things to get right is the sizing. Azure offers several VM series and multiple sizes within each that have fixed allocations of resource such as vCPU and RAM. There are also speciality series that offer additional capabilites like vGPU. Below is a table that covers the majority of series available and their recommended purpose.

There are many reasons you may need to resize a VM, but this post is about how to do it, rather than why. A quick tip, make sure you check out Azure Advisor for some help with this! Regardless of if you run a Windows VM or a Linux VM the below steps are accurate.

The first thing to note, you can resize a VM using any of the ARM tools you like. Such as CLI, Templates etc. However, for this post, I’m going to explain how to do it via the Portal. I would recommend that if you are new to Azure, this is also where you start, until you are familiar with the series and sizes as well as their respective costs.

Azure VMs are deployed on physical servers within an Azure datacenter. These servers are grouped together into hardware clusters. By design, each cluster does not support all VM series that are available. So if you are currently running a DSv3 series you may not be able to resize to a different series, such as an NCv2 immediately. You will however, always be able to resize within your current series.

Basic steps to resize

  • Login to the Azure Portal
  • Select the VM you need to resize
  • Click the Size option under Settings
  • Click the size you would like
  • Click Resize

NOTE: Your VM will need to restart, be wary of Dynamic Public IPs – the Portal should flag this.

Some things to note with the above process, when the VM is active and you click on Size, you will be displayed with a table of series and size currently available in the active cluster, as mentioned earlier. So for my VM, when active I see the below screengrab, note the highlighted number of sizes available.

If I Stop my VM before choosing the Size blade, I am now given the option to choose from the entire range available in the current region. Again note the highlighted number available in the below screengrab.

So, as I am sure you’ve guessed, to resize to any series VM, you must first Stop your VM. This ensure that the VM instance can be moved to a different hardware cluster when it’s started. Changing to a different series obviously takes slightly longer as you have to Stop your VM first etc. However, there is nothing else you have to do for this change.

Hopefully this post has helped understand how to resize and some of the series options you may need to address.

As always, if there are any questions please get in touch!